 VanGami.com
Sunflowers
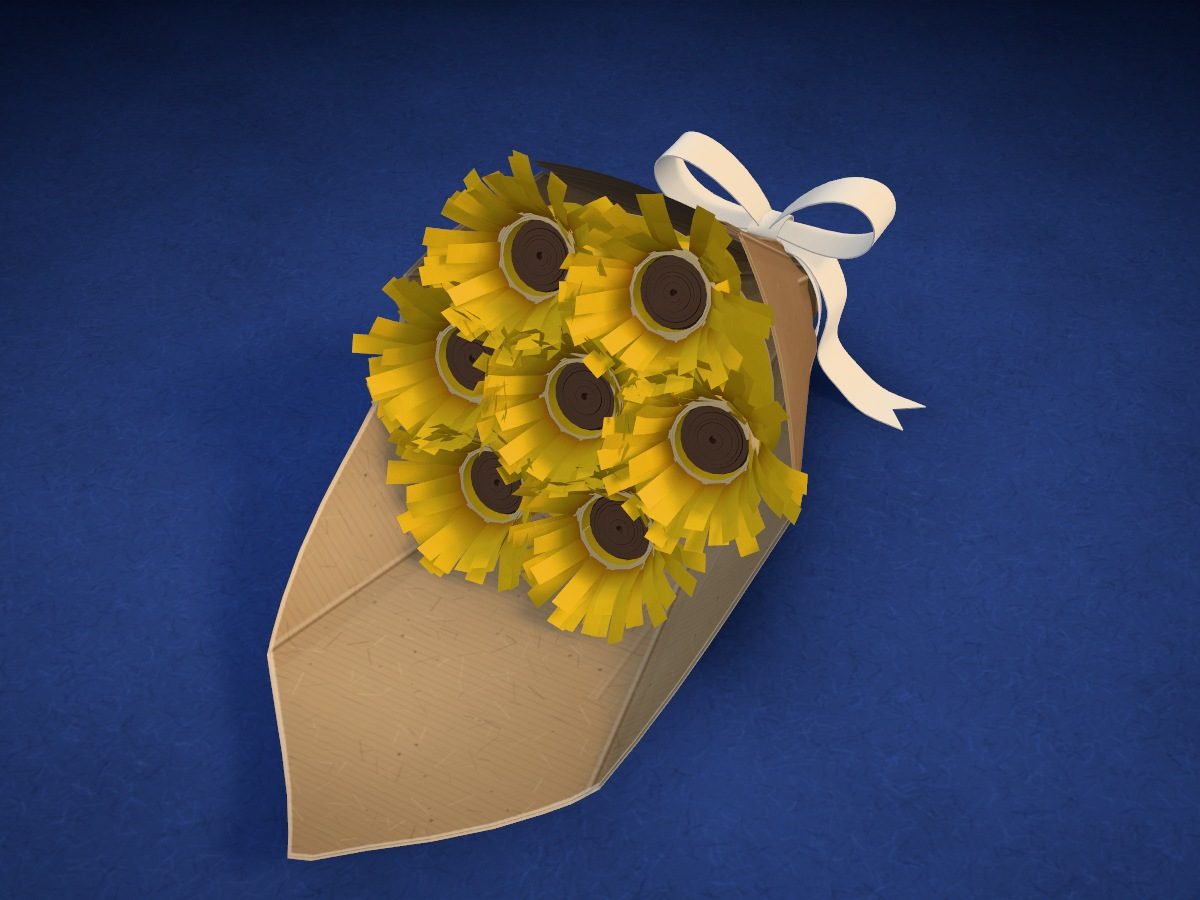
A mini bouquet in a kraft cone: seven coin-sized sunflowers. Each one is a tight roll of narrow strip with a dark end, wrapped in a yellow fringed strip. The flowers are glued to the bottom inside the cone.
- Medium
- 7 flowers in the cone
- 21 paper strips
- 3 Letter sheets
Make it with your phone cameraLesson code: 8621
On VanGami the template appears over your sheet through your phone camera — no printer needed. Trace it, cut, fold and glue. Below are all the steps in text.
What you’ll need
- 3 Letter sheets — office paper, 80 gsm (20 lb)
- Markers
- Pencil — and eraser
- Ruler — 11¾ in
- Scissors — small
- Glue stick
- Paper clip or clothespin — to hold the cone seam while the glue dries
- Thread or string
- Glass — phone stand
Steps
Sheet 1
- Sheet 1: yellow sheet. A yellow sheet should be under the camera now. The template has 3 sheets. The sheet is white — the pieces get their color at the coloring step.
- Yellow sheet: outlines. Using a ruler, trace a 5⅞ × 5½ in rectangle — it holds all seven strips at once — and a base circle 2⅜ in across.
- Six lines. Six lines divide the rectangle into seven strips ¾ in wide — one per flower. Draw them with a ruler.
- Fringe. The short marks are the future fringe cuts: from the bottom edge of each strip to its middle, every ⅛ in. You don’t have to trace them all — mark a few on each strip.
- Yellow. The paper is white, but these parts should be this color: color them in completely, up to the outline. Move the marker in one direction.
Sheet 2
- Sheet 2: white sheet for the centers. Remove the previous sheet and put the white sheet for the centers in its place, edge to edge. Don't move the phone — the scale stays the same.
- Strips for the centers. Trace the 4⅜ × 10 in rectangle with a regular pencil. You don't need to color the strips: only the top of the center shows on the flower — you'll color it with a marker after rolling.
- Thirteen lines. Lines 5/16 in apart divide the rectangle into fourteen strips. Mark the ends of each line at the top and bottom edges and connect them with a ruler.
Sheet 3
- Sheet 3: light brown sheet. Remove the previous sheet and put the light brown sheet in its place, edge to edge. Don't move the phone — the scale stays the same. The sheet is white — the pieces get their color at the coloring step.
- Cone. Trace the cone sheet: two straight edges meet at a point at the top, and at the bottom there’s a tongue that will become the tall back.
- Glue strip. Draw a straight line from the top corner to the arc: to the right of it is the strip you’ll apply glue to.
- Light brown. The paper is white, but these parts should be this color on both sides: color them up to the outline, then turn the sheet over and color the back.
Cut
- Cut out: strip block and base — 2 pcs. Cut out the yellow rectangle and circle along the outer lines. Don’t cut inside the rectangle yet.
- Cut out: block of strips for the centers. Cut out the rectangle along the outer line. Don't cut inside yet.
- Cut out: cone. Cut out the cone sheet. Don’t throw away the scraps — you’ll make a support ball for the base from them.
- Cut into strips. Cut both rectangles along the lines: you'll get seven yellow strips, 5⅞ × ¾ in, and fourteen narrow ones, 10 × 5/16 in.
- Cut the fringe. Make cuts in each yellow strip from the edge to the middle, every ⅛ in, like the sample marks. Keep all the cuts the same depth.
Roll
- Glue the narrow strips. Glue the narrow strips in pairs, end to end, overlapping by 3/16 in: you'll get seven long ones, 20 in each. Glue all seven pairs at once — while you roll the first, the others dry.
- Roll the center. Roll the long strip into a tight roll — it's easiest to start on a toothpick. Glue down the tip and pull out the toothpick: the roll will be about ⅜ in across. Color one end of it with a dark brown marker: that's the only part of the flower that shows.
- Wind the yellow strip. Lay the strip colored side up and set the roll on its side at the end of its plain half: the uncolored end flush with the edge, the colored end toward the fringe. Spread glue on the plain half and roll the roll along to the end.
- Fluff the fringe. Stand the flower up and bend the fringe outward with your finger, from the outer row toward the middle. The dark center will open up.
- Six more flowers. Make the other six the same way. That’s seven sunflowers in all.
Cone
- Roll up the cone. Lay the sheet marked side up, point away from you. Apply glue to the strip along the right edge, roll it into a cone — the left edge goes inside up to the line — and hold the seam pressed for a minute.
- Crumpled ball inside. Stand the cone in a glass, point down. Crumple the trimmings from the cone into a tight ball about 1⅝ in across and drop it inside: its top should sit ⅜ in below the front edge.
- Base. Drip glue onto the ball and set in a yellow circle, colored side up: it will wedge against the walls and sit as a flat platform just below the front edge.
Bouquet
- First flower. Apply glue to the bottom of the flower and glue it to the middle of the base. Hold for half a minute.
- Six around. Glue the other six in a ring right against the wall of the cone, evenly spaced. About ⅜ in is left between the bottoms of neighboring flowers — the fringe will cover it.
- Ribbon and bow. When the glue has set, take the cone out of the glass and tie a ribbon around it 1⅛ in from the point: the paper will gather into pleats under it. Drip glue under the ribbon so it doesn't slide toward the point, then tie a bow.
Done. The bouquet is done. Let the glue dry and it’s ready to give.
Make it with your phone camera
 MarigoldsMedium
 Paper RosesMedium
 Origami LiliesHard
 Mini FlowersMedium
 Daisy Corner BookmarkEasy
 Mini LilyEasy