 VanGami.com
Marigolds
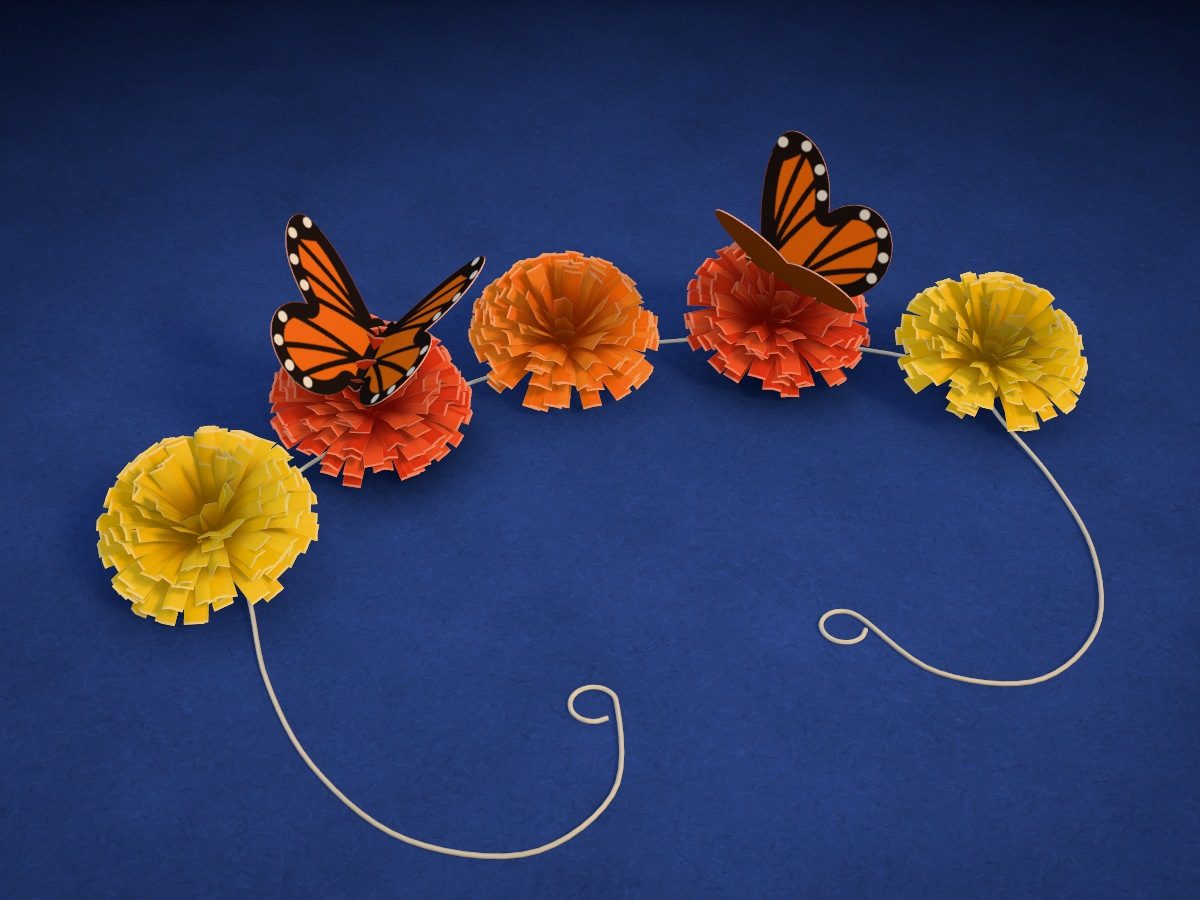
A garland of five marigolds in three shades and two monarch butterflies. Each flower is three fringed strips glued into one, rolled into a coil, and fluffed out; the butterfly pattern is drawn with a black marker on orange paper.
- Medium
- 5 flowers in the garland
- 3 Letter sheets
- 2 monarch butterflies
Make it with your phone cameraLesson code: 3490
On VanGami the template appears over your sheet through your phone camera — no printer needed. Trace it, cut, fold and glue. Below are all the steps in text.
What you’ll need
- 3 Letter sheets — office paper, 80 gsm (20 lb)
- Markers
- Pencil — and eraser
- Ruler — 8–12 in
- Scissors — small
- Glue stick
- Thread no thicker than 1/16 in (crochet cotton, embroidery floss) — 27½ in
- Regular markers
- Glass — phone stand
Steps
Sheet 1
- Sheet 1: yellow sheet. A yellow sheet should be under the camera now. The template has 3 sheets. The sheet is white — the pieces get their color at the coloring step.
- Strips: frame. Trace a 5⅞ × 10 in rectangle — with a ruler.
- Strips: cut lines. Divide it into six strips 1 in wide — with solid lines.
- Strips: fringe boundary. In each strip, 5/16 in from its left edge, draw a thin line with a ruler — on screen it’s dashed so you don’t mix it up with a cut. The cuts will run up to it; you don’t cut along it.
- Yellow. Color only the fringe — from the line to the right edge of each strip, on one side: roll the flower with the colored side facing in. Don't color the narrow edge — it hides inside the roll.
Sheet 2
- Sheet 2: orange sheet. Remove the previous sheet and put the orange sheet in its place, lined up edge to edge. Don’t move the phone — the scale stays the same. The sheet is white — the parts get their color at the coloring step.
- Strips: frame. Trace a 3 × 10 in rectangle — with a ruler.
- Strips: cut lines. Divide it into three strips 1 in wide — with solid lines.
- Strips: fringe boundary. In each strip, 5/16 in from its left edge, draw a thin line with a ruler — on screen it’s dashed so you don’t mix it up with a cut. The cuts will run up to it; you don’t cut along it.
- Butterflies: outlines. Trace the two butterflies to the right of the strips. They have no antennae or thin abdomen — you can’t cut out such tiny details with scissors.
- Butterflies: fold. Down the middle of each one is the fold line — a dash-dot line from the head to the notch at the bottom.
- Butterflies: pattern. Sketch the border along the edge of the wings, three veins on each wing, and the body along the fold. Draw the veins freehand, looking at the screen: precision doesn’t matter.
- Circles: outlines. Five circles ⅞ in across — you’ll use them to glue the flowers to the thread. Trace them freehand; precision doesn’t matter.
- Orange. Color the fringe of the strips — from the line to the right edge, on one side — and the butterflies completely. Don't color the strip edges or the circles: they hide inside the roll and under the flowers.
- Color: butterflies. Color the border and body with a fine-tip black marker; draw each vein in a single line. Add the light dots on the border with correction fluid or a white pen once the black has dried.
Sheet 3
- Sheet 3: red sheet. Remove the previous sheet and put the red sheet in its place, lined up edge to edge. Don’t move the phone — the scale stays the same. The sheet is white — the parts get their color at the coloring step.
- Strips: frame. Trace a 5⅞ × 10 in rectangle — with a ruler.
- Strips: cut lines. Divide it into six strips 1 in wide — with solid lines.
- Strips: fringe boundary. In each strip, 5/16 in from its left edge, draw a thin line with a ruler — on screen it’s dashed so you don’t mix it up with a cut. The cuts will run up to it; you don’t cut along it.
- Red. Color only the fringe — from the line to the right edge of each strip, on one side: roll the flower with the colored side facing in. Don't color the narrow edge — it hides inside the roll.
Cut
- Cut out: yellow strips. Cut out the rectangle along the outer line. You’ll cut it into strips at the end of this stage.
- Cut out: orange strips. Cut out the rectangle along the outer line. You’ll cut it into strips at the end of this stage.
- Cut out: butterfly — 2 pcs. Cut out the butterflies along the outline. Go into the notches between the wings from both sides, with two cuts; go around the head in one smooth cut.
- Cut out: circle — 5 pcs. Cut out five circles. The edges don’t need to be neat — the circles will be hidden under the flowers.
- Cut out: red strips. Cut out the rectangle along the outer line. You’ll cut it into strips at the end of this stage.
- Cut into strips. Cut each rectangle into strips 1 in wide: six yellow, three orange, six red. Each strip keeps its fringe boundary — a line 5/16 in from the edge.
Fringe
- Fold the strip in quarters. Lay the strip with the fringe boundary down and fold it in half, then in half again, lining up the ends. The line will end up on the outside.
- Cut the fringe. Without unfolding, cut the fringe: from the edge farthest from the line, all the way to the line, every 3/16 in. The narrow edge beyond the line stays uncut.
- Same for all fifteen. Unfold it: there’s fringe along one edge and the uncut edge along the other. Cut the other fourteen strips the same way.
Roll
- Glue three strips together. Take three strips of the same color, with the fringe pointing the same way and the colored side up. Glue them into a band: put glue on the edge near the end, then lay the next strip on top, overlapping by ⅜ in, and press for half a minute.
- Roll up the coil. Roll the band up from one end tight, like a tape measure: the edge winds coil on coil and the fringe points one way. Every 2–2¼ in, spread glue on the edge. Colored side inward: on the fluffed-up flower it ends up on top.
- Glue down the end. Glue the end of the strip to the coil and hold it for half a minute. Stand it on the table: the base should be flat — if the turns have slipped, even them out before the glue sets.
- Fluff it out. Bend the fringe outward from the edge toward the middle: fold the outer rows down to horizontal or lower, and just spread the middle slightly. You’ll get a full, fluffy head about 2 in wide.
- Four more flowers. Glue, roll, and fluff the remaining strips the same way. That makes five flowers in all: two yellow, two red, and one orange.
Garland
- Line up the flowers. Turn the flowers over so the bases face up and line them up snugly in a row: yellow, red, orange, red, yellow.
- Lay down the thread. Cut 27½ in of thread and tie a small loop at each end. Lay the thread across the bases, over the middle of each one, so the ends hang down evenly.
- Glue on the circles. On the bottom of each flower, over the thread, drip plenty of PVA glue and cover with a circle. Press the circle on both sides of the thread and let it dry for 10 minutes.
- Flip it over. Once the glue is dry, lift the garland by the thread and flip it so the flowers face up. Give the ends a gentle tug: if the flowers don’t slide along the thread, you used enough glue.
Butterflies
- Fold the butterflies. Fold each butterfly in half along the line, with the design on the inside, crease the fold and let go: the wings will stay raised.
- Set them on the flowers. Spread the petals in the middle of the second and fourth flowers, put a drop of glue there, and press the butterfly’s fold in between the petals. Hold it for a minute.
Check
- Give it a shake. Lift the garland by the loops and give it a light shake. If no flower unwinds and the butterflies hold on, there’s enough glue everywhere.
Done. The garland is done. Lay it out in an arc on a table or attach it to a wall.
Make it with your phone camera
 Paper RosesMedium
 Origami LiliesHard
 SunflowersMedium
 Mini FlowersMedium
 Daisy Corner BookmarkEasy
 Mini LilyEasy