 VanGami.com
Origami Lilies
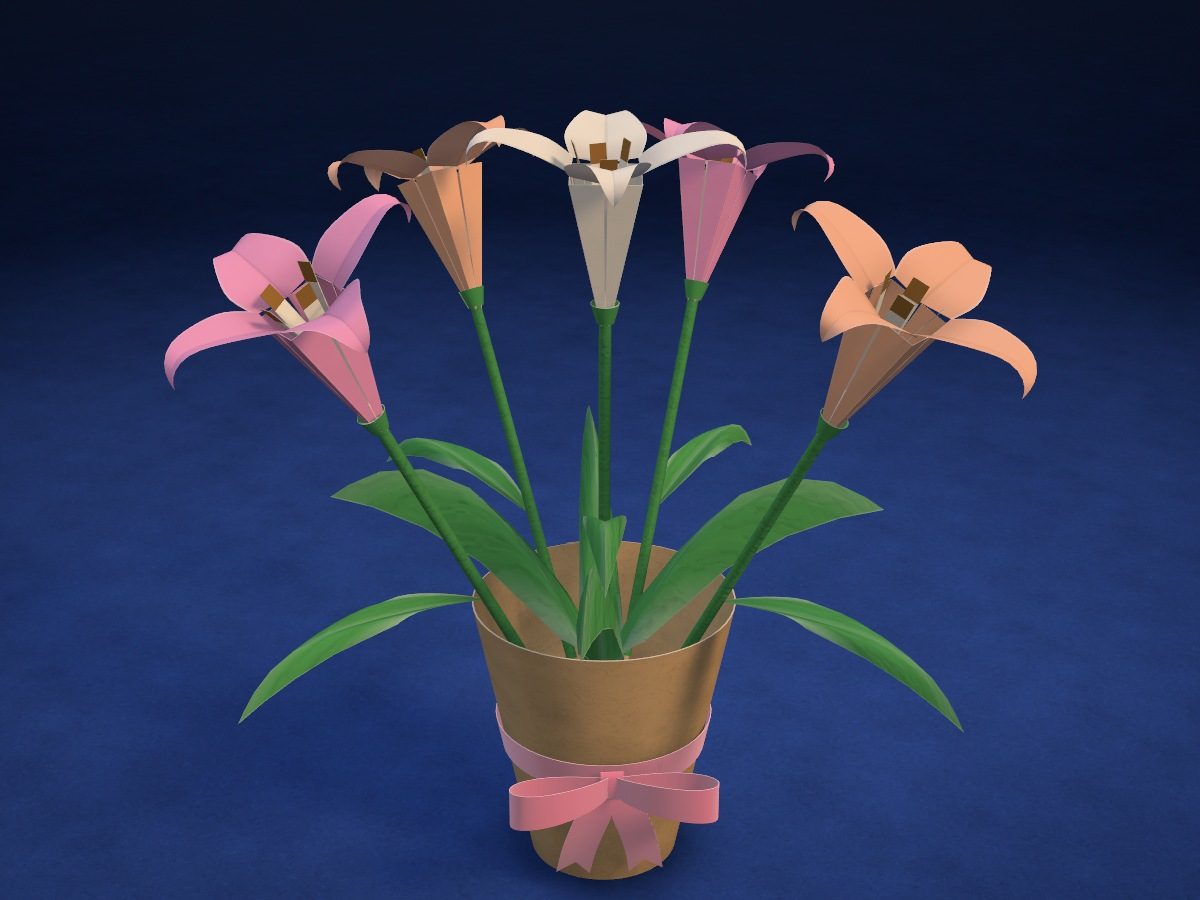
A bouquet of five origami lilies in a kraft-paper vase. Each lily is folded without glue from a 4⅞ × 4⅞ in square: a funnel with crisp folds and four curled petals. The stems are skewers wrapped in green paper, the stamens are fringe, and there are narrow leaves in the vase.
- Hard
- 5 lilies in the bouquet
- 5 Letter sheets
- 4 petals per flower
Make it with your phone cameraLesson code: 3516
On VanGami the template appears over your sheet through your phone camera — no printer needed. Trace it, cut, fold and glue. Below are all the steps in text.
What you’ll need
- 6 Letter sheets — office paper, 80 gsm (20 lb)
- Markers
- Pencil — and eraser
- Ruler — 8–12 in
- Scissors — small
- Glue stick
- Bamboo skewers — 5 pcs, 7⅞ in each, ⅛ in thick; if they’re longer, nick them and snap off the blunt end
- Modeling clay — a lump the size of a walnut
- Thread or string
- Glass — phone stand
Steps
Sheet 1
- Sheet 1: pink sheet. The pink sheet should be under the camera now. The template has 5 sheets. The sheet is white — the pieces get their color in the coloring step.
- Two 4⅞ × 4⅞ in squares. Trace both squares with a ruler: each side is exactly 4⅞ in and the corners are right angles.
- Pink. The paper is white, but these parts should be this color on both sides: color them up to the outline, then turn the sheet over and color the back.
Sheet 2
- Sheet 2: peach sheet. Remove the previous sheet and put the peach sheet in its place, lined up edge to edge. Don’t move the phone — the scale stays the same. The sheet is white — the parts get their color at the coloring step.
- Two 4⅞ × 4⅞ in squares. Trace both squares with a ruler: each side is exactly 4⅞ in and the corners are right angles.
- Peach. The paper is white, but these parts should be this color on both sides: color them up to the outline, then turn the sheet over and color the back.
Sheet 3
- Sheet 3: cream sheet. Remove the previous sheet and put the cream sheet in its place, lined up edge to edge. Don’t move the phone — the scale stays the same.
- 4⅞ × 4⅞ in square. Trace the square with a ruler: each side is exactly 4⅞ in and the corners are right angles.
- Stamens. Five 1 × 2 in rectangles — with a ruler. They’ll become the stamens.
- Fringe. Each rectangle gets three cut lines: from the top edge down, stopping ½ in short of the bottom edge.
Sheet 4
- Sheet 4: green sheet. Remove the previous sheet and put the green sheet in its place, lined up edge to edge. Don’t move the phone — the scale stays the same. The sheet is white — the parts get their color at the coloring step.
- Leaves: outlines. Trace the four long leaves and the five short ones with a solid line. Each short leaf has a rectangular stalk at the bottom — that’s what glues the leaf to the stem.
- Veins. Down the middle of each leaf is the fold line — a dash-dot line from the base to the tip.
- Strips. Five 7½ × ⅜ in strips — with a ruler. You’ll wrap the stems with them.
- Green. The paper is white, but these parts should be this color on both sides: color them up to the outline, then turn the sheet over and color the back.
Sheet 5
- Sturdy sheet from two. Apply glue stick over the whole surface of a sheet of printer paper, press a second sheet onto it, and smooth with your palm from the middle to the edges. You'll get a thick sheet — work on that one. Put it back in the same spot, edge to edge; don't move the phone.
- Sheet 5: light brown sheet. Remove the previous sheet and put the light brown sheet in its place, edge to edge. Don't move the phone — the scale stays the same. The sheet is white — the pieces get their color at the coloring step.
- Vase wall: outline. Trace the solid line — the edge of the “Vase wall” piece. You’ll cut along it.
- Tab. The line near the straight edge marks the tab boundary: the other edge will reach it when you roll the vase.
- Base: outline. Trace the solid line — the edge of the “Base” piece. You’ll cut along it.
- Teeth. Each tooth has a fold line at its root — a dash-dot line. You’ll fold the teeth up along them.
- Light brown. The paper is white, but these parts should be this color: color them in completely, up to the outline. Move the marker in one direction.
Cut
- Cut out: pink square — 2 pcs. Cut exactly along the line. Then fold the square diagonally: the edges should line up. If they don’t, trim them even with a ruler.
- Cut out: peach square — 2 pcs. Cut exactly along the line. Then fold the square diagonally: the edges should line up. If they don’t, trim them even with a ruler.
- Cut out: cream square. Cut exactly along the line. Then fold the square diagonally: the edges should line up. If they don’t, trim them even with a ruler.
- Cut out: stamens — 5 pcs. Cut out five rectangles using a ruler and make cuts in each one along the three lines — you’ll get four strips of fringe. Don’t cut all the way to the bottom edge.
- Cut out: leaves — 9 pcs. Cut with scissors along the solid line. Turn the sheet, not the scissors — the cut will come out neater.
- Cut out: stem strip — 5 pcs. Cut out five strips using a ruler.
- Cut out: vase wall. Cut with scissors along the solid line. Turn the sheet, not the scissors — the cut will come out neater.
- Cut out: base. Cut with scissors along the solid line. Turn the sheet, not the scissors — the cut will come out neater.
Lily
- Two diagonals. Fold the pink square diagonally, corner to corner, crease the fold with your fingernail, and unfold it. Do the same along the other diagonal.
- In half — on the back. Flip the square over. Fold it in half, edge to edge, and unfold — first lengthwise, then crosswise.
- Preliminary base. Bring all four corners together — the center of the sheet stays at the bottom. The sheet will fold itself into quarters along the creases you made: this is the “preliminary base,” with one closed corner and one open corner.
- Flatten the pocket. Open corner toward you. Lift the upper right pocket upright, open it with your finger, and flatten it: its fold will land exactly on the center line — you get a “kite.”
- Pocket on the other side. Flip the blank over: this side is smooth again. Lift, open, and flatten the right pocket the same way — now there are two “kites,” front and back.
- Two more pockets. Flip the right half of the “kite” to the left, like a page: underneath is a smooth triangle — that’s a pocket. Flatten it, flip the blank over, and repeat once more.
- Mark the folds. Fold the two short lower edges of the “kite” to the center line, crease them, and unfold again.
- Petal fold. In the middle of the “kite” is the horizontal edge of the paper. Grab it and pull it up toward the closed corner: the sides will come together at the center line on their own along the creases you made.
- Triangle down. You now have a small triangle pointing up. Fold it down toward the open corner.
- Three more sides. Repeat the last three steps on the other three “kites”: to open the next one, flip two flaps. You’ll get a narrow diamond with a triangle on each side.
- Smooth side up. Flip one flap from right to left, like a page — on the front and the back. Now the outer sides are smooth, with no triangle.
- Narrow the bud. Closed corner toward you. Fold the two lower edges to the center line. Do the same on all four smooth sides, flipping two flaps each time: you’ll get a narrow bud.
- Bend the petals out. Hold the bud by its closed end and gently spread the layers — it becomes three-dimensional. The four upper corners are the petals: bend each one outward as far as it goes.
- Curl the petals. Wind each petal tightly around a pencil, tip facing out, then let go — it stays curled. The first lily is done.
- Four more lilies. Fold the remaining squares the same way. That makes five lilies in all: two pink, two peach, and one cream.
Stem
- Stamens. Color the tips of the fringe with a brown marker. Apply glue to the uncut edge and wind it tightly onto the blunt end of the skewer, fringe facing out and sticking out past the end.
- Cut off the tip. On the lily, cut off the very tip of the funnel, 3/16–¼ in, and test it: the skewer should fit through the hole snugly, and the wrap with the stamens should get stuck. If the skewer won't pass, cut off 1/16 in more.
- Slide on the lily. Put a drop of PVA glue on the wrap under the stamens. Push the pointed end of the skewer into the lily from the top, through the hole, and pull it down until the wrap gets stuck in the neck.
- Wrap the stem. Apply glue to the green strip and start right at the flower: the first wrap sits halfway on the funnel — it covers the cut and holds the lily from below. Then wind the strip diagonally down the skewer until it runs out, and let the glue set for 5 minutes.
- Leaf. Fold the short leaf lengthwise along the line and open it up a little. Apply PVA glue to the leaf stalk, wrap it around the stem 2¾ in below the flower, and hold for half a minute.
- The other flowers. Assemble the other four flowers the same way: stamens, lily, green strip, leaf. Set the long leaves aside — they go in the vase.
Vase
- Roll up the vase. Roll the vase wall into a funnel. Apply PVA glue to the tab and tuck it under the other edge, up to the line. Hold for a minute.
- Base. Bend all the teeth of the base up and apply PVA glue to the outside of them. Lower the base into the vase teeth up and press it down with the blunt end of a pencil — it will lodge a little above the bottom edge.
- Modeling clay. Roll the clay into a ball, drop it into the vase, and press it down onto the bottom. It will hold the stems and keep the vase from tipping over.
- Ribbon. Wrap the ribbon around the middle of the vase and secure it at the back with a drop of PVA glue — on a cone the ribbon slides down. Tie a bow at the front.
Bouquet
- Place the lilies. Stick the stems into the clay: the cream lily goes in the middle, upright; the other four go around it, leaning outward so the stems rest on the rim of the vase.
- Leaves into the vase. Fold the long leaves lengthwise at the base, and pull the upper half between your finger and a pencil — it will curve into an arc. Stick the bases into the clay between the stems: the leaves will drape over the rim of the vase in different directions.
Done. The bouquet is done. Lilies can be folded from any thin paper — a square 3⅞ in or larger will work.
Make it with your phone camera
 MarigoldsMedium
 Paper RosesMedium
 SunflowersMedium
 Mini FlowersMedium
 Daisy Corner BookmarkEasy
 Mini LilyEasy