 VanGami.com
Origami Tulip
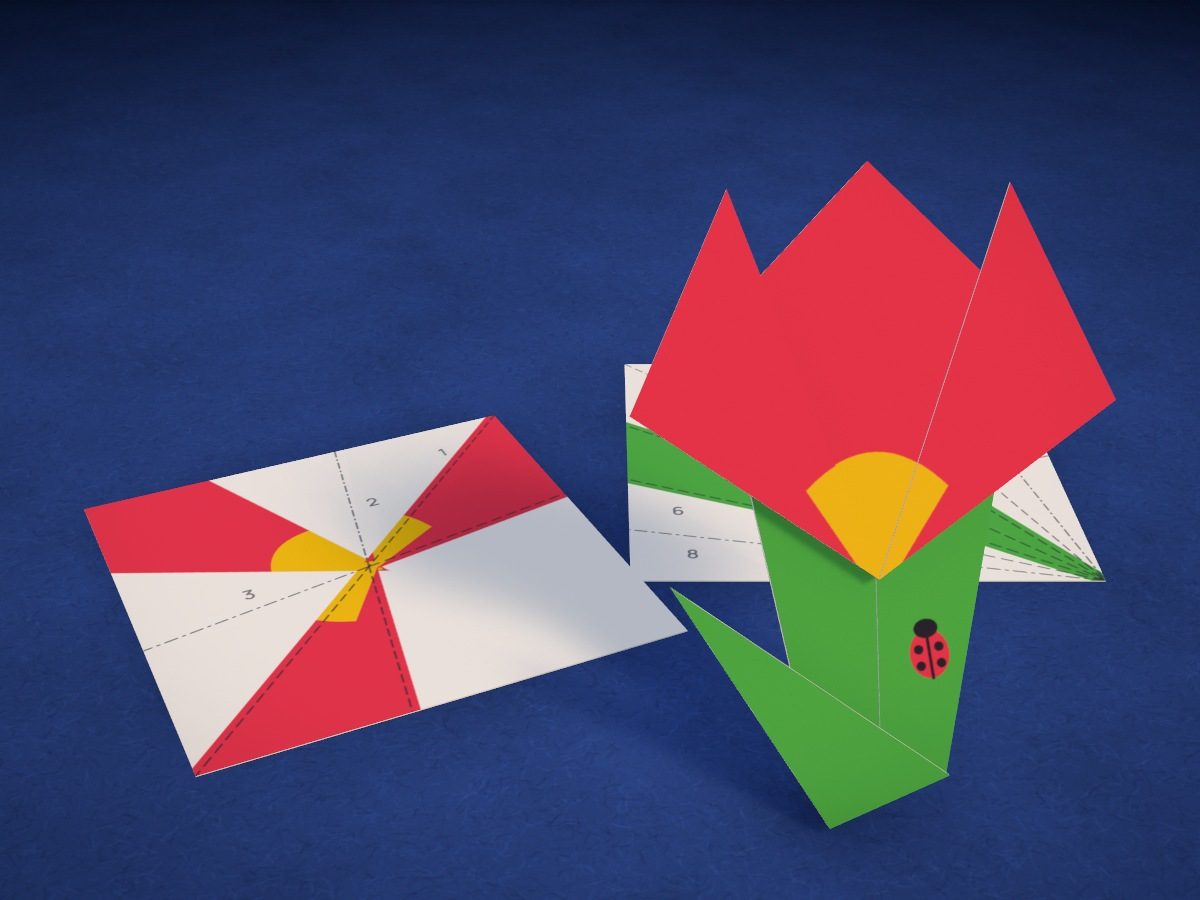
A red tulip from two squares: the flower is a triangle with two petals, the stem is a “kite” with a leaf, and a ladybug is crawling up the stem. You trace the fold lines and the drawing through the camera right onto the squares, then glue the flower to the stem.
- Easy
- 2 3½ × 3½ in squares
- 9 folds
- 1 drop of glue
Make it with your phone cameraLesson code: 5952
On VanGami the template appears over your sheet through your phone camera — no printer needed. Trace it, cut, fold and glue. Below are all the steps in text.
What you’ll need
- Letter sheet — office paper, 80 gsm (20 lb)
- Markers
- Pencil — and eraser
- Scissors — small
- Glue stick — or PVA glue
- Glass — phone stand
Steps
Trace
- Flower square: outline. Trace the solid line — the edge of the “Flower square” piece. You’ll cut along it.
- Fold lines. Trace the dashed lines thinly, without pressing hard, as on the screen, and write its number next to each line — that’s the order of the folds. Underline the numbers 6 and 9: on the folded sheet they can end up upside down. Each step will tell you which way to fold.
- Flower square: drawing. Copy the drawing with thin lines: the picture on the screen is your guide. It doesn't have to be exact to the millimeter.
- Stem square: outline. Trace the solid line — the edge of the “Stem square” piece. You’ll cut along it.
- Fold lines. Trace the dashed lines thinly, without pressing hard, as on the screen, and write its number next to each line — that’s the order of the folds. Underline the numbers 6 and 9: on the folded sheet they can end up upside down. Each step will tell you which way to fold.
- Stem square: drawing. Copy the drawing with thin lines: the picture on the screen is your guide. It doesn't have to be exact to the millimeter.
Color
- Flower. Color the petals red and the center yellow. Don’t color the rest — you can’t see it after folding.
- Stem. Color the stem and leaf green, and the ladybug red and black.
Cut
- Cut out: flower square. Cut with scissors along the solid line. Turn the sheet, not the scissors — the cut will come out neater.
- Cut out: stem square. Cut with scissors along the solid line. Turn the sheet, not the scissors — the cut will come out neater.
Flower
- Drawing side down. Take the flower square, flip it drawing side down and turn it so one corner points toward you.
- Triangle. Fold the square in half along the diagonal: bottom corner exactly onto the top corner. Crease the fold with your fingernail.
- Right petal. Fold the right corner up along line 2: the fold starts at the middle of the bottom edge. The tip ends up next to the top corner.
- Left petal. Do the same with the left corner, along line 3. Three petals — the flower is done.
Stem
- Drawing side down. Now the stem square: drawing side down, one corner toward you.
- Center crease. Fold the square in half — left corner onto the right corner — and unfold. There’s now a crease down the middle.
- Kite base. Fold the lower left side to the center crease, edge to crease, then do the same with the right one. You’ve made a “kite” with its point facing down.
- Even narrower. Once more: fold the lower left side to the middle along line 7, edge to crease, and the right side along line 8. The stem is narrow now.
- Leaf. Fold the bottom tip up and to the left along line 9: it will stick out past the left edge of the stem — that’s the leaf.
Glue
- Glue on the flower. Spread glue on the white top of the stem and place the flower on it so the top is hidden. Press for 10 seconds.
Done. Done. Let the glue dry, and it’s ready to show off.
Make it with your phone camera
 MarigoldsMedium
 Paper RosesMedium
 Origami LiliesHard
 SunflowersMedium
 Mini FlowersMedium
 Daisy Corner BookmarkEasy