 VanGami.com
Mummy Bookmark
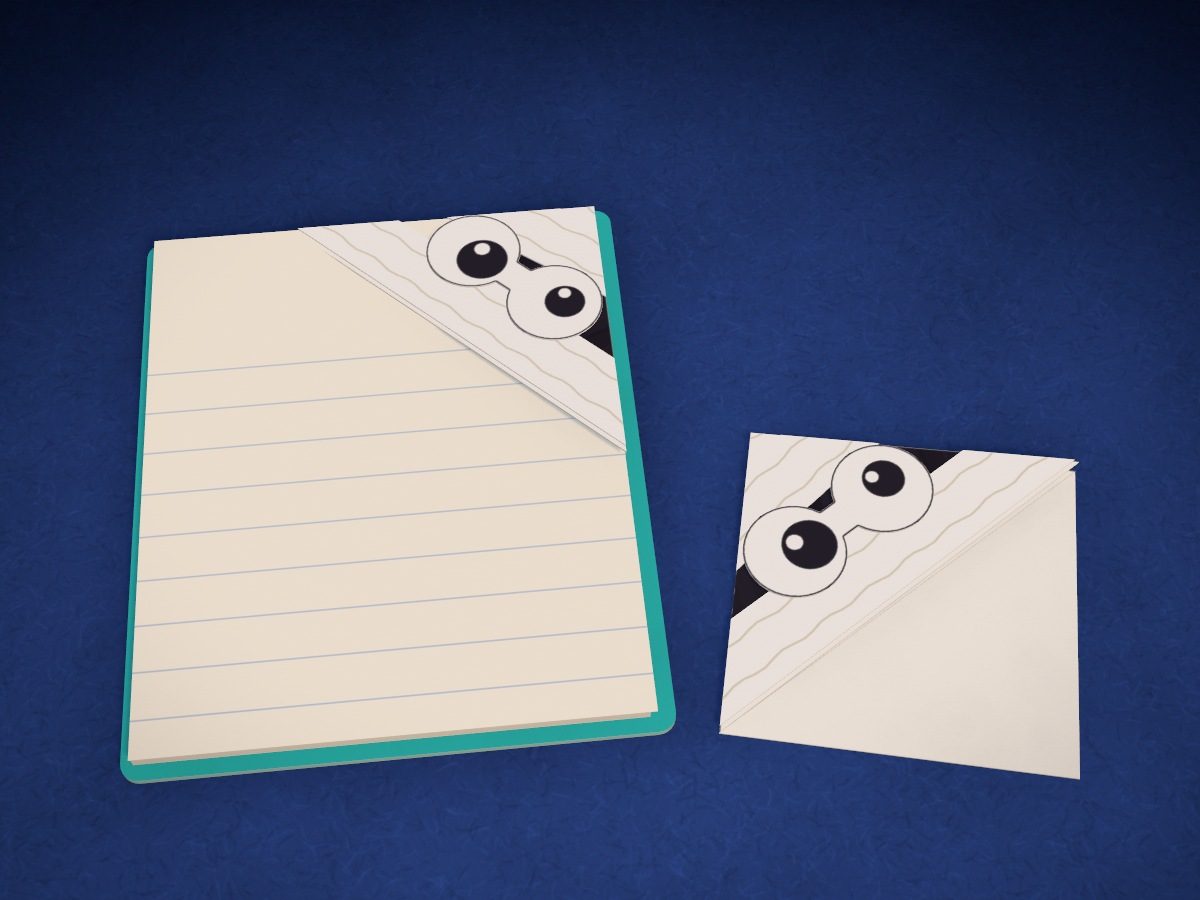
A corner bookmark wrapped in bandages: three white strips overlapping and big eyes in a black slit. The bookmark is folded from one piece — the pocket slips onto the corner of a page by itself.
- Easy
- 5 pieces
- 1 Letter sheet
- 2 folds
Make it with your phone cameraLesson code: 9858
On VanGami the template appears over your sheet through your phone camera — no printer needed. Trace it, cut, fold and glue. Below are all the steps in text.
What you’ll need
- Letter sheet — office paper, 80 gsm (20 lb)
- Markers
- Pencil — and eraser
- Scissors — small
- Glue stick — or PVA glue
- Book or notebook — to try on the bookmark
- Glass — phone stand
Steps
Trace
- Bookmark: outline. A square turned with a corner pointing up, and two triangles to the left of it. You’ll cut along this line.
- Bookmark: folds. Draw the two lines between the square and the triangles as dashed lines, numbered 1 and 2.
- Bookmark: markings. On the top triangle, draw three lines, where the middles of the bandages will go, and a gap between the top and middle lines. The markings are upside down here — that’s right: the triangle will flip over when you assemble it.
- Bandages and eyes: outlines. Trace the three strips and the eyes on the bridge under them. You’ll cut along these lines.
- Bandages and eyes: drawing. On each bandage, draw two thin wavy lines lengthwise — that’s the gauze. On the eyes, draw pupils looking in different directions.
Color
- Color: bookmark. The gap between the top and middle lines — black, on the top triangle only. Don’t color anything else.
- Color: eyes. Pupils — black; leave the highlights white. Don’t color the bandages.
Cut
- Cut out: bookmark. Cut out the bookmark along the outline. In the notch between the triangles, cut with the scissors exactly up to the dot.
- Cut out: bandages and eyes — 4 pcs. Cut out the three bandages along a ruler and the eyes along the circles. Don’t cut through the bridge.
Fold
- Fold the bottom triangle. Turn the bookmark drawing side down. Fold the bottom triangle onto the square along fold 1 and crease the fold with your fingernail.
Glue
- Glue the bookmark. Put glue on the folded triangle only. Fold the top triangle over it along fold 2: the black slit ends up on top. Press down. Don’t glue the square: there’s a pocket under the triangles.
- Bandages. Put glue on a bandage and lay it on the face along the markings, letting the ends hang over the side edges. Do all three the same way. The bottom bandage must not go past the bottom edge — that’s the entrance to the pocket.
- Trim the ends. Cut off the ends of the bandages flush with the side edges of the bookmark. Cut along the edge without nicking the bookmark itself.
- Eyes. Put glue on the back of the eyes and glue them into the black slit between the bandages — let them overlap the bandages a little.
Check
- Slide it onto the page. Open a book or notebook and slip the bookmark onto the corner of a page: the page goes into the pocket from the bottom, all the way to the point. The mummy peeks out of the book.
Done. The mummy is done. Slip the bookmark onto the corner of a page — the eyes will peek out of the book.
Make it with your phone camera
 Mini NotebookEasy
 Corner Bookmarks: AnimalsEasy
 Sugar Skull BookmarkEasy
 Candy Cane BookmarkEasy
 Clip Bookmarks: Heart and StrawberryEasy
 Corner Bookmark: Little MonstersEasy