 VanGami.com
Kitty Phone Stand
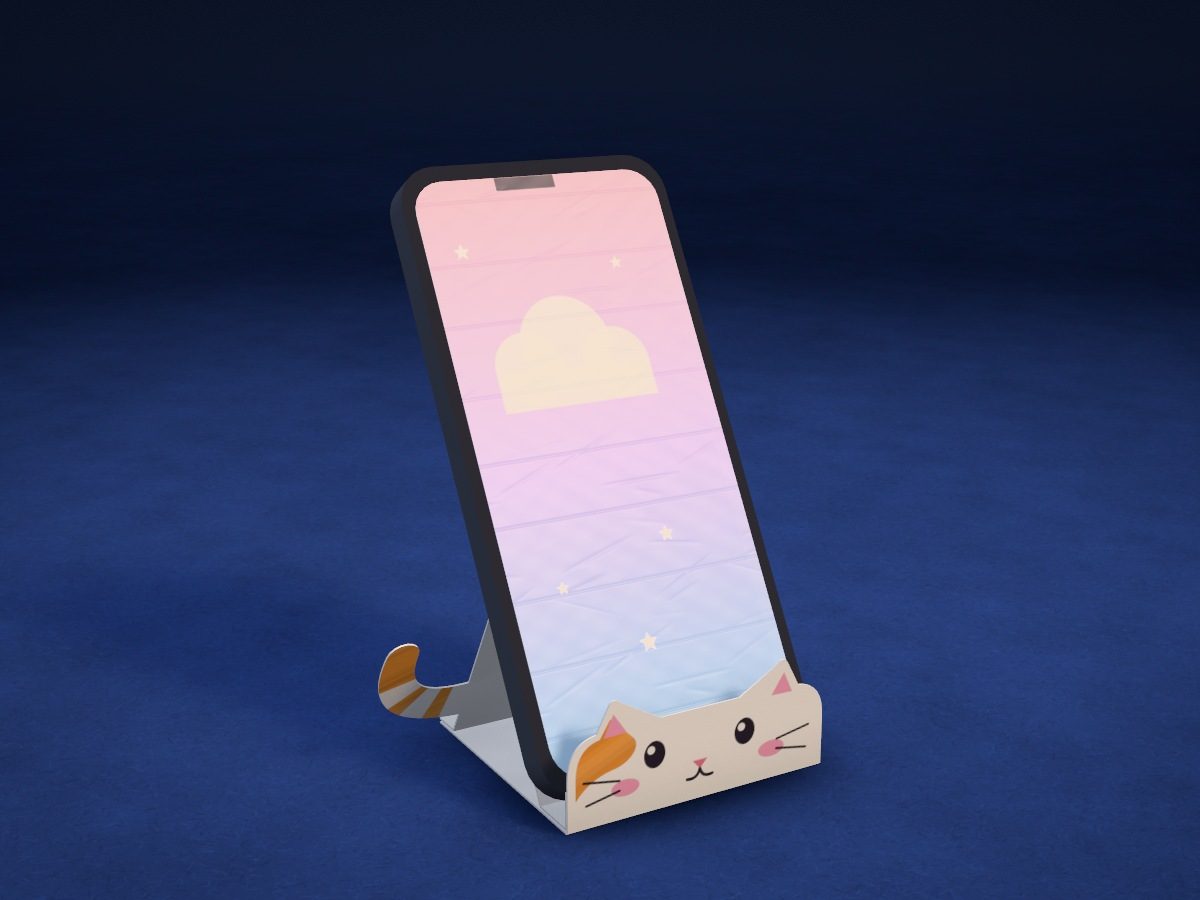
A white kitty holds your phone: the head with ears is the lip at the front, the back is a triangular little house, and an orange tail sticks out at the side. The phone rests on the front wall at a comfortable angle, and you can see the screen from your desk.
- Easy
- 2 pieces
- 60 ° — wall tilt
- 4 cm — stand height
Make it with your phone cameraLesson code: 3783
On VanGami the template appears over your sheet through your phone camera — no printer needed. Trace it, cut, fold and glue. Below are all the steps in text.
What you’ll need
- 2 Letter sheets — office paper, 80 gsm (20 lb)
- Markers
- Pencil — and eraser
- Scissors — small
- Glue stick — or PVA glue
- Paper Phone — up to 3⅛ in wide, in a case up to ⅜ in thick
- Glass — phone stand
Steps
Trace
- Sturdy sheet from two. Apply glue stick over the whole surface of a sheet of printer paper, press a second sheet onto it, and smooth with your palm from the middle to the edges. You'll get a thick sheet — work on that one. Put it back in the same spot, edge to edge; don't move the phone.
- Walls: outline. Trace the long strip with slanted corners and a tail at the side with a solid line. You’ll cut along it.
- Walls: folds. Four lines across. A plain dashed line with the number 1 is near the ends — there are three of them: two tabs and a brace. A dash-dot line with the number 2 is in the middle — that’s the ridge.
- Bottom: outline. Trace the bottom with a solid line: at one end is the kitty’s head with ears, at the other a narrow tongue.
- Bottom: fold. Across the bottom, under the head, is a dashed line with the number 3: the head will stand up along it as a lip.
- Bottom: drawing. Copy the face with thin lines: eyes, nose, mouth, whiskers, cheeks, the insides of the ears and the patch by the ear.
Color
- Orange. Color the areas that match this color. Move the marker in one direction — you’ll get fewer streaks.
- Color: head. Patch by the ear — orange; insides of the ears and cheeks — pink; eyes — black; don’t color the highlights.
Cut
- Cut out: walls. Cut out the walls along the solid line, and the tail along its smooth curve. Don’t cut the dashed lines.
- Cut out: bottom. Cut out the bottom along the solid line, and the ears with two cuts that meet. Don’t cut the dashed line.
Fold
- Fold the walls. Turn the walls over markings down. Fold the tabs and the brace up toward you along the dashed lines 1. Then fold the piece along the dashed line 2: you’ll get a triangular little house, with the tabs standing as feet and the brace as a wall.
- Raise the lip. Turn the bottom over design side down, with the head toward you. Fold the kitty’s head up along the dashed line 3 at a right angle: the face looks forward.
Glue
- Walls onto the bottom. Put glue on the tabs and the brace, on the marked side. Stand the little house on the bottom: the front tab goes into the groove, press the brace against the head from the inside, and the back tab goes flush with the step in the bottom.
Check
- Put the phone on. Lay the phone with its back on the front wall, its bottom edge in the groove behind the kitty’s head. The screen tilts back and is easy to see from your desk.
Done. Your stand is done. Put the phone with its back on the wall and its bottom behind the kitty’s head: watch videos or make calls from your desk.
Make it with your phone camera
 Mini NotebookEasy
 Corner Bookmarks: AnimalsEasy
 Sugar Skull BookmarkEasy
 Candy Cane BookmarkEasy
 Clip Bookmarks: Heart and StrawberryEasy
 Corner Bookmark: Little MonstersEasy