 VanGami.com
Mini Witch Hat
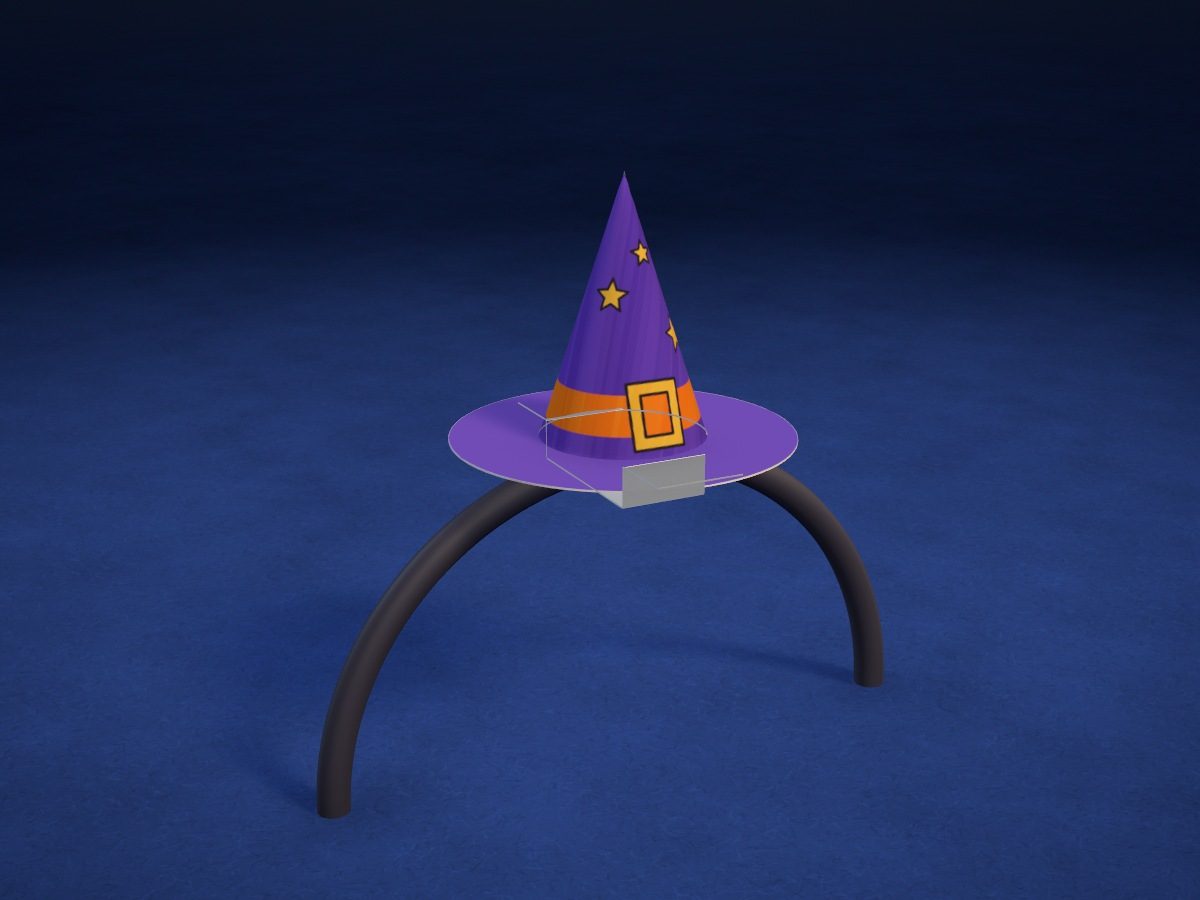
A small witch hat for a headband: a purple cone with an orange band and stars, a round brim, and a little loop underneath that a headband or clip slips through. The window in the brim is cut without a craft knife.
- Easy
- 3 pieces
- 1 Letter sheet
- 8 tabs
Make it with your phone cameraLesson code: 4685
On VanGami the template appears over your sheet through your phone camera — no printer needed. Trace it, cut, fold and glue. Below are all the steps in text.
What you’ll need
- Letter sheet — office paper, 80 gsm (20 lb)
- Markers
- Pencil — and eraser
- Scissors — small
- Glue stick — or PVA glue
- Tape — clear, wide
- Headband or hair clip — headband up to 1⅛ in wide or a duckbill clip
- Glass — phone stand
Steps
Trace
- Cone: outline. A sector like a slice of pie: two straight edges from the tip and an arc with teeth. Put dots at the tip and at the ends of the arc; draw the straight edges with a ruler.
- Cone: slits. Seven short lines from the edge of the arc — the slits between the teeth.
- Cone: folds. The zigzag line along the bottom of the teeth is the fold: you’ll bend the teeth outward along it.
- Cone: drawing. Two arcs make a ribbon, with a buckle in front; five stars above the ribbon. The line by the right edge sets off the glue wedge.
- Brim and loop: outlines. Trace the big circle, the little window in the middle, and the loop strip under it. You’ll cut along these lines.
- Brim and loop: folds. The dashed line across the brim is where you fold the brim to cut out the window. The loop has four folds across.
Color
- Color the cone. Color the hat up to the fold purple, the ribbon orange, the buckle and stars yellow. Leave the teeth and the wedge white.
- Purple. Color the areas that match this color. Move the marker in one direction — you’ll get fewer streaks.
Cut
- Cut out: cone. Cut out the sector along the outline, then cut seven slits up to the fold. Cut the straight edges along a ruler.
- Cut out: brim and loop — 2 pcs. Cut out the brim along the large circle. The window: fold the brim in half along the dashed line and cut a semicircle from the fold, then unfold it. Cut out the loop along the lines.
Assemble
- Roll the cone. Put glue on the wedge at the right edge. Roll the sector into a cone with the drawing on the outside: the wedge goes under the left edge. Press the seam for 20 seconds.
- Bend the teeth. Stand the cone on the table and bend all the tabs outward along the fold — let them lie on the table like petals.
Glue
- Put on the brim. Put glue on the tabs on top. Slip the brim onto the cone from the top, drawing side up, and lower it all the way down onto the tabs. Press the brim down all around.
- Loop underneath. Fold the loop along the folds — it makes a little bridge. Turn the hat over, put glue on the ends of the loop and glue them to the underside of the brim, bridging the window: the walls stand at the edge of the window.
Put on
- On the headband. Turn the hat over and thread the headband under the bridge of the loop. Slide the hat a little to the side and put on the headband.
Done. The hat is done. Put on the headband and slide the hat a little to the side — it looks more fun that way.
Make it with your phone camera
 Cat MaskMedium
 Black Cat MaskMedium
 White Fox MaskMedium
 Oni Demon MaskMedium
 Origami ClawsEasy
 Fox Ears HeadbandEasy