 VanGami.com
Mini Explosion Box
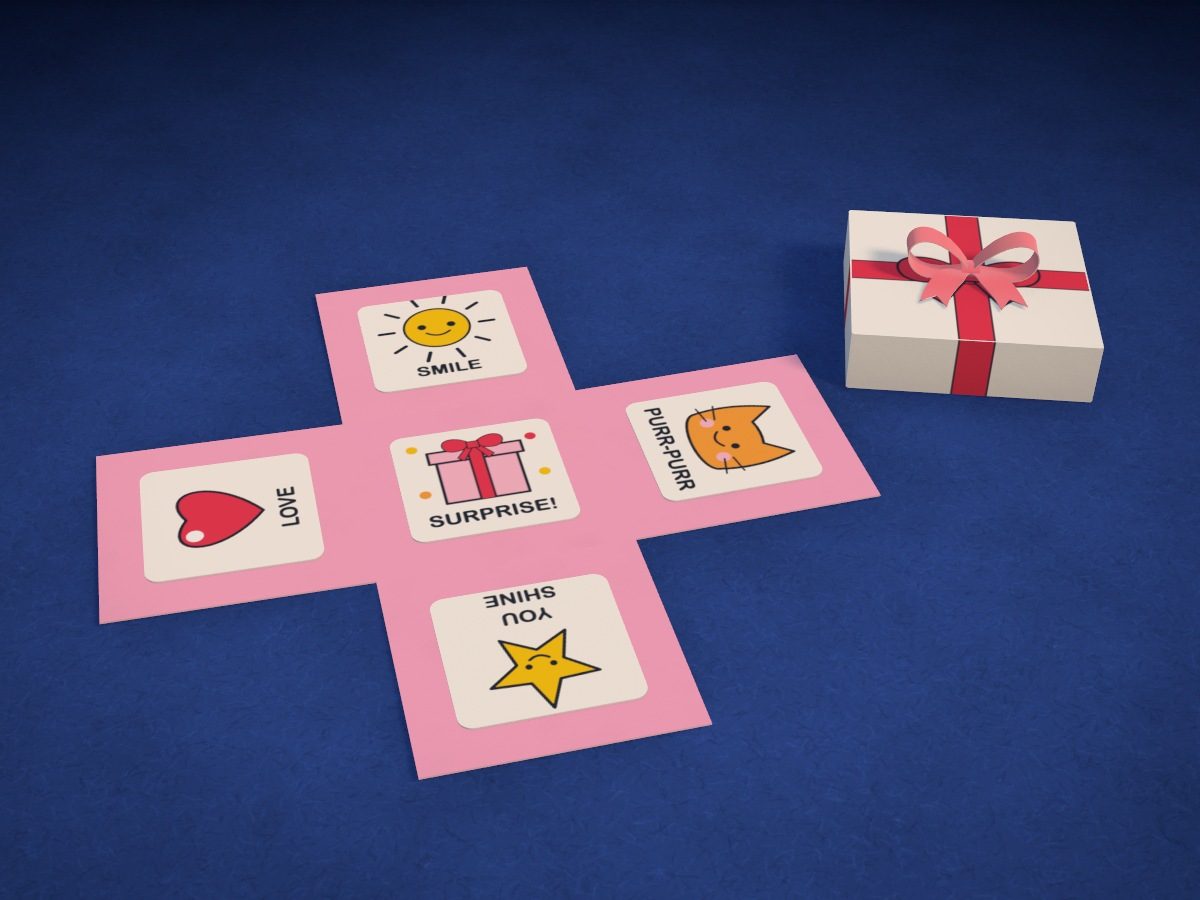
A pink 2 in cube with a white lid: take off the lid and the walls fall open, with four cards on them and a fifth one on the bottom. The base is folded from a sheet without a ruler; the lid and the cards are traced through the camera.
- Medium
- 5 cm — cube
- 5 cards
- 2 Letter sheets
Make it with your phone cameraLesson code: 2725
On VanGami the template appears over your sheet through your phone camera — no printer needed. Trace it, cut, fold and glue. Below are all the steps in text.
What you’ll need
- 2 Letter sheets — office paper, 80 gsm (20 lb)
- Markers
- Pencil — and eraser
- Scissors — small
- Glue stick — or PVA glue
- Glass — phone stand
Steps
Sheet 1
- Sheet 1: white sheet. The white sheet should be under the camera now. The template has 1 sheets.
- Lid: outline. Trace the lid with a solid line: a square with rims and four tabs at the corners.
- Lid: folds. Eight lines are dashed: four around the square and four by the tabs.
- Lid: ribbon. Draw the edges of the ribbon crossing each other and copy the bow in the middle.
- Cards: outlines. Trace five little squares with rounded corners. You’ll cut along these lines.
- Cards: drawings. Copy the pictures and words: a sun, a heart, a star, a cat and a gift. Write the letters in block letters, like on the screen.
- Lid: color. Ribbon and bow — red, the outline of the bow — black. Don’t color the tabs.
- Cards: color. Sun and star — yellow, heart and the gift’s ribbon — red, cat — orange, cheeks and the gift — pink. Letters and outlines — black.
Sheet 2
- Pink: color the sheet (optional). The sheet is white. You can color it in this color all over before marking it out (that takes longer) — or leave it white: the craft will come out white.
- Sheet 2: pink sheet. Take a pink sheet. You don’t need the camera here — follow the diagram on the screen.
- Pink sheet: diagram. You don’t need to draw anything: these lines will give you the folds, and the numbers show their order. The next steps will show each fold.
Base
- Square. Place the pink sheet upright. Fold the top edge to the left edge: you get a triangle. Fold the strip under it up along its edge, crease it, unfold the sheet and cut off the strip along the fold.
- Grid. Fold the square in half and unfold it. Fold both edges to the center fold and unfold. Turn the square a quarter turn and do the same — you get a 4 × 4 grid.
- Cross. Cut off the right column and the bottom row of squares along the folds — a 3 × 3 square is left. Cut out its four corner squares: you get a cross.
- Sides. If you colored the sheet, put the cross colored side down. Lift the four walls toward you along the sides of the middle square, crease the folds and lay the cross flat again.
Cut
- Cut out: lid. Cut out the lid along the solid line. At the tabs, cut all the way to the corner of the rim.
- Cut out: cards — 5 pcs. Cut with scissors along the solid line. Turn the sheet, not the scissors — the cut will come out neater.
Fold
- Lid folds. Lay the lid ribbon side down and lift the rims along the lines around the square. Fold the tabs inward, toward the neighboring rims.
Glue
- Glue the lid. Spread glue on the tabs on the outside, lift the other two rims and press them onto the tabs — the tabs end up inside. Hold each corner for ten seconds.
- Cards. Lay the cross flat. Glue a card onto each wall with its top toward the free edge of the wall, and the fifth one in the middle.
Assemble
- Close. Lift all four walls — the cards end up inside — and put the lid on top. It holds the walls.
Check
- Take off the lid. Take off the lid — the walls fall open and all five cards are in view. That’s how the box will open for whoever you give it to.
Done. The box is done. Put the lid on and give it as a gift: the walls open by themselves as soon as the lid comes off. You can put a candy in the middle.
Make it with your phone camera
 Gift BoxEasy
 Candy BoxMedium
 Cake BoxMedium
 Gift BagMedium
 Cake Slice BoxEasy
 Candy Corn BoxMedium