 VanGami.com
Gift Bag
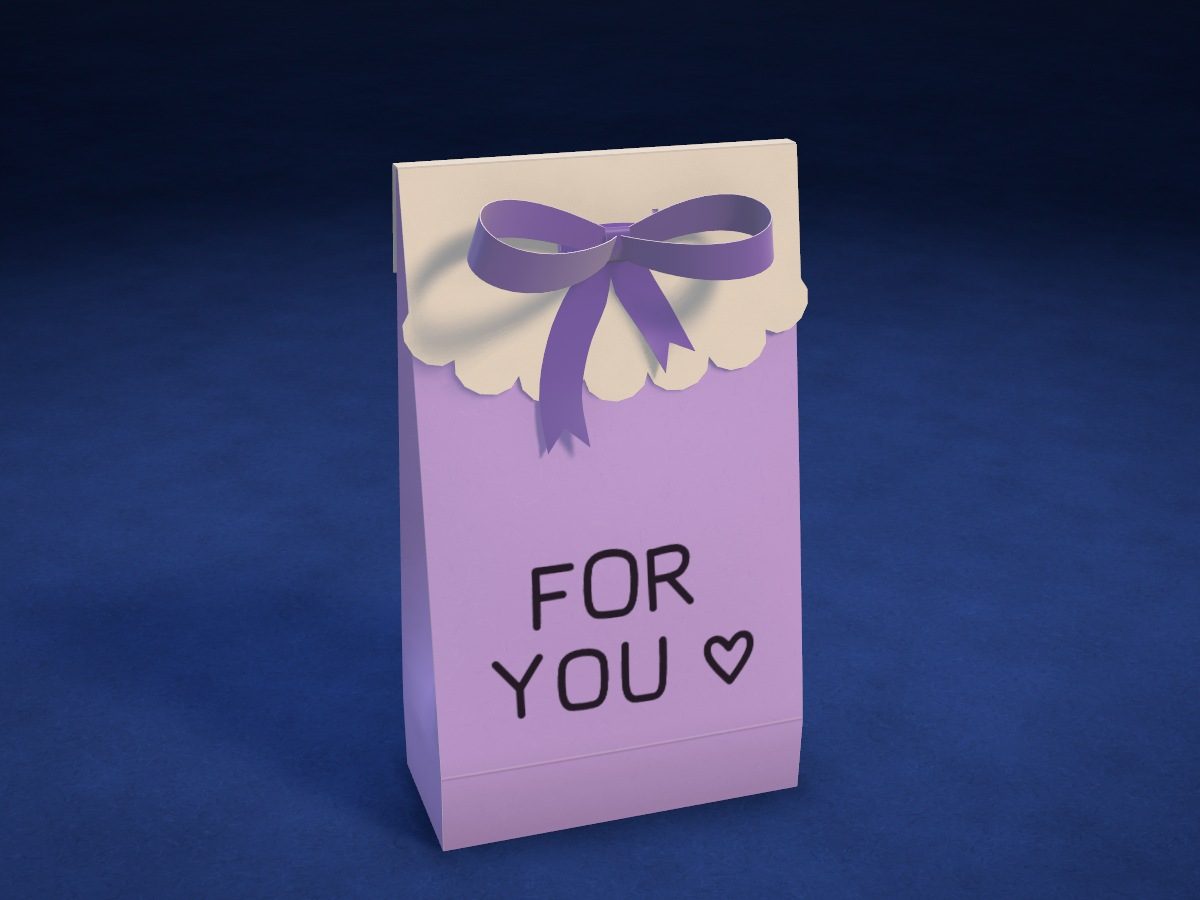
A flat-bottom bag from a single Letter sheet: 3½ × 6⅛ in, 1⅝ in deep. A white scalloped flap on top, with a satin ribbon threaded through two slits and tied in a bow; marker lettering on the front.
- Medium
- 2 Letter sheets
- 14 folds
- 1 template piece
- 40 cm of ribbon
Make it with your phone cameraLesson code: 1369
On VanGami the template appears over your sheet through your phone camera — no printer needed. Trace it, cut, fold and glue. Below are all the steps in text.
What you’ll need
- 2 Letter sheets — office paper, 80 gsm (20 lb)
- Markers
- Pencil — and eraser
- Ruler — 8–12 in
- Scissors — small
- Glue stick — or PVA glue
- Thread or string
- Glass — phone stand
Steps
Trace
- White sheet under the camera. Right now the white sheet is under the camera: you trace the flap on it. Set the lilac sheet aside for now.
- Flap: outline. Trace the flap along the solid line: a straight strip on top and an arc of seven scallops below. You’ll cut along this line.
- Flap: slits. The two short lines in the middle are the slits for the ribbon, ½ in each.
- Flap: folds. The two lines across, 3/16 in apart, are dash-dot lines: the flap folds over the top of the bag along them. The strip above them gets glued to the bag.
- Lilac: color the sheet (optional). The sheet is white. You can color it in this color all over, on both sides, before marking it out (that takes longer) — or leave it white: the craft will come out white.
Cut
- Cut out: flap. Cut out the flap along the solid line. Cut the scallops one at a time, turning the sheet, not the scissors.
- Slits for the ribbon. Fold the flap across, through the middle of the two short lines, with the lines on the outside, without creasing it. Cut along the lines ¼ in out from the fold, then unfold — you get two slits, ½ in each.
Bag
- Hem. Lay the lilac sheet with its long side toward you. Fold the far edge toward you by 1⅛ in: measure with a ruler in two places and crease the fold.
- Sides to the middle. Measure 3 in in from each short edge and fold both edges to the middle: the left one first, then the right one over it. They’ll overlap by a little more than ¾ in.
- Seam. Lift the right edge, apply glue to a ¾ in strip under it and press it down. You now have a flat tube.
- Bottom fold. The hem is the top of the bag, and the seam is facing up now. Fold the bottom edge of the tube up 2 in, crease it with your fingernail and unfold it.
- Open up the bottom. Open up the bottom of the tube: fold the top layer up along the fold, and press the side edges to the fold line. The corners will fall into triangles, and the bottom will become a hexagon.
- Glue the bottom shut. Fold the top edge of the hexagon down: it goes ⅜ in past the middle fold. Apply glue to the bottom edge, fold it up over the first one and press it down.
- Bag sides. Fold both side edges in ¾ in, toward the side with the bottom: the fold runs through the corner of the bottom. Crease with your fingernail and don’t unfold.
The word
- Bag under the camera. Flip the folded bag smooth side up, bottom toward you, and put it under the camera. Slip a card or a folded piece of paper inside: the marker won’t catch on the seam.
- Frame. Put the bottom edge and both side edges of the bag inside the frame: slide the bag over — you can set the glass right on top of it. If the frame is wider or narrower than the bag, unlock it and adjust it in the “Scale” tab.
- The word. Copy the letters and the little heart in pencil, with a single line. Don’t trace the frame — it’s the edges of the bag.
- With a marker. Trace over the letters and the little heart with a black marker — each line in one stroke.
Assemble
- Open up the bag. Unfold the sides, put your hand inside and open up the bottom: it becomes a 1⅝ × 3½ in rectangle. The ¾ in folds are the four edges of the bag: on the back, fold them the other way.
- Fold in the sides. Push in the middle of each side along the fold. Squeeze the top of the bag and crease the side folds all the way to the edge — the opening will go flat.
- Fold the flap. Fold the flap along both lines toward you, with the lines on the inside, then unfold it. It’s easier to fold along a ruler.
- Glue on the flap. Apply glue to the strip of the flap above the folds, on the side with the pencil lines, and glue it to the back of the bag — the side with the seam. The first fold sits on the top edge, and the flap folds over it to the front.
- Thread the ribbon. Turn the bag so the lettering faces you and lift the flap. Thread the ends of the ribbon through the slits from the inside out and even them up: the middle of the ribbon lies between the slits.
- Tie the bow. Lower the flap and tie the ends of the ribbon in a bow, like shoelaces. Fluff the loops and trim the ends in a V.
Check
- Put in the gift. Open the flap and put a card or some candy inside. Put a drop of glue on the bag under the middle scallops, then lower the flap and press it down.
Done. The bag is done. A drop of glue holds the flap: to open the bag, lift the flap with your finger — no need to untie the bow.
Make it with your phone camera
 Gift BoxEasy
 Candy BoxMedium
 Cake BoxMedium
 Cake Slice BoxEasy
 Candy Corn BoxMedium
 Little Gift Box with a BowEasy