 VanGami.com
Dart Shotgun
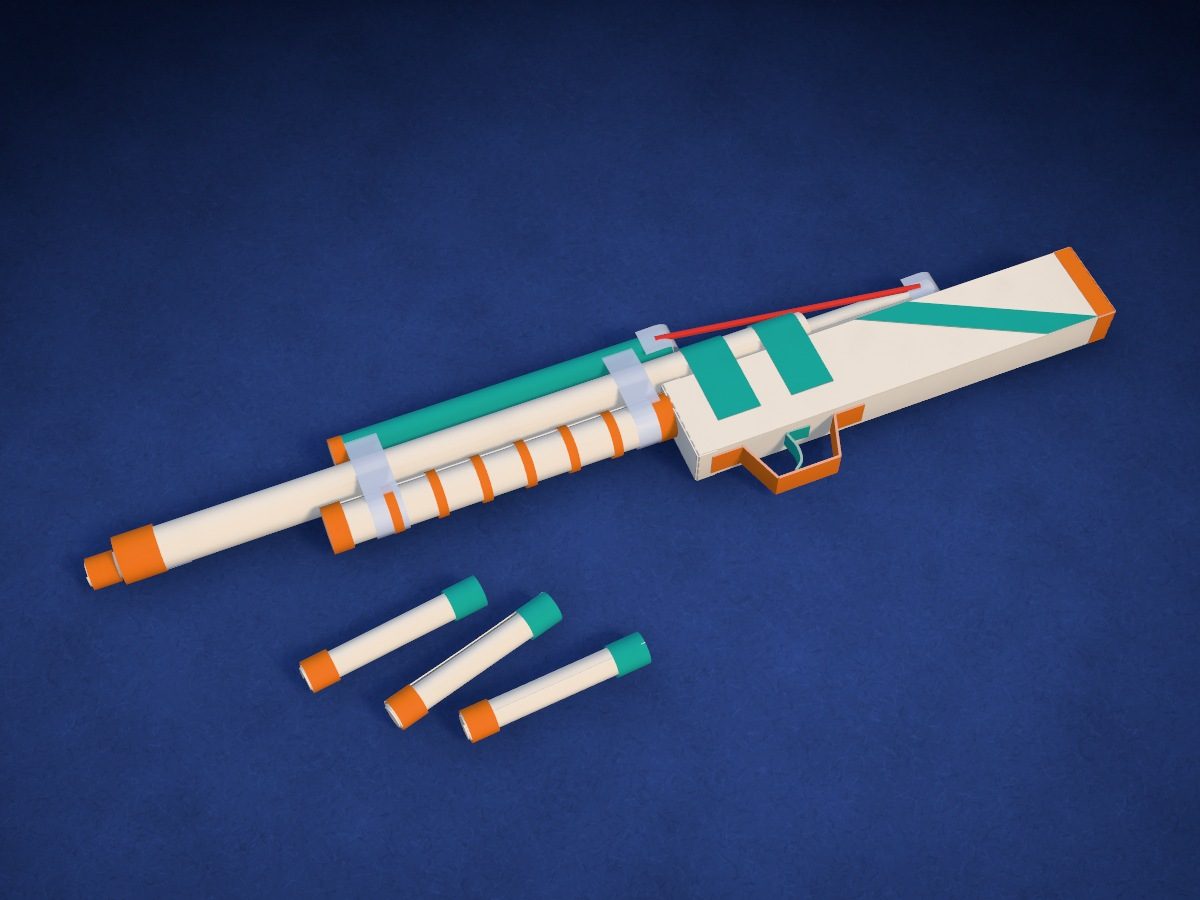
A 12¼ in gun made from three sheets of office paper. The barrel, plunger, forend, sight rail and darts are tubes rolled on pencils; the body with the stock is a block made from a folded strip with two tubes inside. A rubber band pulls the plunger: pull it back by the tail and let go — the dart shoots out of the barrel. The forend is glued on and doesn't move. Easy to do in two sessions: tubes first, then assembly.
- Hard
- 31 cm long
- 4 darts
- 3 Letter sheets
- 1 rubber band
Make it with your phone cameraLesson code: 2132
On VanGami the template appears over your sheet through your phone camera — no printer needed. Trace it, cut, fold and glue. Below are all the steps in text.
What you’ll need
- Letter sheet — office paper, 80 gsm (20 lb)
- Markers
- Pencil — and eraser
- Ruler — 8–12 in
- Scissors — small
- Glue stick — or PVA glue
- Tape — narrow, clear
- Two more Letter sheets — same paper: the second sheet is for the barrel, plunger and darts, the third is for the block insert, and half of it is left as a spare
- Second pencil — same as the first: about ¼ in thick, new, at least 7⅛ in long; the barrel, forend and insert are rolled on both together
- Rubber band — 2¼–2¾ in across (folded in half — 3½–4¼ in); longer is fine, you can tie a knot
- Glass — phone stand
Steps
Trace
- Trigger guard, trigger and end caps. Trace with a ruler the long and the short strip — the trigger guard and the trigger — and the two crosses — the end caps of the block. Draw them in the bottom right quarter of the sheet: the other three quarters are for the block, the forend and the sight rail.
- Trigger guard, trigger and end caps: folds. The fold lines are dashed — you don't cut along them. On the strips, the long line is number 1 and the short ones are 2; on the crosses the dashes go around the center.
- Saddles and stripes. Trace with a ruler two long strips — the saddles — and two slanted stripes for the stock: they're mirror images of each other. Draw them in the same quarter, below the trigger guard and the end caps.
Color
- Orange. Color the areas that match this color. Move the marker in one direction — you’ll get fewer streaks.
- Teal. Now the areas that match this color.
Cut
- Cut out: trigger guard, trigger and end caps — 4 pcs. Cut out the two strips and the two crosses. On the crosses, cut toward the inner corners from both sides.
- Cut out: saddles and stripes — 4 pcs. Cut out two saddles and two slanted stripes.
- First sheet into quarters. Fold the sheet in half crosswise and cut along the fold. Fold each half in half too, short edge to short edge, and cut: four quarters, 4¼ × 5½ in.
- Second sheet in half. Fold the second sheet in half crosswise and cut along the fold. One half is the barrel — set it aside.
- Strips for the plunger and darts. Fold the other half in half lengthwise and cut it: two strips, 8½ × 2¾ in. One is the plunger. Fold the other in half twice, short edge to short edge, and cut along the folds: four small sheets for the darts.
- Third sheet for the insert. Cut the third sheet in half crosswise too, then fold one half in half again, short edge to short edge, and cut. The two quarters are for the block insert; the other half is a spare.
Roll
- Plunger and sight rail on a pencil. Apply glue to a ⅝ in band along the far edge of the strip. Starting from the near edge, roll it tightly onto a pencil (the pencil lies along the long side), press the seam and pull out the pencil: this is the plunger. Roll a quarter the same way for the sight rail, with the pencil along the short side.
- Four darts. Roll the four small sheets onto the pencil the same way, with glue — short side along the pencil. You'll get darts 2 in long.
- Forend on two pencils. Put two pencils together and tape them near the ends. Apply glue to a ⅝ in band along the far edge of the quarter and roll it onto the pencils (they lie along the short side). Pull out the pencils and squeeze the tube from the sides: it will become round.
- Block insert. Roll the two quarters of the third sheet the same way, with glue — pencils along the long side. Pull out the pencils and squeeze the tubes from the sides: they will become round, about ½ in thick.
- Barrel — on two pencils. Roll the half sheet without glue tightly onto the same pencils (they lie along the long side). Hold the edge with three pieces of tape.
- Check the movement. Pull out the pencils and squeeze the barrel from the sides so it becomes round. Insert the plunger, then a dart: they should slide freely, with a ⅛–3/16 in gap above them.
- Cuts for the rubber band. At one end of the plunger and one end of the sight rail, make two cuts 3/16 in deep: cut from the end along the tube, with the second cut directly opposite the first. The rubber band sits in them.
- Rings on the barrel and forend. Hold the orange marker against the tube and roll the tube with your palm — you get an even ring. Barrel: a ⅜ in ring at the end, the muzzle. Forend: a ring at both ends and six rings between them.
- Sight rail and darts. Color the sight rail teal and the end without cuts orange: that's the front sight. Each dart has an orange nose at one end and a teal tail at the other.
Fold
- Block: eight bands. Fold the last quarter of the first sheet in half lengthwise — long edge to long edge — then again, and again. Unfold it: seven folds, eight bands of ½ in each.
- Fold up the block. Place both inserts on bands 4 and 5 and fold the block around them along folds 2, 3, 5 and 6. Apply glue to the last two bands and press them over the first two.
- Block end caps. Fold the tabs on the crosses along the dashed lines, apply glue and slip them onto the ends of the block like caps: the orange butt cap goes on one end, the white end cap on the other.
- Trigger guard and trigger. Fold both strips in half lengthwise, color side out, and glue them shut. Bend the trigger guard along the short lines into a U shape with tabs. On the trigger, fold back a 5/16 in tab, and curve the long end slightly with your finger.
Assemble
- Barrel onto the block. Apply glue to the top of the block next to the white end cap, over 2 in. Lay the barrel on it with the pieces of tape turned to the side, so the glue touches paper: the rear end of the barrel sits 2 in from the end cap, and the rest of the barrel extends forward.
- Saddles and stripes. Apply glue to the saddles and wrap them over the barrel onto the sides of the block: one at the rear end of the barrel, the other a finger's width ahead. The stock stripes go one on each side, diagonally, with the top end toward the barrel.
- Forend. Glue the forend under the barrel, snug against the white end of the block: apply glue along the contact line and press for 30 seconds.
- Sight rail. Glue the sight rail on top of the barrel with the cut end facing back: the cuts face sideways, and the back end of the rail sits 1⅝ in from the back end of the barrel.
- Tape rings. Wrap the barrel, sight rail, and forend together with two rings of tape: one at the front sight, the other ⅜ in in front of the rail cuts. The tape holds them while the glue dries, and later when the rubber band pulls.
- Trigger guard and trigger. Glue the trigger guard tabs to the underside of the block, 3/16 in from the white end. Put the trigger inside the guard, its tab against the block, pointing forward.
- Plunger. Insert the plunger into the barrel from the back, cuts toward the back: the cuts face sideways, like on the rail. The tail sticks out of the barrel by 1¾ in.
- Rubber band. Thread the rubber band through the rail cuts. Run both strands back along the sides of the barrel and hook them into the plunger cuts. Cover both ends with a small piece of tape so the band doesn't slip off.
Shoot
- Load the shotgun. Put a dart in the muzzle teal tail first and push it in until it reaches the plunger: the tip sticks out 3/16–⅜ in. Don't push harder, or the plunger will slide back.
- Shot. Hold the shotgun by the block with the barrel level or angled slightly up. Pull the plunger back by its tail 2 in and let go: it knocks the dart out of the barrel.
Done. The shotgun is done. Aim at a box or a paper cup — not at people or animals.
Make it with your phone camera
 Paper PlaneEasy
 Paper PopperEasy
 Paper GunMedium
 Paper HelicopterEasy
 Karambit and DaggerMedium
 ShurikenEasy