 VanGami.com
Karambit and Dagger
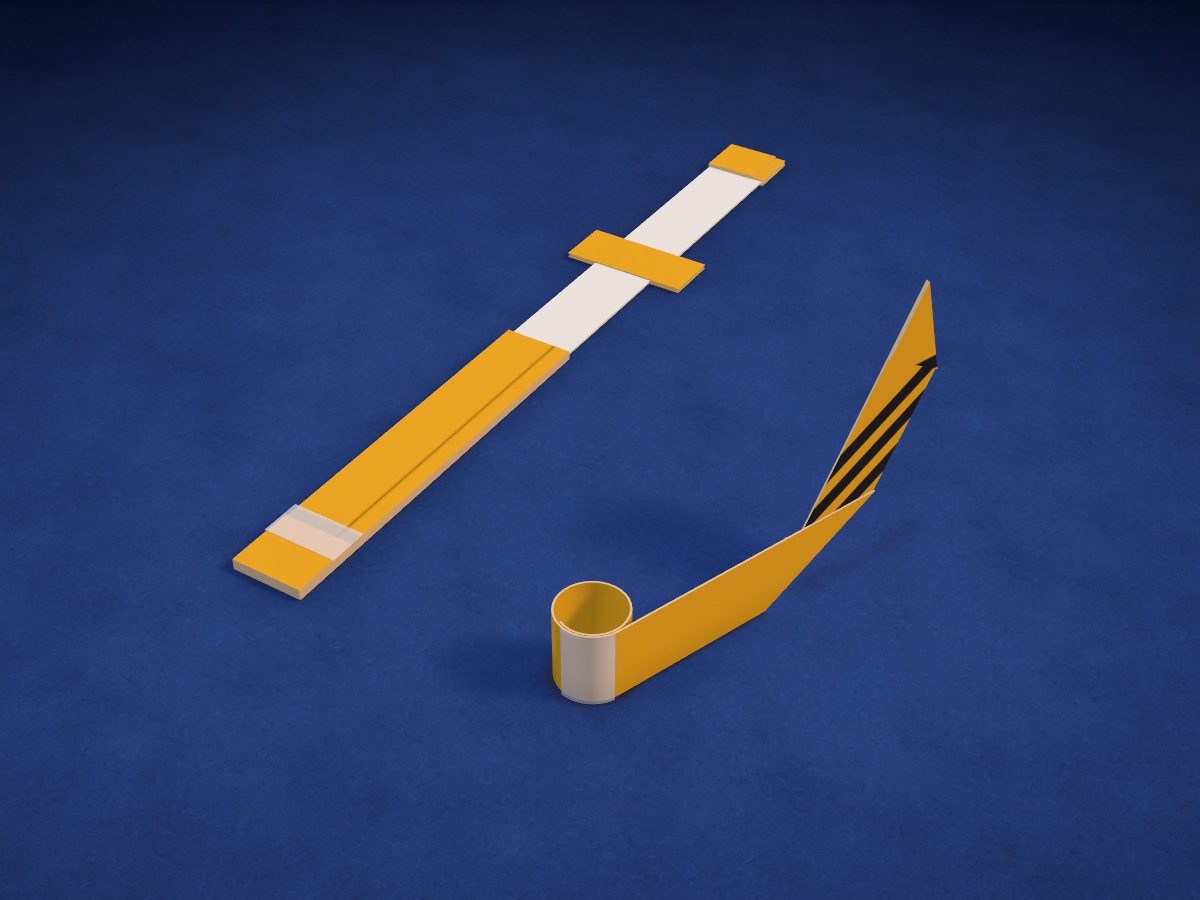
A karambit with tiger stripes and a finger ring, made from half of a colored sheet: a four-layer strip is folded diagonally and the end is rolled into a ring. It comes with a white dagger made from a whole sheet, with a guard and a pommel, and a sheath made from the other colored half. The karambit is done by the middle of the lesson — you can play with it while you make the dagger.
- Medium
- 2 Letter sheets
- 2 knives
- 1 sheath
- 3 stripes
Make it with your phone cameraLesson code: 9749
On VanGami the template appears over your sheet through your phone camera — no printer needed. Trace it, cut, fold and glue. Below are all the steps in text.
What you’ll need
- Letter sheet — office paper, 80 gsm (20 lb)
- Markers
- Pencil — and eraser
- Ruler — 8–12 in
- Scissors — small
- Glue stick — or PVA glue
- Tape — clear, narrow — ⅝–¾ in
- White Letter sheet — regular printer paper, 80 gsm (20 lb) — for the dagger
- Glass — phone stand
Steps
Mark
- Orange: color the sheet (optional). The sheet is white. You can color it in this color all over before marking it out (that takes longer) — or leave it white: the craft will come out white.
- Sheet folds. Fold the sheet in half lengthwise, then fold one half in half again, and unfold. Place the sheet so that this outer fold lies under the blue dashed line and the top edge of the sheet is level with the top of the dashed line.
- Stripes and line. Trace three chevrons with a ruler: their points lie on the fold. Below them, draw one diagonal line — the karambit will bend along it.
Color
- Black. Color the areas that match this color. Move the marker in one direction — you’ll get fewer streaks.
Karambit
- Cut the sheet lengthwise. Fold the sheet along the middle fold — it’s already there — crease it and cut along it. The half with the stripes is for the karambit, the other half is for the sheath.
- Center line. Flip the striped half over, stripes down. Fold it in half lengthwise along the existing fold — this time in the opposite direction — crease it and unfold.
- Edges to the center. Fold both long edges to the center line: the edges meet at the fold and don’t overlap.
- Fold in half. Fold along the center line, with the folded edges inside. You get a four-layer strip: stripes on the outside, on both sides.
- Tip. Lay the strip pencil line facing up, with the stripes away from you — the solid fold will be on the right. Fold the far right corner to the left so the short edge lies along the left long edge, and glue it down.
- Bend. Apply glue to the handle right below the line and fold the strip toward you along the line: the blade will lie at an angle and point to the right. Press it down and tape the edge of the blade that lies on the handle.
- Mark and curl. Measure 3⅞ in from the blunt end and make a mark. Wind the end up to the mark tightly around a glue stick or a marker — upward, toward the blade side — then let go: the strip will remember the curve.
- Ring. Apply glue along ¾ in from the mark to the end and roll it into a ring: the tip will lie on the glue from the inside. Wrap a strip of tape around the joint, passing it through the ring.
Dagger
- Fold the white sheet in half. Fold the white sheet in half lengthwise, long edge to long edge. From here on, fold it as if it were a single half.
- The same strip. Repeat the three folds: center line, edges to the middle, in half. The strip will have eight layers — crease each fold with a ruler.
- Dagger tip. Fold the corner like on the karambit: short edge along the long edge. Put glue under the corner and tape it down on top: eight layers will spring open.
- Cut off 3½ in. From the second half of the sheet, cut off a 3½ in piece straight across. Set the long leftover aside — it’s the sheath.
- Two strips. Fold the piece in half, bringing the edge you just cut to the opposite edge, and cut along the fold: you get two strips, 4¼ × 1¾ in. Fold each one in half lengthwise: one is for the pommel, the other for the guard.
- Pommel. Apply glue along the whole length of the strip and place the blunt end of the dagger on its left edge. Lift the end and wrap the strip tightly around the handle — almost two turns.
- Guard. On the second strip, fold both ends to the middle, unfold it and apply glue. Lay the dagger across it so the strip is 3⅞ in from the blunt end, and fold the ends closed over the blade.
Sheath
- Wrap the blade. Lay the blade on the long edge of the leftover piece, with the guard right against the short edge. Wrap it in the paper by rolling it — not too tight — and glue down the last edge.
- Close the end. Take the free end of the sheath past the tip and fold it onto the seam side, glue it down and wrap tape around the sheath. The fold sits 3/16 in past the tip: the dagger stops at the guard, not the tip.
- Check the movement. Pull the dagger out and put it back in: it should slide out freely and go in all the way to the guard.
Play
- Karambit on your finger. Put the ring on your index finger and flick your wrist: the karambit spins around your finger and lands in your palm.
Done. The karambit and dagger are ready. Their tips are paper, but hard — don’t point them at a face, yours or anyone else’s.
Make it with your phone camera
 Paper PlaneEasy
 Paper PopperEasy
 Paper GunMedium
 Paper HelicopterEasy
 Dart ShotgunHard
 ShurikenEasy