 VanGami.com
Paper Plane
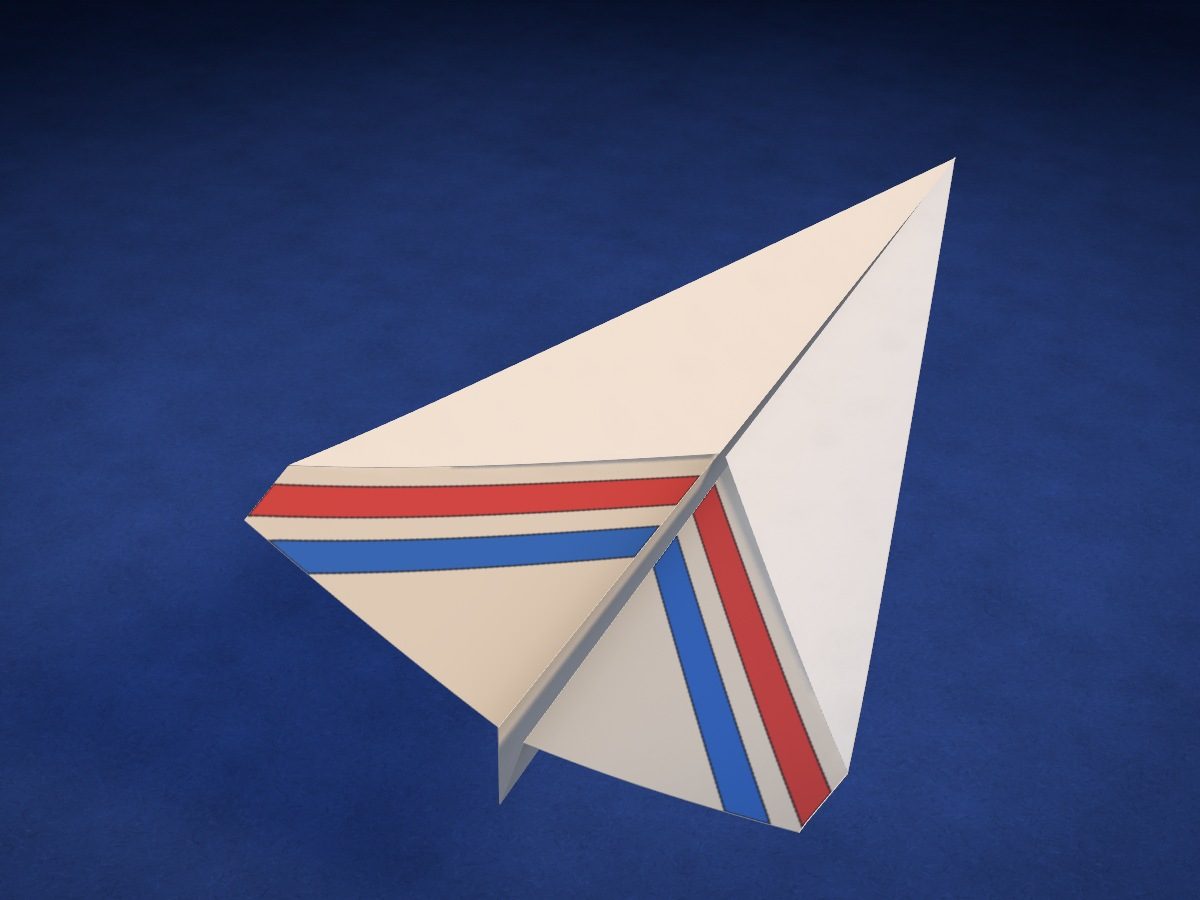
A classic “dart” from a single Letter sheet. Trace seven fold lines and two colored stripes on each wing from the template, then fold the sheet along them — no scissors or glue.
- Easy
- 1 Letter sheet
- 7 folds
- 0 glue or scissors
Make it with your phone cameraLesson code: 4309
On VanGami the template appears over your sheet through your phone camera — no printer needed. Trace it, cut, fold and glue. Below are all the steps in text.
What you’ll need
- Letter sheet — office paper, 80 gsm (20 lb)
- Markers
- Pencil — and eraser
- Ruler — 11¾ in
- Glass — phone stand
Steps
Mark
- Seven lines from one point. Put a dot at the middle of the top edge — 4¼ in from the corner, mark the ends of the seven lines on the edges of the sheet, and connect them to the dot with a ruler. Write the numbers. Draw the lines thin and solid — no need to copy the dashes.
- Stripes on the wings. Each half of the sheet gets two stripes from line 4 to the edge of the sheet: draw their borders with a ruler. On the finished plane they end up on top of the wings.
Color
- Red. Color the areas that match this color. Move the marker in one direction — you’ll get fewer streaks.
- Blue. Now the areas that match this color.
Fold
- Fold in half and unfold. Fold the sheet in half lengthwise with the lines inside: long edge exactly to long edge. Crease the fold with your fingernail and unfold it — it will run along line 1 or right next to it.
- Corners to the center. Fold both top corners toward you along the lines marked 2: the top edge lies along the center fold. It now looks like a house with a pointed roof.
- Edges to the center. Fold the slanted edges toward you along the lines marked 3 — they also lie along the center fold. The top of the line is hidden under the little corner: start the fold right at the nose.
- Fold in half. Fold the blank in half along the center fold: the folded-in edges stay inside, with plain paper on the outside. Crease the fold.
- Wing line. Lay the blank with the fold toward you. On the back edge, measure 1⅜ in from the fold, make a dot, and use a ruler to draw a line from it to the tip of the nose.
- First wing. Fold the top layer toward you along the line you drew and crease the fold. The stripes will end up on top, and the fold at the tail will run along line 4 or close to it.
- Second wing. Flip the blank over and fold the second layer so it lies on top of the first wing. The wings must line up edge to edge — otherwise the plane will veer to one side.
- Spread the wings. Hold the plane by the keel and raise both wings. The wings sit slightly above level, forming a Y, with the stripes on top.
Launch
- How to hold. Hold the keel from below with your fingertips, a third of the way back from the nose: thumb on one side, index finger on the other.
- Launch. Throw it forward, level with the horizon, with a firm push and no upward swing. The “dart” flies fast and straight.
Done. The paper plane is done. If it veers to one side, compare the wings: they should be identical, and the keel should be exactly in the middle.
Make it with your phone camera
 Paper PopperEasy
 Paper GunMedium
 Paper HelicopterEasy
 Dart ShotgunHard
 Karambit and DaggerMedium
 ShurikenEasy