 VanGami.com
Sugar Skull Garland
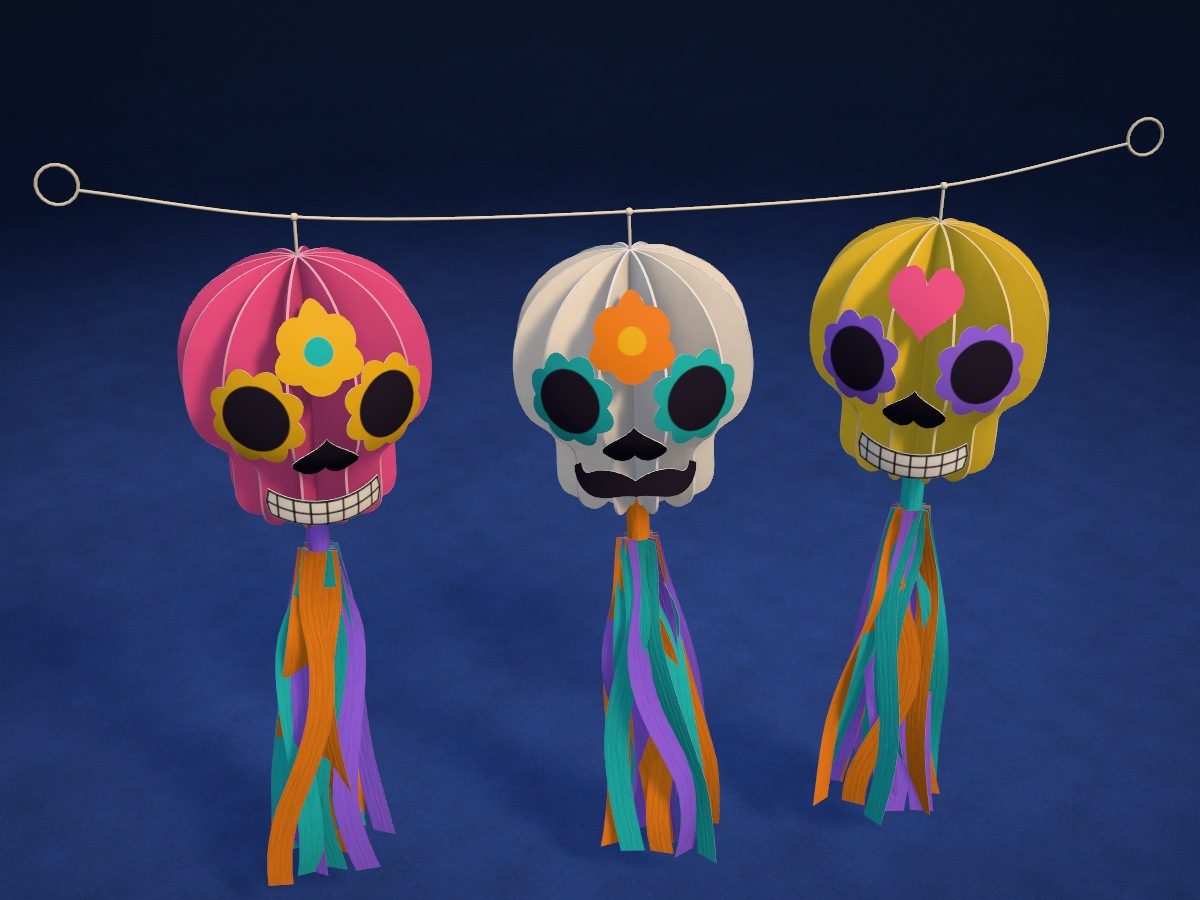
Three 3D skulls on one thread. Each is made of twelve identical slices: you cut them from a stack of three sheets, fold them in half and glue them into a book that opens out into a ball. The face is stickers colored with markers; at the bottom there’s a fringe tail made of crepe paper.
- Medium
- 3 skulls
- 12 slices in each
- 11 Letter sheets
Make it with your phone cameraLesson code: 3985
On VanGami the template appears over your sheet through your phone camera — no printer needed. Trace it, cut, fold and glue. Below are all the steps in text.
What you’ll need
- 11 Letter sheets — office paper, 80 gsm (20 lb)
- Markers
- Pencil — and eraser
- Ruler — 8–12 in
- Scissors — small
- Glue stick
- Hot glue gun — for the face; thick PVA glue works too
- Crepe paper — 3 colors, 3 pieces of each, 2⅜ × 6¼ in
- Thread — strong: 1 m and 3 pieces of 15¾ in each
- Paper clips — 8 pcs, for the stacks
- Glass — phone stand
Steps
Sheet 1
- Sheet 1: pink sheet. The pink sheet should be under the camera now. The template has 4 sheets. The sheet is white — the pieces get their color in the coloring step.
- Pink slices: outlines. Trace the four skulls. Draw the scalloped bottom edge as a wave — it doesn’t have to be exact.
- Pink slices: folds. Down the middle of each skull runs a fold line, from the top of the head to the chin.
- Pink. The pieces are traced on the back, but the color is needed on the front: flip the sheet over and color the whole area under the pieces with this color, then put the sheet back as it was. There are 3 sheets like this: color the others the same way — completely.
Sheet 2
- Sheet 2: white sheet. Remove the previous sheet and put the white sheet in its place, lined up edge to edge. Don’t move the phone — the scale stays the same.
- White slices: outlines. Trace the four skulls. Draw the scalloped bottom edge as a wave — it doesn’t have to be exact.
- White slices: folds. Down the middle of each skull runs a fold line, from the top of the head to the chin.
Sheet 3
- Sheet 3: yellow sheet. Remove the previous sheet and put the yellow sheet in its place, lined up edge to edge. Don’t move the phone — the scale stays the same. The sheet is white — the parts get their color at the coloring step.
- Yellow slices: outlines. Trace the four skulls. Draw the scalloped bottom edge as a wave — it doesn’t have to be exact.
- Yellow slices: folds. Down the middle of each skull runs a fold line, from the top of the head to the chin.
- Yellow. The pieces are traced on the back, but the color is needed on the front: flip the sheet over and color the whole area under the pieces with this color, then put the sheet back as it was. There are 3 sheets like this: color the others the same way — completely.
Sheet 4
- Sturdy sheet from two. Apply glue stick over the whole surface of a sheet of printer paper, press a second sheet onto it, and smooth with your palm from the middle to the edges. You'll get a thick sheet — work on that one. Put it back in the same spot, edge to edge; don't move the phone.
- Sheet 4: white sheet for stickers. Remove the previous sheet and put the white sheet for stickers in its place, lined up edge to edge. Don’t move the phone — the scale stays the same.
- Eyes: outlines. Trace the six circles with wavy edges. Each row holds the pieces for one skull: two eyes, a nose, a mouth and a decoration.
- Eyes: eye sockets. Inside each circle is a smaller circle: that’s the eye socket.
- Noses and mouths: outlines. Trace three heart-shaped noses with the point up, two smiles and a mustache.
- Smiles: teeth. On each smile there’s a line down the middle and seven short strokes across it: those make the teeth.
- Decorations: outlines. Trace two flowers and a heart — they go on the forehead.
- Flowers: centers. In the middle of each flower is a circle.
- Color: eyes. Eye sockets in black. The borders around them in pairs: two yellow, two turquoise, two purple.
- Color: noses and mouths. Color the noses and mustache black. Leave the smiles white; outline the teeth and the edge in black.
- Color: decorations. Color the top flower yellow with a turquoise center, the second one orange with a yellow center, and the heart pink.
Stack
- Three stacks. Put two more sheets under each sheet with outlines: under the pink and yellow ones, sheets colored the same way, color side down, like the top one; under the white one, plain sheets. Clip each stack with paper clips on both sides.
Cut
- Cut out: pink slices in three layers — 4 pcs. Cut the stack into four parts between the outlines and clip each part on the side. Then cut out all three layers at once along the outline — you’ll get 12 slices.
- Cut out: white slices in three layers — 4 pcs. Cut the stack into four parts between the outlines and clip each part on the side. Then cut out all three layers at once along the outline — you’ll get 12 slices.
- Cut out: yellow slices in three layers — 4 pcs. Cut the stack into four parts between the outlines and clip each part on the side. Then cut out all three layers at once along the outline — you’ll get 12 slices.
- Cut out: eyes — 6 pcs. Cut out the six eyes. Cut the wavy edge with short snips, turning the sheet as you go.
- Cut out: noses and mouths — 6 pcs. Cut out the three noses, two smiles and the mustache. Make the corners at the mustache tips with two cuts that meet.
- Cut out: decorations — 3 pcs. Cut with scissors along the solid line. Turn the sheet, not the scissors — the cut will come out neater.
Glue
- Fold the slices in half. Start with the pink ones: fold each of the 12 cutouts in half, edge to edge, colored side in — the pencil lines will stay on the outside. Crease the fold with your fingernail.
- First pair. Lay a folded slice down and apply glue stick to the whole top half, right to the edge. On top goes the second folded slice: fold to fold, edge to edge.
- The whole book. Glue the other ten the same way — you get a book of 12 slices. Press it with your palm for a minute.
- Thread along the fold. Cut a thread 15¾ in long. Along the top of the booklet, right along the fold, run a line of PVA glue and lay the thread into it by its middle: about 5⅞ in is left sticking out on each side.
- Open it into a ball. Apply glue stick to the top half, open the book out in a circle and glue the first slice to the last one: the thread stays right in the center. Spread the ridges so the gaps are even.
Face
- Eyes. The ball sits with the groove facing up: that’s the middle of the face. Put hot glue on the edges of the two ridges to the left of it and immediately press on the eye with the yellow border, then do the same on the right.
- Nose and smile. The nose goes below the eyes, point up: it covers the groove and rests on the two middle ridges. Below it, on the same ridges, goes the smile.
- Flower on the forehead. Glue the yellow flower on the forehead, above the eyes: it also rests on the two middle ridges.
Tail
- Three pieces of crepe. From crepe paper in three colors, cut one 2⅜ × 6¼ in rectangle of each, with the crinkles running along the long side: that way the strips won’t stretch. Stack the pieces.
- Cut the fringe. Cut the stack lengthwise into six strips, ⅜ in wide each, stopping ¾ in short of the top edge: the strips hang from it like fringe.
- Roll around the thread. Apply PVA glue to the uncut edge, between the layers too, and attach it by its side edge to the bottom end of the thread, right up against the chin. Roll the edge tightly around the thread into a little roll and glue the tip down.
Garland
- Two more skulls. Make the white and yellow skulls the same way — with faces and tails. The white one has turquoise eyes, a mustache, and an orange flower; the yellow one has purple eyes, a smile, and a pink heart.
- Tie them to the thread. Cut a thread 1 m long and tie the skulls to it by the top ends of their threads — 4¾ in apart. Leave ⅜ in from the knot to the top of the skull and trim the excess.
- Hang it up. Tie a loop at each end of the long thread and hang the garland. Fluff out the tails so the strips don’t stick together, and turn the skulls to face forward.
Done. The garland is done. A single skull with a tail is also a finished hanging decoration: same template.
Make it with your phone camera
 PumpkinMedium
 GhostMedium
 Star PiñataHard
 Cobweb with a SpiderEasy
 Paper Chain GarlandEasy
 La CatrinaHard