 VanGami.com
La Catrina
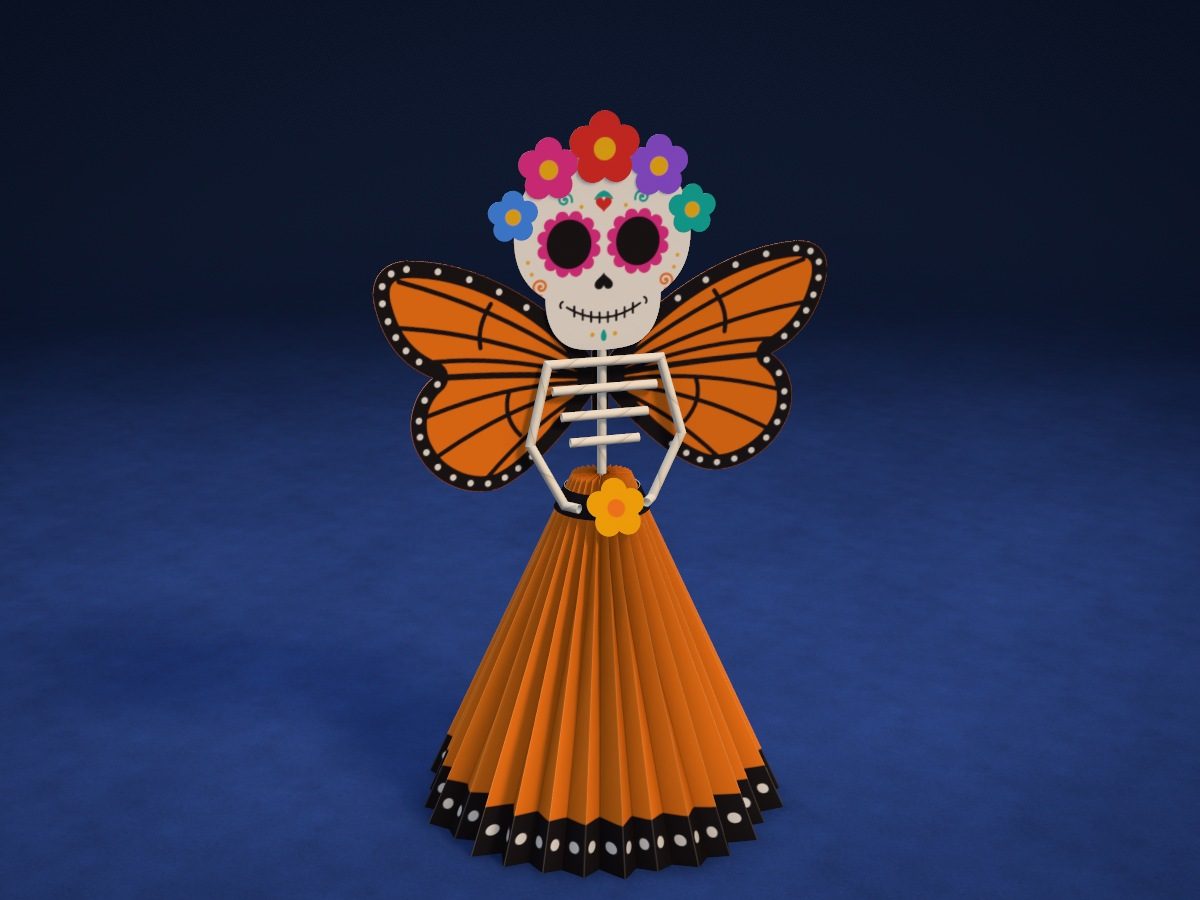
A skeleton doll about 15¼ in tall: a cone skirt made of three accordion-folded sheets, bones made of paper tubes, a painted skull with a crown of five flowers, and monarch butterfly wings on the back.
- Hard
- 60 skirt pleats
- 6 paper flowers
- 8 Letter sheets
Make it with your phone cameraLesson code: 3751
On VanGami the template appears over your sheet through your phone camera — no printer needed. Trace it, cut, fold and glue. Below are all the steps in text.
What you’ll need
- 8 Letter sheets — office paper, 80 gsm (20 lb)
- Markers
- Pencil — and eraser
- Ruler — 8–12 in
- Scissors — small
- Glue stick
- Glue gun — optional: for the tubes
- Skewer or knitting needle — at least 11 in long: for rolling the tubes
- Rubber band — or 11¾ in of thread
- Regular markers
- Glass — phone stand
Steps
Sheet 1
- Orange: color the sheet (optional). The sheet is white. You can color it in this color all over before marking it out (that takes longer) — or leave it white: the craft will come out white. There are 3 such sheets: color the others the same way, all over.
- Sheet 1: orange sheet for the skirt. Take the orange sheet for the skirt. You don’t need the camera here — follow the diagram on the screen.
- Skirt: fold lines. Mark the colored sheets on the clean side: the color has to stay on the outside of the skirt. There are three sheets like this — this is the first one. Draw 20 lines across the sheet with a ruler: dashed and dash-dot lines alternate, and the narrow strip at the end is a tab.
- Skirt: hem and two more sheets. Draw a line along the long edge: the hem will go on this side. Mark the other two sheets without the camera: place the marked sheet right next to each one, transfer the ends of the lines to both long edges as small tick marks, and connect them with a ruler; mark the hem side on them too — on the right, with the narrow tab at the bottom.
Sheet 2
- Sheet 2: black sheet. Place the black sheet under the camera and don’t move the phone. The sheet is white — the pieces get their color at the coloring step.
- Black strips. Trace seven strips along a ruler: six wide ones for the skirt trim, one narrow one for the waistband.
- Black. The paper is white, but these parts should be this color: color them in completely, up to the outline. Move the marker in one direction.
Sheet 3
- Sheet 3: white office sheet. Remove the previous sheet and put the white office sheet in its place, lined up edge to edge. Don’t move the phone — the scale stays the same.
- Strips for the tubes. Use a ruler to trace three strips, 2 × 10 in. Roll them into the skeleton’s bones.
Sheet 4
- Sturdy sheet from two. Apply glue stick over the whole surface of a sheet of printer paper, press a second sheet onto it, and smooth with your palm from the middle to the edges. You'll get a thick sheet — work on that one. Put it back in the same spot, edge to edge; don't move the phone.
- Sheet 4: thick white sheet. Remove the previous sheet and put the thick white sheet in its place, edge to edge. Don't move the phone — the scale will stay the same.
- Skull: outline. Trace the skull and the short strip next to it — you’ll use it to attach the head to the spine.
- Skull: face. Copy the face with thin lines: eye sockets inside petals, a heart-shaped nose, a smile with teeth, swirls, and dots.
- Flowers: outlines. Trace six flowers: one large, three medium, and two small.
- Flowers: centers. Draw a circle in the center of each flower.
- Color: skull. Color the eye sockets and nose black, the petals around the eyes pink, and the heart on the forehead red. Color the swirls and drops turquoise and orange, and the dots yellow.
- Color: flowers. Color the large one red, the medium ones pink, purple, and yellow, and the small ones blue and turquoise. Color the centers yellow — orange for the yellow flower.
Sheet 5
- Sheet 5: orange sheet for the wings. Remove the previous sheet and put the orange sheet for the wings in its place, lined up edge to edge. Don’t move the phone — the scale stays the same. The sheet is white — the parts get their color at the coloring step.
- Wings: outline. Trace the whole butterfly: both wings and the narrow body between them.
- Wings: fold. The line down the middle of the body is a dash-dot line: you’ll fold the wings toward you along it.
- Wings: pattern. Copy the veins and the border line along the edge of the wings. Don’t add the dots yet.
- Orange. The paper is white, but these parts should be this color: color them in completely, up to the outline. Move the marker in one direction.
- Color: wings. Color the border along the edge, the veins, and the body with a black marker; it’s quicker to fill in the border with a wide-tip marker. When it dries, add white dots on the border with the correction pen.
Cut
- Cut out: black strips — 7 pcs. Cut out seven strips along a ruler: six wide ones and one narrow one.
- Cut out: tube strip — 3 pcs. Cut out three long strips along a ruler.
- Cut out: skull and support strip — 2 pcs. Cut out the skull along the solid line and the short support strip.
- Cut out: flowers — 6 pcs. Cut out six flowers. Between the petals, run the scissors all the way into the notch and keep turning the sheet.
- Cut out: wings. Cut out the wings along the outline as one piece: don’t cut through the body in the middle.
Bones
- Tubes. Lay a skewer on the long edge of the strip — or a knitting needle or an empty pen — and roll the paper tightly around it; apply glue to the last ⅜ in and press. Pull out the skewer and roll two more tubes.
- Cut the tubes. Leave one tube whole — that one is for the arms. From the second, cut off 5⅞ in for the spine. From the third, cut the ribs: 2⅜, 2, and 1⅝ in. Don’t throw away the leftovers: you’ll need one for the skirt.
- Bend the arms. Bend the whole tube in four places: 2 in from each end for the elbows, then another 1¾ in in for the shoulders — that leaves 2½ in between the shoulders. Bend the shoulders down and outward and the elbows inward: there should be about 1⅝ in left between the ends, and all the bends should lie in one plane.
- Ribs. Set the bent tube aside. Glue the ribs across the spine: the short one 2 in from the bottom end, the medium and long ones above it, ⅝ in apart; flatten the tubes slightly with your fingers where they’re glued.
- Shoulders. Glue the bent tube by its middle to the spine — ⅝ in above the long rib, with the elbows pointing out to the sides.
- Skull. Apply glue to the top 2 in of the spine and lay the skull on top, design side up: the chin goes right above the shoulders, with the tube running down the middle.
- Flower crown. Glue five flowers along the top edge of the skull, half over the edge: first the small blue and turquoise ones on the sides, then pink and purple, and the large red one in the middle, on top of its neighbors. Set the yellow one aside for now: it's for the waistband.
- Head support. Flip the skeleton face down. Apply glue to the short strip and glue it across the tube to the back of the skull — it holds the head.
Skirt
- Black hem. Set the skeleton aside to dry. Flip the orange sheet over, lines facing down, and glue two black strips butted together along the marked edge, colored side up; do the same on the other two sheets.
- Accordion. Flip the sheet back over, lines up, and fold it accordion-style, alternating mountain and valley folds. Fold the narrow tab at the end back too. Crease each fold with your fingernail.
- Three accordions. Fold the other two sheets the same way. Flip all three accordions hem side up and lay them in a row, with the tabs all on the same side.
- One long band. Apply glue to the tab of the first accordion on the front side and glue it under the first panel of the second one, hem to hem. Attach the third one the same way.
- White dots. Stretch out the band of 60 panels and use the correction pen to put a white dot on each panel of the hem.
- Ring. Stand the band on the table with the hem down and close it into a ring with the hem facing out: glue the last tab under the first panel. You get a pleated tube.
- Waist. Stand the leftover piece of tube in the middle of the ring and gather the top edge into a bunch around it. Cinch the bunch with a rubber band ⅝ in from the edge, wrapping it two or three times, then spread the bottom out in a circle — the skirt will stand up as a cone.
- Belt. Apply glue to the narrow black strip on the white side and wrap it over the elastic band, trimming the excess. Don't take the tube out yet.
Doll
- Wings. Fold the wings along the line with the design inside, then open them up until they are almost flat. Apply glue to the fold and press it to the spine from behind, design side down: the top of the body goes right under the head support.
- Skeleton onto the skirt. Pull the leftover tube out of the waist and push the spine, with glue on its end, 1⅛ in deep into that opening: the short rib will end up ¾ in above the skirt. Angle the ends of the arms forward so they don’t press against the skirt, and hold the skeleton for a minute.
- Hands on hips. Flatten the last centimeter of each end, bend it forward, and glue it flat against the belt at the sides — with PVA glue (white glue) or a glue gun. Hold for a minute: La Catrina now stands with her hands on her hips.
- Flower on the belt. Glue the yellow flower by its center to the front of the belt, between the hands. Fluff out the skirt pleats and bring the wing tips slightly forward.
Done. La Catrina is done. Fluff out the skirt pleats so she stands straight, and she’s ready for the shelf.
Make it with your phone camera
 PumpkinMedium
 GhostMedium
 Star PiñataHard
 Cobweb with a SpiderEasy
 Paper Chain GarlandEasy
 Halloween SuncatchersMedium