 VanGami.com
Pumpkin Basket
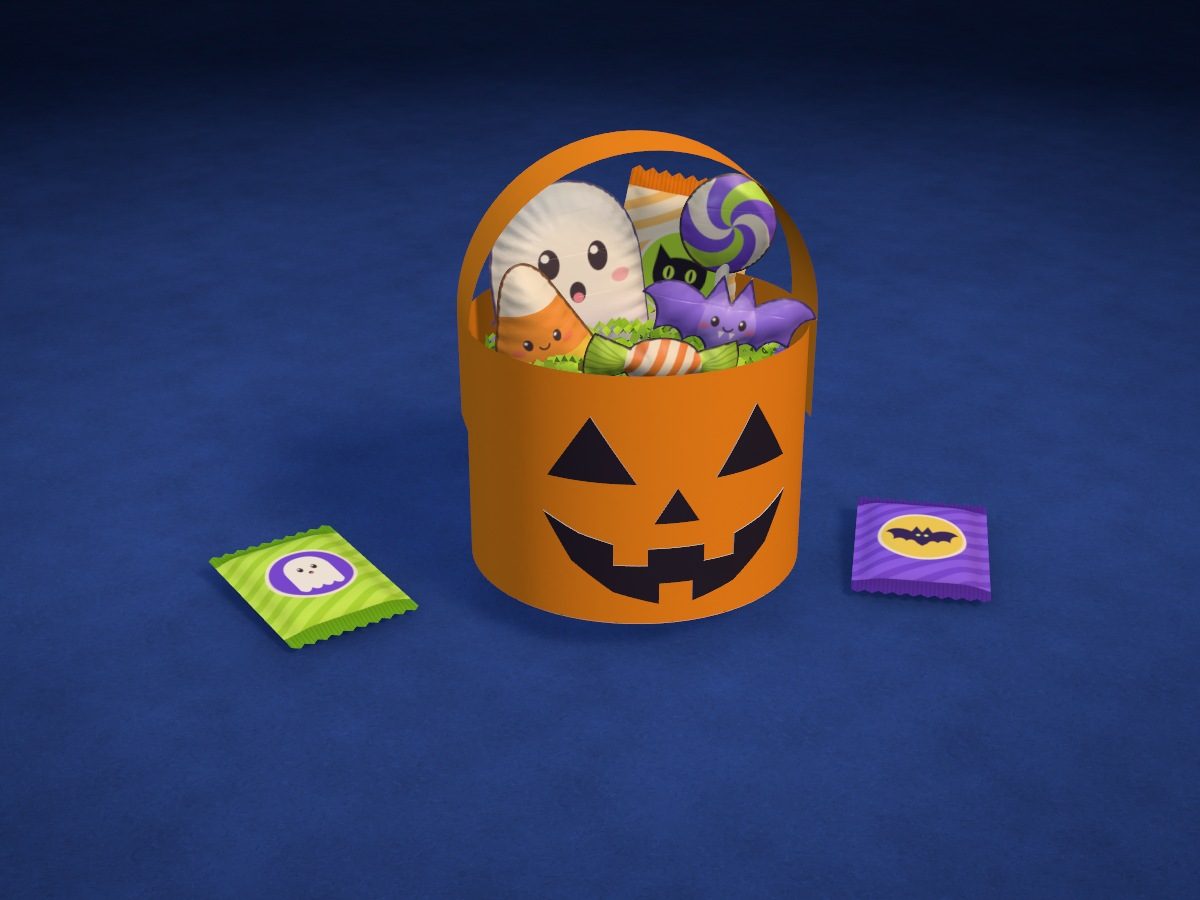
A pumpkin pail 4⅞ in wide and 3⅝ in tall, made from two orange sheets: a strip rolled into a ring, teeth that hold the bottom, and a two-layer strip for the handle. The jack-o’-lantern face is traced on white paper, colored black and glued on. Fill it with shredded paper and surprises.
- Easy
- 3 Letter sheets
- 8 pieces
- 12.4 cm wide
- 9.3 cm tall
Make it with your phone cameraLesson code: 8890
On VanGami the template appears over your sheet through your phone camera — no printer needed. Trace it, cut, fold and glue. Below are all the steps in text.
What you’ll need
- 3 Letter sheets — office paper, 80 gsm (20 lb)
- Markers
- Pencil — and eraser
- Ruler — 8–12 in
- Scissors — small
- Glue stick — or PVA glue
- Stuffing — crumpled or shredded paper — for the bottom, optional
- Surprises — candy, paper squishies, little bags
- Tape — optional: to secure the teeth and the handle ends
- Stapler — optional: to secure the handle
- Glass — phone stand
Steps
Trace
- Face: outlines. Trace the four pieces along the solid line: two triangle eyes, a nose and a mouth with three teeth. You’ll cut along these lines.
Color
- Black. Color the areas that match this color. Move the marker in one direction — you’ll get fewer streaks.
Cut
- Cut out: face — 4 pcs. Cut out the four pieces along the solid line. The mouth’s teeth are rectangular notches: make two cuts inward, bend the little tab back and snip it off along the fold.
- Cut the sheet lengthwise. Fold the blank sheet in half lengthwise, long edge to long edge, crease the fold and unfold it. Cut along the fold: you get two strips, 4¼ × 11 in.
- Short piece. Fold one strip in half crosswise, short edge to short edge, and cut along the fold. One piece will extend the wall, the other is a spare.
- Strip for the handle. On the second blank sheet, measure 2⅜ in from the long edge at both ends, connect the marks with a ruler and cut off a strip. The strip is the handle; the big piece will become the bottom.
- Color the strips. The paper is white but the basket is orange: with an orange marker, color the long strip, the wall piece and the handle strip — each on one side, all over. Leave the spare piece and the big piece uncolored.
Wall
- Extend the strip. Lay the long strip and one short piece back side up. Apply glue to the short edge of the strip, ⅝ in deep, and lay the piece over it, with the long edges in line.
- Line for the teeth. On the back of the strip, measure ⅝ in from the long edge in three places — near the ends and in the middle. Connect the marks along a ruler: the line will stay inside the basket.
- Fold the edge. Fold the edge along the line up, onto the strip, crease it with your fingernail and unfold it. This fold will make the teeth bend inward neatly later.
- Cut the teeth. Make cuts in the folded-over edge up to the line every ¾ in. You’ll get about twenty teeth: they’ll hold the bottom.
- Make the ring. Apply glue to the short edge of the strip, ⅝ in deep. Roll it into a ring with the line on the inside, lay the glued edge over the other end — with the edges in line — and press for half a minute.
Bottom
- Trace the bottom. Stand the ring on the big piece of the second sheet, teeth up, uncut edge down, and trace around the outside with a pencil. Don’t squeeze the ring: it should stay round.
- Cut out the bottom. Remove the ring and cut out the circle along the pencil line. This is the bottom of the basket.
- Teeth inward. Fold all the teeth inward along the line and flip the ring so the teeth face down. Neighboring teeth will overlap — that’s how it should be.
- Glue on the bottom. Apply glue to the edge of the circle in a ⅝ in band and stand the ring on it, teeth down. Press each tooth from the inside with your finger or the blunt end of a pencil.
Assemble
- Fold the handle. Apply glue to the 2⅜ × 11 in strip on the back side and fold it in half lengthwise, colored side out. You get a two-layer handle 1⅛ in wide.
- Glue on the handle. Apply glue to the ends of the handle, 1⅝ in on each, and press them to the outside of the wall: one over either of the two seams, the other exactly opposite. Hold each one for half a minute.
- Pumpkin face. Glue the face midway between the handle ends, on the side without a seam: the mouth ⅜ in from the bottom, the nose above it, and the two eyes higher up. Try the pieces on first, without glue.
- Fill the basket. Put crumpled or shredded paper on the bottom, and the surprises on top: candy, squishies, little bags. Pick up a heavy basket from underneath, not by the handle.
Done. The pumpkin basket is done. Let the glue dry for half an hour; hold a heavy basket from underneath — the paper handle only supports light things.
Make it with your phone camera
 PumpkinMedium
 GhostMedium
 Star PiñataHard
 Cobweb with a SpiderEasy
 Paper Chain GarlandEasy
 La CatrinaHard