 VanGami.com
Potted Cactus
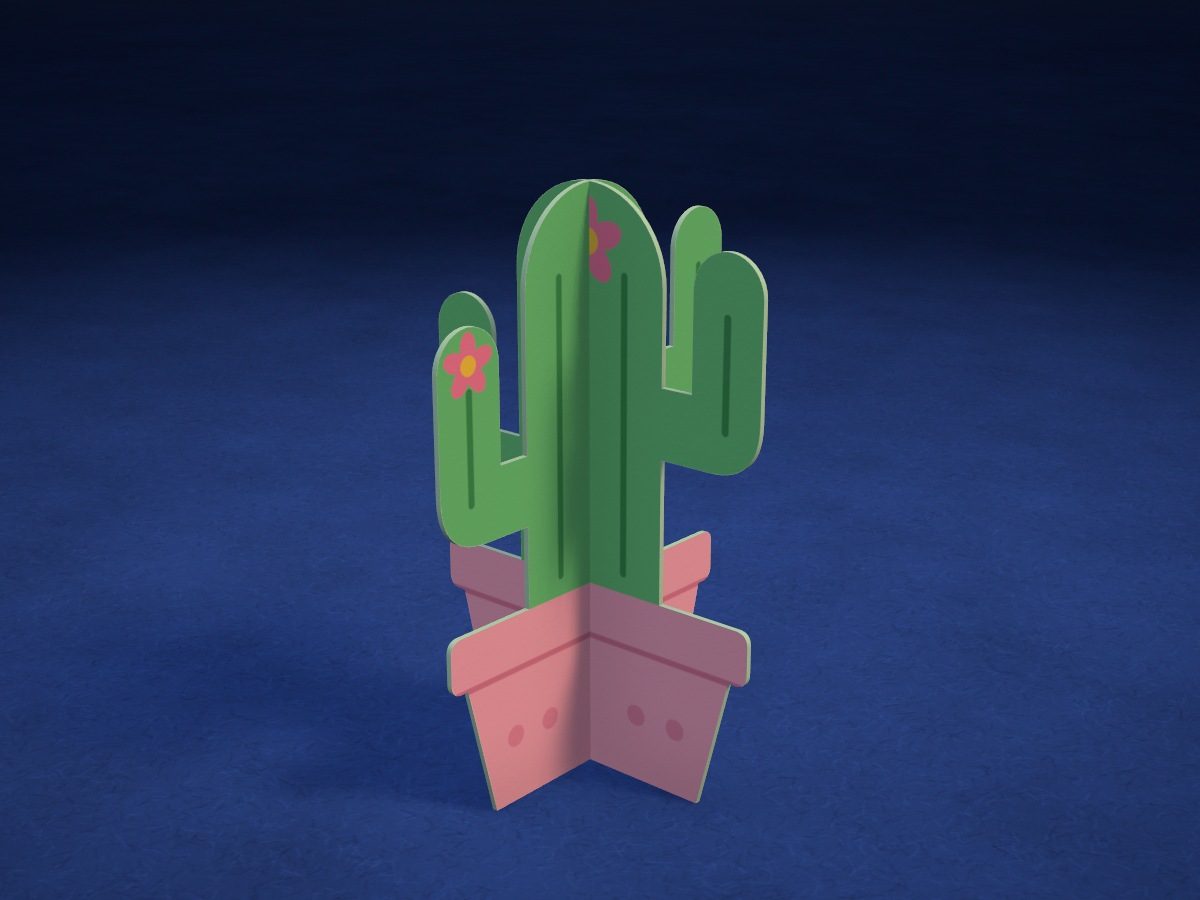
A flowering cactus in a pink pot that stands on the table by itself: two silhouettes slot into each other crosswise through slits. Each silhouette is two layers glued together, so the cactus is decorated on every side.
- Easy
- 1 Letter sheet
- 4 pieces
- 2 slits
Make it with your phone cameraLesson code: 7699
On VanGami the template appears over your sheet through your phone camera — no printer needed. Trace it, cut, fold and glue. Below are all the steps in text.
What you’ll need
- Letter sheet — office paper, 80 gsm (20 lb)
- Markers
- Pencil — and eraser
- Scissors — small
- Glue stick — or PVA glue
- Glass — phone stand
Steps
Trace
- First cactus: outlines. Trace the two silhouettes with a solid line: the cactus and its mirror-image back. You’ll cut along these lines.
- First cactus: slit. The line down the middle of the left silhouette is a slit from the top to the middle. You’ll cut it after gluing.
- First cactus: drawing. On both silhouettes, trace the ridges on the trunk and arms, the rim and dots on the pot, and the flower.
- Second cactus: outlines. Trace the two silhouettes with a solid line: the cactus and its mirror-image back. You’ll cut along these lines.
- Second cactus: slit. The line down the middle of the left silhouette is a slit from the bottom of the pot to the middle. You’ll cut it after gluing.
- Second cactus: drawing. On both silhouettes, trace the ridges on the trunk and arms, the rim and dots on the pot, and the flower.
Color
- First cactus: coloring. Both silhouettes: cactus — green, ridges — dark green, pot — pink, flower center — yellow.
- Second cactus: coloring. Both silhouettes: cactus — green, ridges — dark green, pot — pink, flower center — yellow.
Cut
- Cut out: first cactus — 2 pcs. Cut out both silhouettes along the outline. Don’t cut the slit yet: you’ll cut it after gluing, through both layers at once.
- Cut out: second cactus — 2 pcs. Cut out both silhouettes along the outline. Don’t cut the slit yet: you’ll cut it after gluing, through both layers at once.
Glue
- Glue the first cactus. Turn the back layer face down and spread glue over the whole blank side. Lay the first cactus on it drawing side up, edge to edge, and smooth it with your palm.
- Glue the second cactus. Glue the second cactus the same way: back layer face down, glue over the whole blank side, cactus on top edge to edge.
Assemble
- Cut the slits. Cut through both layers at once: on the first cactus, from the top down the line to its end; on the second, from the bottom of the pot to the end of the line.
- Slot them together crosswise. Stand the first cactus with its slit facing up. Turn the second one crosswise and slide it on from above, slit facing down: the slits fit all the way into each other, and the bottoms of the pots sit level on the table.
Done. The cactus is done and stands on its own. Make a whole shelf of them: you can draw your own silhouettes — just keep the slits on the center line and exactly to the middle.
Make it with your phone camera
 PumpkinMedium
 GhostMedium
 Star PiñataHard
 Cobweb with a SpiderEasy
 Paper Chain GarlandEasy
 La CatrinaHard