 VanGami.com
Paper Strip Pumpkin
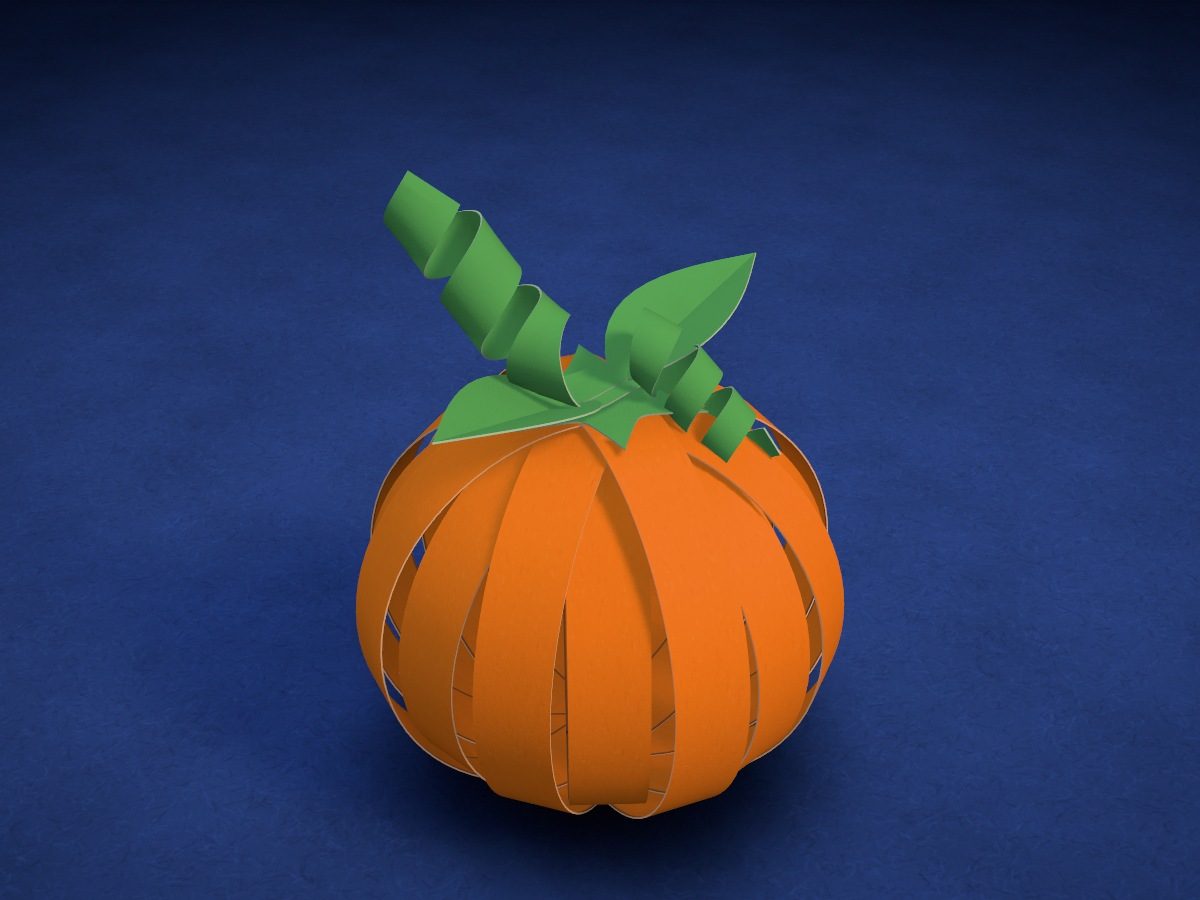
Eight orange strips are glued together at their middles into a star, and their ends are lifted and gathered at the top — you get a ball of sixteen arcs. On top: a green calyx, two leaves and two curls wound around a pencil.
- Easy
- 8 strips
- 16 arcs in the ball
- 2 Letter sheets
- 8 cm wide
Make it with your phone cameraLesson code: 9241
On VanGami the template appears over your sheet through your phone camera — no printer needed. Trace it, cut, fold and glue. Below are all the steps in text.
What you’ll need
- 2 Letter sheets — office paper, 80 gsm (20 lb)
- Markers
- Pencil — and eraser
- Ruler — 11¾ in
- Scissors — small
- Glue stick — or PVA glue
- Glass — phone stand
Steps
Sheet 1
- Sheet 1: orange sheet. The orange sheet should be under the camera now. The template has 2 sheets. The sheet is white — the pieces get their color in the coloring step.
- Strips: outlines. Draw nine long lines with a ruler, ½ in apart, and close them off at the top and bottom. You’ll get eight 9⅞ × ½ in strips side by side with no gaps.
- Strips: middle. Draw one line across all the strips, 4⅞ in from the edge. Each strip will be left with a tick mark: the strips meet on these marks to form a star.
- Orange. The paper is white, but these parts should be this color on both sides: color them up to the outline, then turn the sheet over and color the back.
Sheet 2
- Sheet 2: green sheet. Remove the previous sheet and put the green sheet in its place, lined up edge to edge. Don’t move the phone — the scale stays the same. The sheet is white — the parts get their color at the coloring step.
- Calyx. Trace the six-point star. It will cover the top of the pumpkin.
- Pumpkin leaves: outlines. Trace two leaves: pointed tip, round base.
- Leaves: veins. Draw the fold line down the middle of each leaf as a dashed line, from the tip to the base.
- Curls: outlines. Draw two strips with a ruler: the wide one, 4⅜ × ⅜ in, is the stem; the narrow one, 4¾ × 3/16 in, is the tendril.
- Green. The paper is white, but these parts should be this color on both sides: color them up to the outline, then turn the sheet over and color the back.
Cut
- Cut out: strips — 8 pcs. Cut out the block of strips along its edge, then cut it apart along the long lines — you’ll get eight strips. Take your time: the more even the strips, the more even the pumpkin.
- Cut out: calyx. Cut with scissors along the solid line. Turn the sheet, not the scissors — the cut will come out neater.
- Cut out: leaf — 2 pcs. Cut with scissors along the solid line. Turn the sheet, not the scissors — the cut will come out neater.
- Cut out: curls — 2 pcs. Cut out both strips. Cut the narrow one slowly: it’s only 3/16 in wide.
Star
- Cross. Lay one strip with the tick mark facing up, apply glue to the middle, and glue the second one on crosswise: tick mark on tick mark.
- Second cross. Glue on two more strips the same way, but diagonally — halfway between the arms of the cross. Now there are eight arms.
- Four more strips. Glue the last four strips into the gaps between the arms. The sixteen-arm star is done: press down on the middle and wait a minute.
Ball
- First ring. Take the top strip of the star. Lift both of its ends, bring them together over the middle, and glue them with an overlap the width of the strip — you’ve made a ring.
- The other seven. From here on, each time take the strip that’s on top: put glue on both tips on the upper side, then press the ends onto the top, right over the previous ones. Do all seven this way.
- Even out the arcs. Adjust the arcs with your fingers so the gaps between them are even. The pumpkin stands straight, with the top right above the middle.
Top
- Calyx. Apply glue to the top and cover it with the star, pencil side down: it hides the ends of the strips. Press the points down onto the arcs.
- Fold the leaves. Fold each leaf in half along the line, pencil side out. Crease the fold, then open it slightly.
- Glue on the leaves. At the round base of each leaf, flatten the fold for 3/16 in and apply glue. Glue it to the middle of the cap, fold side down: the tips point in different directions and slightly up.
- Wind the curls. Wrap each green strip tightly around a pencil diagonally, without overlapping, leaving ⅜ in at the start straight. Hold for ten seconds, then take it off.
- Glue on the curls. Glue the straight tips to the middle, over the leaves. Bend the wide curl up at the very tip and crease the fold with your fingernail — that’s the stem; let the narrow one hang down as a tendril.
Done. The pumpkin is done. The same template makes a white or cream one — a matching pair.
Make it with your phone camera
 PumpkinMedium
 GhostMedium
 Star PiñataHard
 Cobweb with a SpiderEasy
 Paper Chain GarlandEasy
 La CatrinaHard