 VanGami.com
Paper Phone
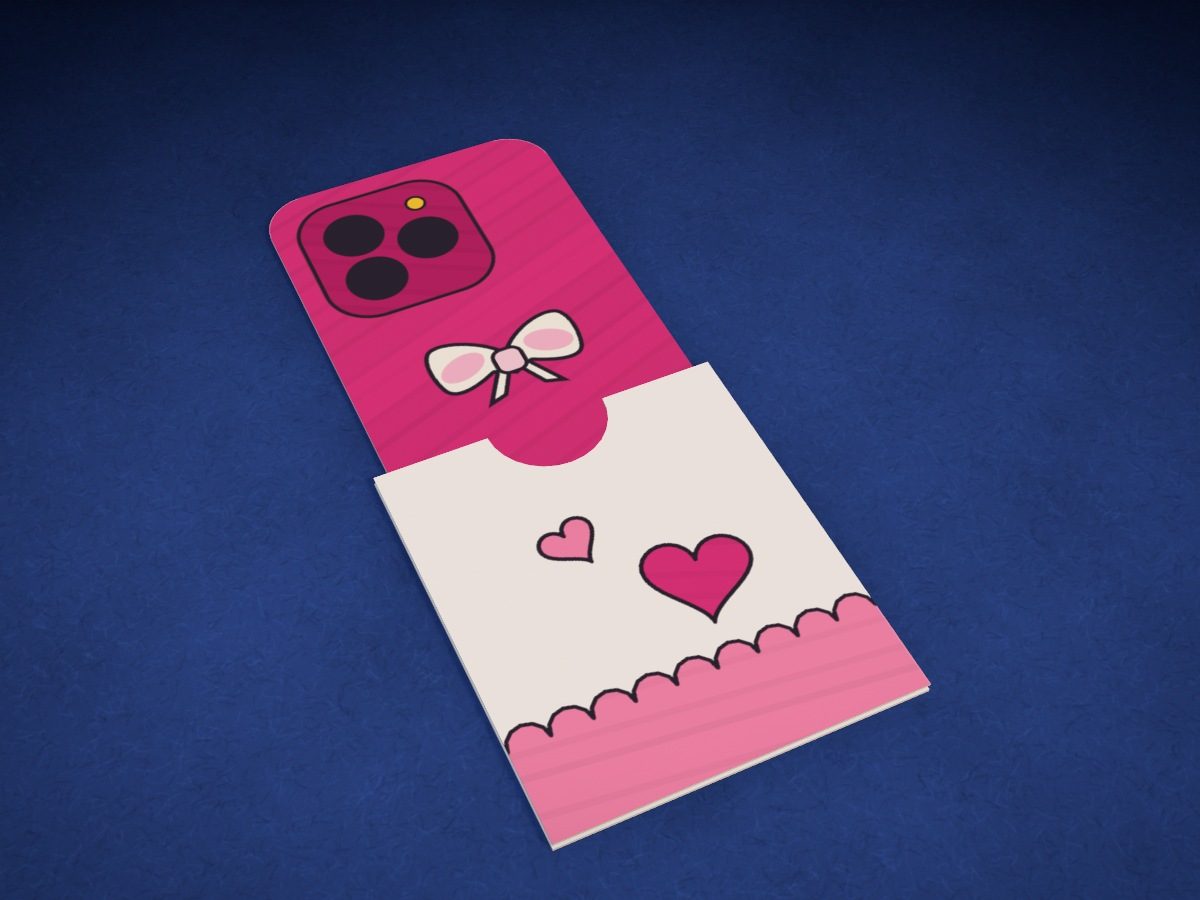
A flat, life-size smartphone and a white box case for it, all from a single sheet of paper. One side has a camera module and a little bow; the other has a screen with a clock and icons. The blanks are made with folds and a ruler, and the drawing is traced through the camera.
- Easy
- 1 Letter sheet
- 5 folds
- 14 cm tall
Make it with your phone cameraLesson code: 7076
On VanGami the template appears over your sheet through your phone camera — no printer needed. Trace it, cut, fold and glue. Below are all the steps in text.
What you’ll need
- Letter sheet — office paper, 80 gsm (20 lb)
- Markers
- Pencil — and eraser
- Ruler — 8–12 in
- Scissors — small
- Glue stick — or PVA glue
- Tape — optional, 3⅛ in
- Glass — phone stand
Steps
Blanks
- Cut off the strip. Lay the sheet vertically. Use a ruler to measure 2½ in from the left edge, at the top and at the bottom, join the marks with a line and cut a strip along it.
- Fold the phone. Apply glue to half of the strip and fold it in half, short edge to short edge. Smooth it from the fold out to the edges — you get a stiff phone blank, 2½ × 5½ in.
- The rest, in quarters. Lay the remaining piece horizontally and fold it in half, short edge to short edge. Then fold it in half again in the same direction; crease both folds with your fingernail.
- Cut off a quarter. Unfold it: three folds divide the piece into four equal parts. Cut off either end part along the fold — you won’t need it. The two remaining folds must face the same way: if they don’t, bend one back.
- Fold and glue. Lay the piece with the valley folds up and trim a strip of 1/16–⅛ in off the left edge, so the left part doesn’t run into the fold. Fold it over onto the middle part, apply glue on top, fold the right part over it and press.
- Glue the bottom shut. Measure 2¾ in from one open edge and fold that edge over along a ruler. Apply glue under it and press down: the side with the folded edge is the back of the box, and the smooth side is the front.
Trace
- Back: blank under the camera. Place the phone blank in the frame: the edge without a fold goes to the camera square, the long edges go on the long lines, and the end with the fold sticks out past the frame. If the frame is wider or narrower than the blank, unlock the template, pinch or spread it with two fingers, and lock it again.
- Back: cameras and bow. Trace a square with rounded corners using thin lines: inside it, three lens circles and a small flash circle; next to it, the bow. Don’t trace the frame: it marks the edges of the blank.
- Screen, top: flip it over. Flip the blank over, clean side up, and place it in the frame again: the edge without a fold goes to the rounded edge of the screen, and the end with the fold sticks out past the frame. Don’t trace the frame.
- Screen, top: clock. Trace the screen frame 3/16 in from the edge and the two arcs in the corners — you’ll cut the corners along them later. Inside: the camera dot, the clock, and a banner with a little heart.
- Screen, bottom: slide the blank. Slide the blank along its length without flipping it: the frame now holds the half with the fold, and the fold is at the rounded edge of the screen. The screen frame you already drew continues with the lines of the template.
- Screen, bottom: icons. Extend the screen frame to the fold and add two more arcs in the corners. Inside: six square icons and a line; copy the pictures on the icons or make up your own.
- Box: under the camera. Place the box in the frame smooth side up: the open edge goes on the line with the half circle, and the bottom goes where the wavy border is. Don’t trace the frame.
- Box: design. Trace the two little hearts, the wavy border at the bottom, and the half circle at the open edge — the notch for your finger.
Color
- Back: color. Flip the blank so the cameras face up. Don’t color the bow, the lenses, or the flash; color everything else raspberry, even past the frame all the way to the fold, and give the camera square a second layer. Then color the lenses black and the flash yellow.
- Screen, top: color. Flip the blank so the screen faces up. Color the screen around the banner light blue; the banner and the margin outside the frame stay white. Then go over the clock, the camera dot, and the frame in black, and color the little heart pink.
- Screen, bottom: color. Color the screen around the icons light blue. Color the icons raspberry, pink, and yellow; go over the pictures on them, the line, and the frame in black on top of the color.
- Box: color. Color the big heart raspberry, and the small heart and the border from the wavy line down to the bottom pink. Don’t color the half circle.
Cut
- Round the corners. Place the phone screen up and cut off the four little corners along the arcs. You can cut both layers at once.
- Finger notch. At the open edge of the box, cut out a half circle along the line: first in the front, then in the back, following the first cut. The notch makes it easy to pull the phone out.
Check
- Insert the phone. Slide the phone into the box with the cameras facing up, fold end first. It goes in easily and sticks out 2⅜ in.
- Pull it out and flip it. Pull the phone by its edge in the notch and it slides out of the box. Flip it over: the other side has the screen with the clock.
Done. The phone is done. Slide it into the box with the cameras facing up and pull it out by the edge in the notch.
Make it with your phone camera
 Paper MakeupMedium
 Magic CircleHard
 Dress-Up Doll: Gamer GirlMedium
 Dress-Up Doll: SwordsmanMedium
 Blind BagMedium
 Finger PuppetsEasy