 VanGami.com
Nutcracker
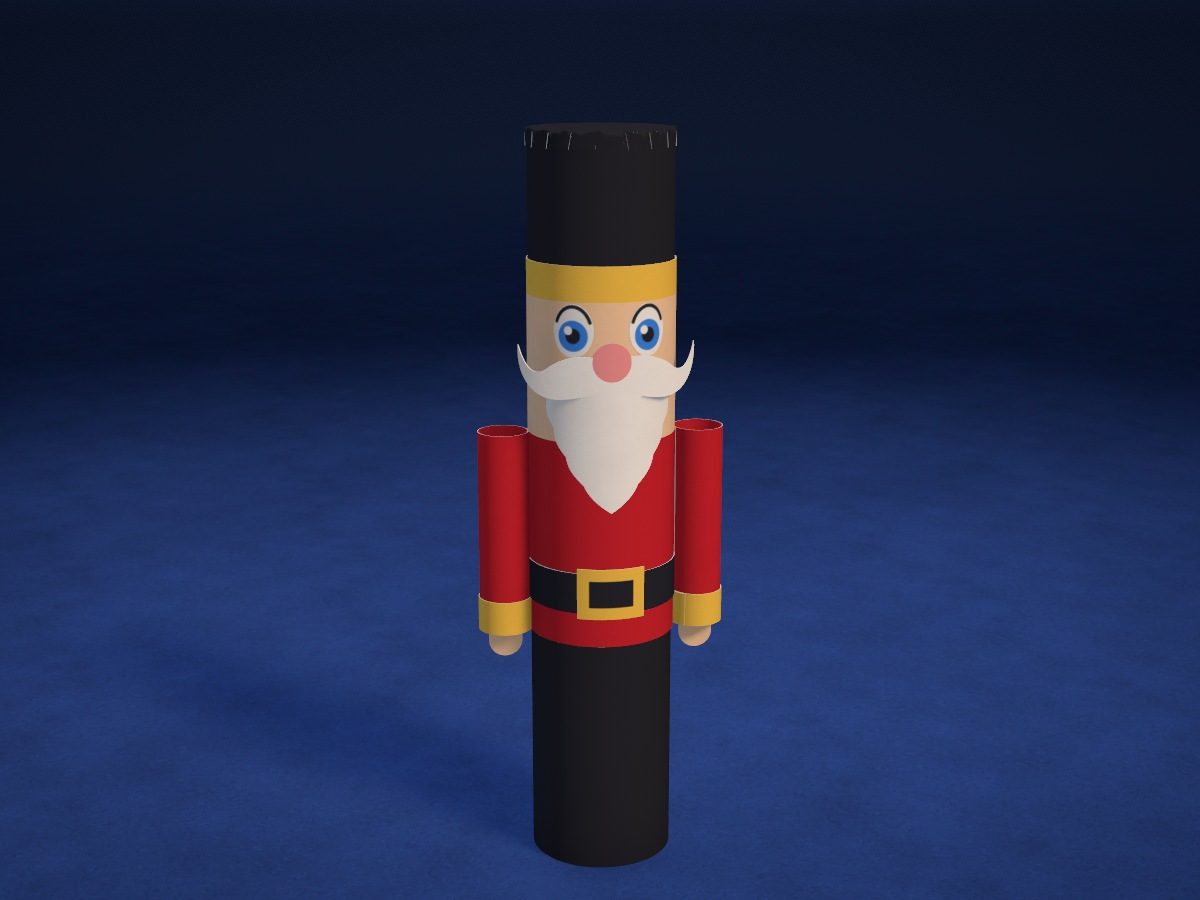
An 8½ in tall nutcracker made from a paper tube. The jacket, belt, face and trim are strips wrapped around the tube, the arms are little tubes with cuffs; the beard, mustache and eyes are cut out from the template.
- Medium
- 21.6 cm tall
- 3 Letter sheets
- 13 assembly steps
Make it with your phone cameraLesson code: 2131
On VanGami the template appears over your sheet through your phone camera — no printer needed. Trace it, cut, fold and glue. Below are all the steps in text.
What you’ll need
- 2 Letter sheets — office paper, 80 gsm (20 lb)
- Markers
- Pencil — and eraser
- One more Letter sheet — printer paper, 80 gsm (20 lb): tube, belt, and hat top
- Ruler — 8–12 in
- Scissors — small
- Glue stick — or PVA glue
- Glass — phone stand
Steps
Sheet 1
- Sheet 1: white sheet. The white sheet should be under the camera now. The template has 2 sheets.
- Nutcracker face: outlines. Trace 4 pieces with a solid line: nutcracker beard, mustache, eye (2 pcs). You’ll cut along these lines.
- Nutcracker face: drawing. Copy the drawing with thin lines: the picture on the screen is your guide. It doesn't have to be exact to the millimeter.
- Color: eyes. Color the iris blue, the pupil and the eyelid line black. Leave the white highlight white.
Sheet 2
- Sheet 2: beige sheet. Remove the previous sheet and put the beige sheet in its place, edge to edge. Don't move the phone — the scale will stay the same. The sheet is white — the parts get their color at the coloring step.
- Hands and nose: outlines. Trace 3 pieces with a solid line: hand (2 pcs), nose. You'll cut along these lines.
- Beige. The paper is white, but these parts should be this color: color them in completely, up to the outline. Move the marker in one direction.
- Pink. Color the areas that match this color. Move the marker in one direction — you’ll get fewer streaks.
Cut
- Cut out: nutcracker face — 4 pcs. Cut with scissors along the solid line. Turn the sheet, not the scissors — the cut will come out neater.
- Cut out: hands and nose — 3 pcs. Cut with scissors along the solid line. Turn the sheet, not the scissors — the cut will come out neater.
- Nutcracker tube. Fold one more sheet in half, short edge to short edge, unfold it, and cut along the fold. One half is for the nutcracker’s tube, the other for the belt and hat top.
- Black. On one half, color black 3 in at one short edge and 1⅝ in at the other — those are the boots and hat; the uniform and face will cover the middle. Use your thickest black marker.
- Belt. From the second half, cut a 5⅞ × ½ in strip with a ruler and color it black — that’s the belt. Don’t throw away the leftover: it will make the hat top.
- Red pieces. On the leftover white sheet, mark a 5⅞ × 2⅜ in strip with a ruler — the uniform — and two 2 × 2⅜ in rectangles — the arms. Color them red, going slightly past the lines, and cut them out.
- Yellow pieces. On the same sheet, mark a 5⅞ × ⅜ in strip — the hat band, two 2⅛ × ⅜ in strips — the cuffs, and a ¾ × ⅝ in rectangle — the buckle. Color them yellow and cut them out.
- Face strip. At the bottom of the beige sheet, mark a 5⅞ × 1⅝ in strip with a ruler, color it beige, going slightly past the lines, and cut it out — that’s the nutcracker’s face.
Nutcracker
- Roll the tube. Roll the colored half into a tube 8½ in tall, color side out, with the long edges overlapping by ⅜ in. Apply glue to the edge and press the seam from the inside with a ruler along its whole length.
- Hat top. Stand the tube on the leftover of the second half and trace around it. Cut out a circle 3/16 in wider than the line, color it black, and snip the edge in to the line every ⅜ in.
- Top goes on the hat. Fold the tabs down along the line. Apply glue to the outside of the top of the hat, in a 3/16 in strip, and put on the top, pressing the tabs against the sides.
- Jacket. Apply glue to the start of the red strip and set it on the tube's seam: the bottom of the strip is 2¾ in above the bottom of the tube. Wrap the strip around, overlapping the end onto the glue.
- Belt and buckle. Wrap the belt over the jacket, ⅜ in from its bottom, with the seam at the back. Color the middle of the buckle black, leaving a frame, and glue it to the front of the belt.
- Face. Wrap the beige strip snug above the jacket, with the start and end on the seam at the back. This is the nutcracker's face.
- Hat trim. Wrap the 5⅞ × ⅜ in yellow strip snug above the face, with the seam at the back. The black top of the tube above it is the hat.
- Beard and mustache. Glue the beard on the front, opposite the seam: its top at the middle of the face, its bottom will rest on the jacket. Glue the mustache over the top of the beard; put glue only on the middle of the mustache and leave the tips free.
- Eyes and nose. Glue the eyes above the mustache, ⅜ in apart, with their tops almost touching the trim. Glue the nose in the middle, on the center of the mustache.
- Arms. Roll the red rectangles into tubes 2⅜ in tall, overlapping by 3/16 in, and glue them. It helps to wrap them around a thick marker.
- Cuffs. Wrap the yellow strips around the bottom of the arms, flush with the edge: start on the seam, overlap the end onto the glue.
- Arms to shoulders. Apply glue along the whole seam of each arm and press the arm to the side, seam against the body, top flush with the top of the jacket. Hold for a minute.
- Hands. Apply glue to the top of the hand and insert it into the arm from below, 3/16 in deep, palm facing forward. Squeeze the bottom of the arm with your fingers so the hand sticks.
Done. The nutcracker is done. The leftover white and beige sheets are enough for a second one — you only need a new sheet for the tube.
Make it with your phone camera
 PumpkinMedium
 GhostMedium
 Star PiñataHard
 Cobweb with a SpiderEasy
 Paper Chain GarlandEasy
 La CatrinaHard