 VanGami.com
Mini Pistol with Paper Pellets
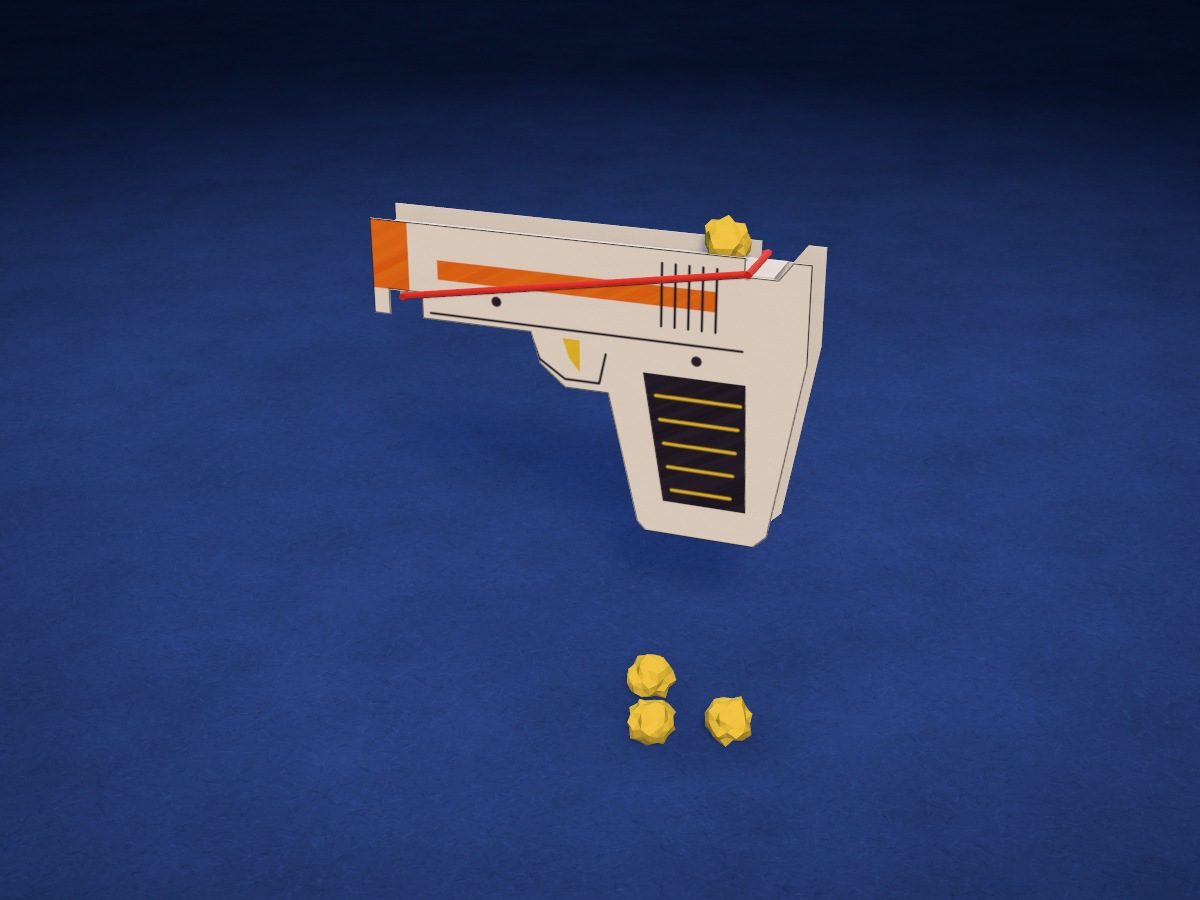
Two side panels on spacer tubes, with a channel along the top. A rubber band is hooked on the notches under the muzzle and stretched along the sides to the hammer, with a paper ball in front of it. Lift the band off the hammer and the ball shoots out of the muzzle.
- Medium
- 15 steps
- 4 pieces
- 1 Letter sheet
Make it with your phone cameraLesson code: 8708
On VanGami the template appears over your sheet through your phone camera — no printer needed. Trace it, cut, fold and glue. Below are all the steps in text.
What you’ll need
- Letter sheet — office paper, 80 gsm (20 lb)
- Markers
- Pencil — and eraser
- Scissors — small
- Glue stick — or PVA glue
- Ruler — 8–12 in
- Empty pen — to score the folds
- Money rubber band — 1–2 pcs, 1⅝–2 in across
- Paper scraps — for the pellets
- Glass — phone stand
Steps
Trace
- Left side: outline. The pistol’s silhouette with the muzzle pointing right. At the top back there’s the hammer notch, and at the bottom near the muzzle the lower notch — trace those too.
- Left side: design. The stripe along the barrel, the muzzle, the grip plate, the trigger in its guard, and the grooves.
- Right side: outline. The same silhouette, but with the muzzle pointing left — the other side, a mirror image.
- Right side: design. The same design, mirrored.
- Tubes: outlines. Two strips with a ruler: the long one is the barrel, the short one is the grip.
- Tubes: folds. The lengthwise lines are dash-dot lines: the strips will fold into square tubes along them.
Color
- Color: left side. Color the stripe and the muzzle orange, the grip plate black with yellow stripes, and the trigger yellow.
- Color: right side. Same here: orange stripe and muzzle, black grip, yellow trigger.
Cut
- Cut out: left side. Cut with scissors along the solid line. Turn the sheet, not the scissors — the cut will come out neater.
- Cut out: right side. Cut with scissors along the solid line. Turn the sheet, not the scissors — the cut will come out neater.
- Cut out: tubes — 2 pcs. Cut with scissors along the solid line. Turn the sheet, not the scissors — the cut will come out neater.
Fold
- Tubes. Score the dashed lines with an empty pen along a ruler. Fold both strips into square tubes, put glue on the narrow tab and glue it inside.
Glue
- Glue the body together. Put the left side design side down. Glue the barrel along the top between the notches, and the grip tube into the grip area. Put glue on top of the tubes and cover them with the right side, design side up, edge to edge.
Assemble
- Rubber band. Slip the rubber band onto the lower notches under the muzzle. Run it back along the sides and hook it from above on the hammer notch: the back strand will lie across the channel.
Fire
- Load and fire. Crumple a ball about ⅜ in across and put it in the channel in front of the rubber band. Aiming at a target, lift the rubber band out of the notch with your thumb — it snaps forward and pushes the ball out.
Done. The gun is ready. Shoot only at targets — cups, cubes, paper figures — not at people or animals.
Make it with your phone camera
 Paper PlaneEasy
 Paper PopperEasy
 Paper GunMedium
 Paper HelicopterEasy
 Dart ShotgunHard
 Karambit and DaggerMedium