 VanGami.com
Cone Santa
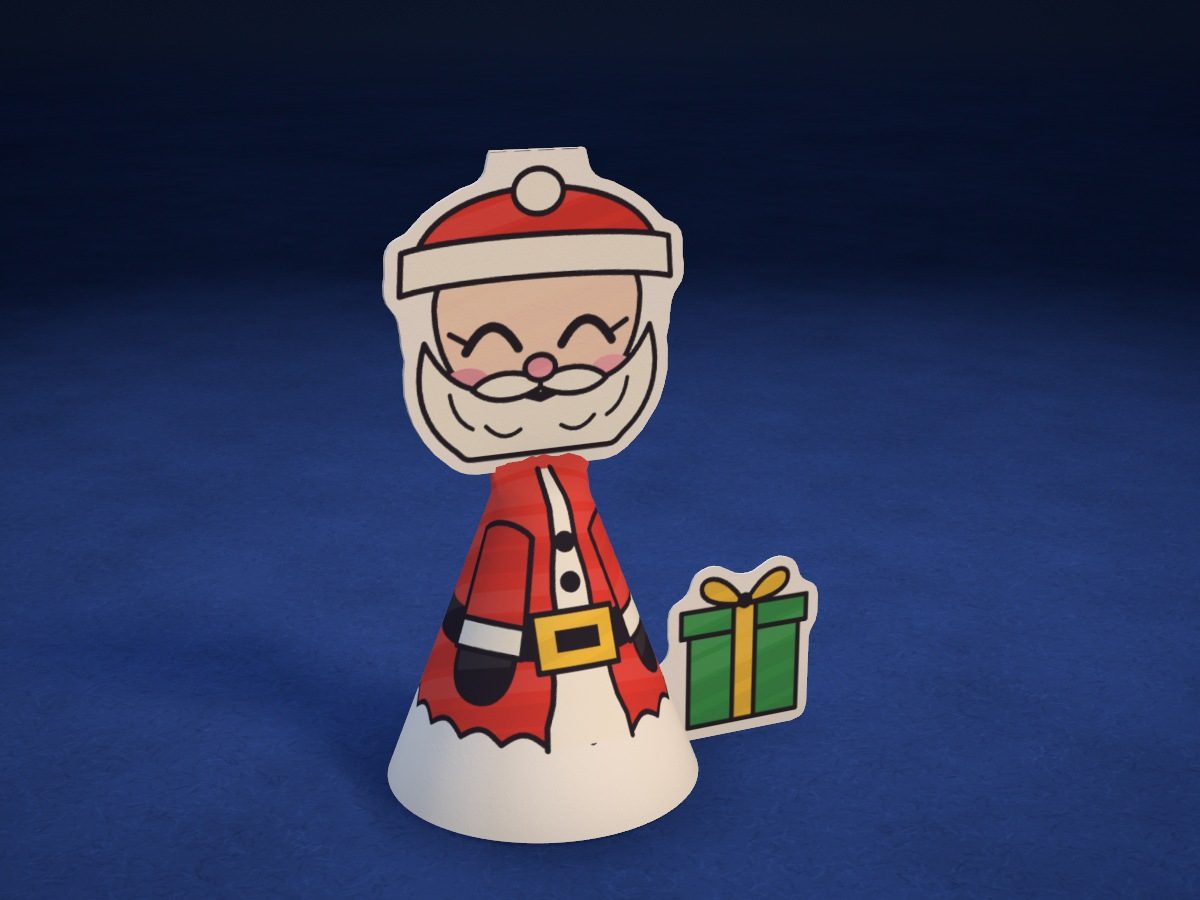
A Santa 4⅜ in tall: his coat is a paper cone, and his head with the hat and beard is made of two halves. Next to him stands a gift with a yellow bow.
- Easy
- 11 cm tall
- 3 pieces
- 1 Letter sheet
Make it with your phone cameraLesson code: 5939
On VanGami the template appears over your sheet through your phone camera — no printer needed. Trace it, cut, fold and glue. Below are all the steps in text.
What you’ll need
- Letter sheet — office paper, 80 gsm (20 lb)
- Markers
- Pencil — and eraser
- Scissors — small
- Glue stick — or PVA glue
- Glass — phone stand
Steps
Trace
- Coat: outline. Trace the solid line: the two straight sides from the pointed corner and the arc at the bottom. You'll cut along it.
- Coat: drawing. Trace the drawing with thin lines. Three more lines: along the right straight edge, the edge of the glue strip (don’t color the strip); near the sharp corner, a short arc, the neck line; and on the side, a short straight line, the mark: you’ll glue the tab to it.
- Head and gift: outlines. Trace 2 pieces with a solid line: the head and the gift. You’ll cut along these lines.
- Head and gift: folds. Draw a dashed line across the top of the head — the head will be folded in half along it — and a line on the gift. Don’t cut along dashed lines.
- Head and gift: drawing. Copy the drawing with thin lines: the picture on the screen is your guide. It doesn't have to be exact to the millimeter.
Color
- Color: coat. Coat and sleeves — red; leave the fur at the hem, the strip down the front and the cuffs white. Belt, buttons and mittens — black, buckle — yellow. Go over the drawing lines with black.
- Color: head and gift. Hat — red; leave the trim, the pom-pom, the mustache and the beard white. Face — skin tone, nose and cheeks — pink. Gift — green, ribbon and bow — yellow; leave the gift’s tab white — it will lie on the white fur. Go over the drawing lines with black.
Cut
- Cut out: coat. Cut out the coat along the outline: cut the straight sides in one motion, and turn the sheet as you cut the arc.
- Cut out: head and gift — 2 pcs. Cut out the head in one piece — face and back together; don’t cut along the dashed line on top. Cut out the gift together with its tab.
- Color the back. Flip the gift face down and color the back: the whole gift green, tab included. The drawing shows through a little — follow it.
Glue
- Roll the coat. Apply glue to the narrow strip along the right edge. Roll the piece into a cone with the drawing facing out and lay the left edge over the strip up to the line: the bottom should become an even circle. Press the seam.
- Head on top. Flatten the top of the coat with your fingers down to the neck line — the seam goes at the back. Lay the head face down, unfolded, and apply glue to the whole back side. Place the flattened top on the half with the face — the neck line along the bottom edge of the head — and cover it with the back of the head, folding along the dashed line. Hold for 20–30 seconds.
Assemble
- Gift. Fold the gift’s tab back along the dashed line, apply glue to it, and press it to the right side of the coat at the hem: the gift stands on the table next to Santa. The fold goes at the mark on the side. Hold for 20–30 seconds until the glue sets.
Done. Santa is done: he stands in his red coat and pom-pom hat, with a gift by his hem. Put him under the tree or on a shelf — or make a whole crew for the holidays.
Make it with your phone camera
 PumpkinMedium
 GhostMedium
 Star PiñataHard
 Cobweb with a SpiderEasy
 Paper Chain GarlandEasy
 La CatrinaHard