 VanGami.com
Ice Cream Cone
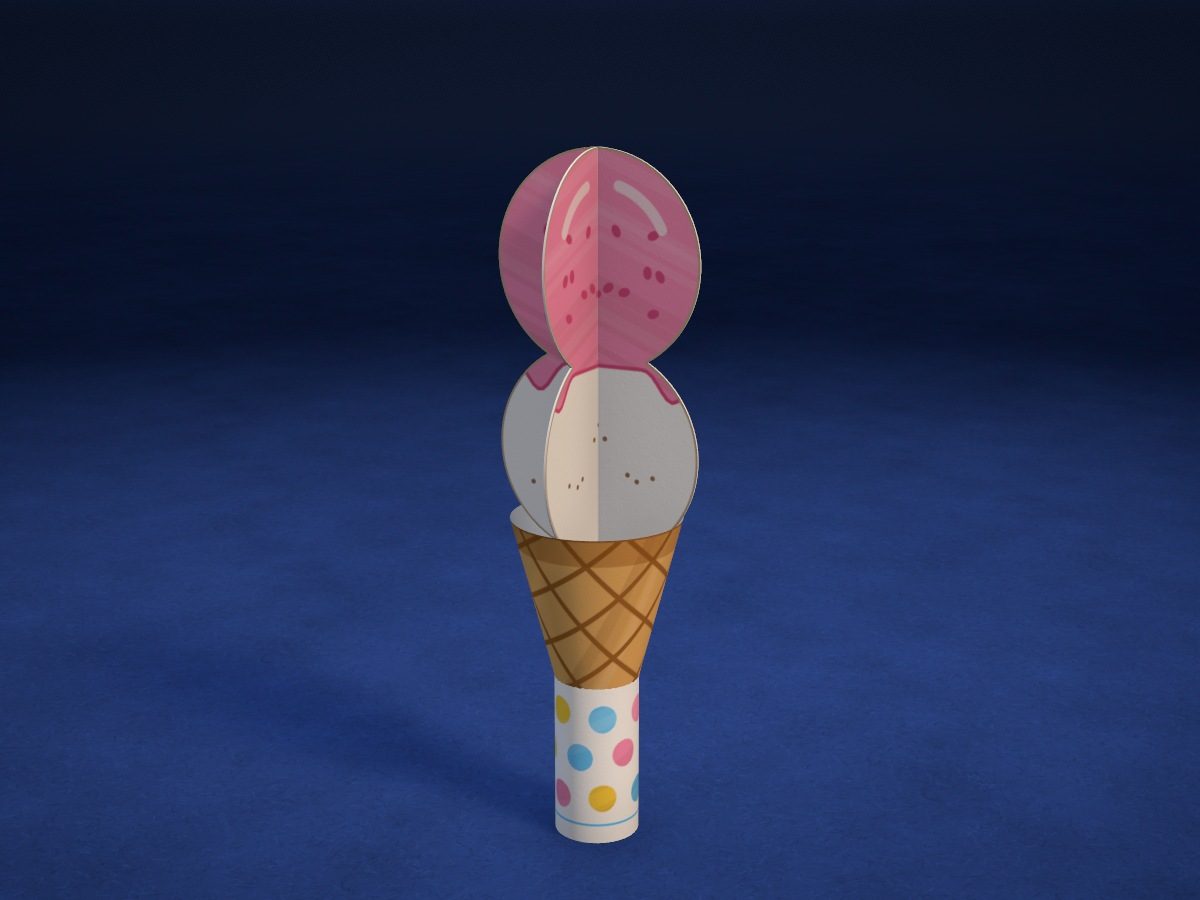
A waffle cone with two scoops — vanilla, and strawberry with drips. The scoops are 3D: two paper figure-eights slotted into each other crosswise. The cone stands in a tube holder.
- Easy
- 2 balloons
- 14 cm tall
- 1 Letter sheet
Make it with your phone cameraLesson code: 4717
On VanGami the template appears over your sheet through your phone camera — no printer needed. Trace it, cut, fold and glue. Below are all the steps in text.
What you’ll need
- Letter sheet — office paper, 80 gsm (20 lb)
- Markers
- Pencil — and eraser
- Scissors — small
- Glue stick — or PVA glue
- Ruler — 8–12 in
- Glass — phone stand
Steps
Trace
- Cone and holder: outlines. Trace a quarter circle with a narrow strip on the left — that’s the cone — and next to it the strip for the holder.
- Cone and holder: drawing. On the cone, draw the line that marks the glue area and a waffle grid (with a ruler or freehand). On the holder, draw the glue-area line and polka-dot circles.
- Balloons: outlines. Two figure eights — each one made of two circles, with a slit down the middle up to the narrow waist: on one it starts at the top, on the other at the bottom.
- Scoops: drips. A wavy line at the narrow waist — the drips of the strawberry scoop.
Color
- Cone and holder: coloring. Color the cone orange, except the glue area; draw the grid over it in brown, and add a darker stripe along the arc. Color the polka dots pink, yellow and light blue, and the strip along the edge light blue.
- Balloons: coloring. Color the part above the drips pink and add darker berry speckles. Leave the vanilla scoop white, with only brown dots.
Cut
- Cut out: cone and holder — 2 pcs. Cut with scissors along the solid line. Turn the sheet, not the scissors — the cut will come out neater.
- Cut out: balloons — 2 pcs. Cut out both figure-eights along the outline. The slit is a single snip with the scissors along the line, right up to the narrow waist.
- Color the back. You can see the scoops from both sides. Flip the figure-eights over and color the back of the strawberry scoop pink down to the drips; put a few dots on the vanilla one.
Assemble
- Roll the cone. Apply glue to the margin on the left. Roll the quarter circle into a cone with the drawing facing out — sharp tip at the bottom — and lay the edge on the line. Hold for 10 seconds.
- Put the cone in the holder. Roll the holder into a tube: glue on the left margin, polka dots facing out. Stand it on the table and lower the cone into it tip down.
- Join the scoops. Stand the figure-eight with the slit at the top so the strawberry scoop faces up. Turn the second one crosswise and slide it in from above: slit into slit, all the way down. Spread the petals out evenly.
- Put the scoops in the cone. Insert the scoops into the cone vanilla side down: the lower petals go inside, and the scoop sits on the rim of the cone.
Check
- The ice cream is done. Turn the ice cream around: the scoop is 3D from every side. You can make another one — in a different flavor.
Done. The ice cream is done. Without the holder, you can stand it in a narrow glass.
Make it with your phone camera
 Pizza in a BoxMedium
 OnigiriEasy
 RamenMedium
 Bubble TeaMedium
 Burger StackEasy
 CupcakeEasy