 VanGami.com
Mini Rose Bouquet
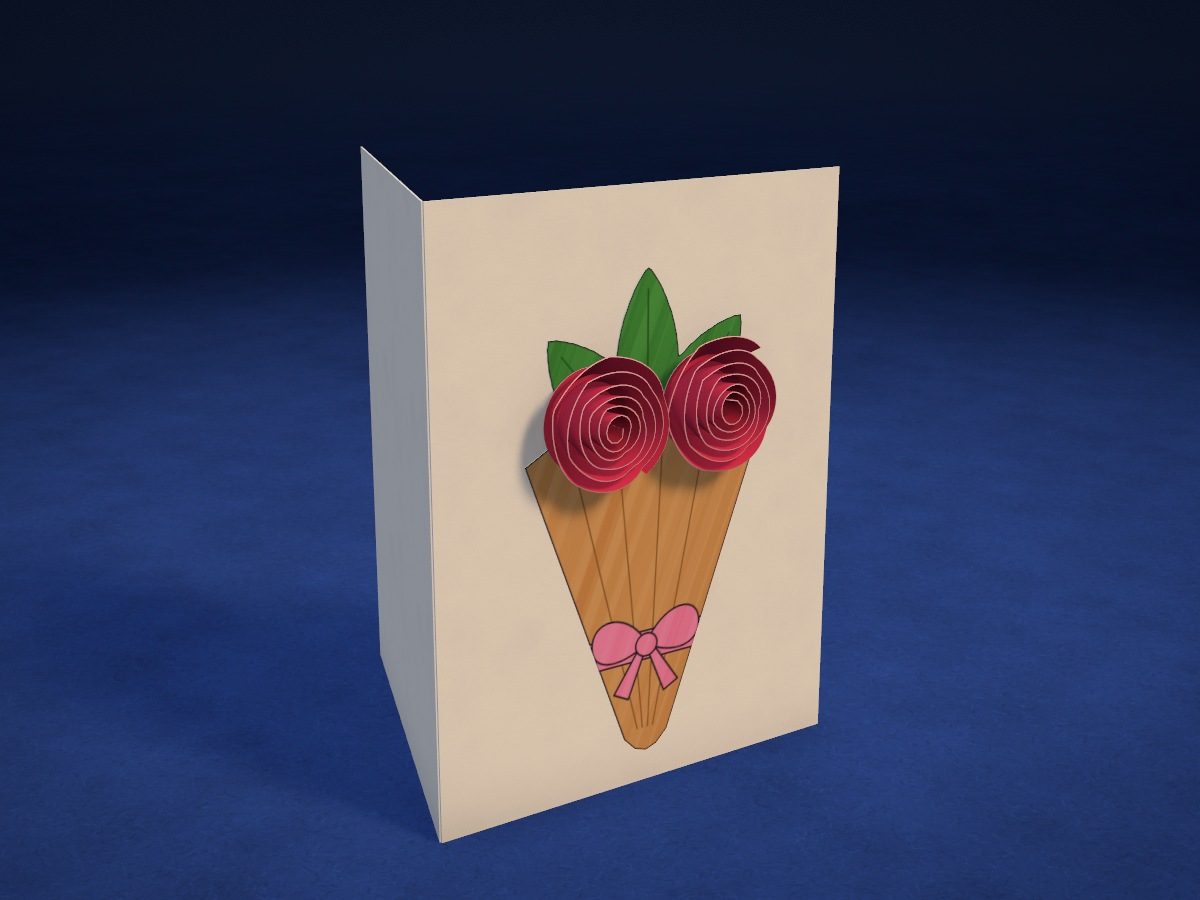
A card made from a Letter sheet folded in four. The cover has a bouquet: a kraft paper cone with a pink bow, a fan of leaves and two 3D roses rolled from spirals.
- Easy
- 2 Letter sheets
- 4 pieces
- 2 spiral roses
Make it with your phone cameraLesson code: 1865
On VanGami the template appears over your sheet through your phone camera — no printer needed. Trace it, cut, fold and glue. Below are all the steps in text.
What you’ll need
- 2 Letter sheets — office paper, 80 gsm (20 lb)
- Markers
- Pencil — and eraser
- Scissors — small
- Glue stick — or PVA glue
- Ruler — 8–12 in
- Glass — phone stand
Steps
Sheet 1
- Sheet 1: white sheet. The white sheet should be under the camera now. The template has 1 sheets.
- Roses: outlines. Trace two circles — each one will become a rose.
- Roses: spirals. In each circle, draw a wavy spiral from the edge to the middle. This is the cut line; a small circle stays in the middle — the base of the rose. You’ll color the circles on the top side only.
- Cone and leaves: outlines. A cone of wrapping paper: three points on top, a rounded tip at the bottom, and straight edges drawn with a ruler. Next to it, on its side, a fan of three leaves.
- Cone and leaves: drawing. On the cone, draw fold lines toward the tip and a ribbon with a bow; on the leaves, veins.
- Red. Color the areas that match this color. Move the marker in one direction — you’ll get fewer streaks.
- Color: cone and leaves. Color the cone beige, the ribbon and bow pink, and the leaves green.
Sheet 2
- Sheet 2: card sheet. Take the card sheet. You don’t need the camera here — follow the diagram on the screen.
- Card base. Fold the sheet in half, short edge to short edge (line 1), then in half again (line 2), and crease the folds with your fingernail. You get a 4¼ × 5½ in card.
Cut
- Cut out: roses — 2 pcs. Cut out both circles along the outer line. Don’t touch the spiral inside yet.
- Cut out: cone and leaves — 2 pcs. Cut out the cone and leaves along the solid line, including the cone’s teeth. Between the leaves, cut all the way into the corner.
- Cut along the spiral. Cut each circle in a spiral from the edge to the middle, turning the circle, not the scissors. Stop where the line ends: the little circle in the middle stays whole.
Roses
- Roll up two roses. Start at the outer end of the strip and roll it tightly, colored side out, up to the little circle in the middle. Let go — the coils will spread out to the edge of the circle. Spread glue on the little circle and press the rose onto it from below.
Glue
- Leaves and cone. Lay the card with the spine to the left. Spread glue on the back of the leaves and stick them in the middle of the cover, tips up. Glue the cone over the base of the leaves, tip down, ½ in from the bottom edge.
- Roses into the cone. Spread a thicker layer of glue on the base of each rose and set the roses side by side in the mouth of the cone, on the teeth. Press each one for half a minute.
Done. The card is done. The roses are held on by glue: let it dry before you put the card into an envelope.
Make it with your phone camera
 Pop-Up HeartHard
 Surprise BookHard
 Lotus in the WindowHard
 Bouquet of RosesHard
 Love LetterEasy
 Slider CardMedium