 VanGami.com
Day of the Dead
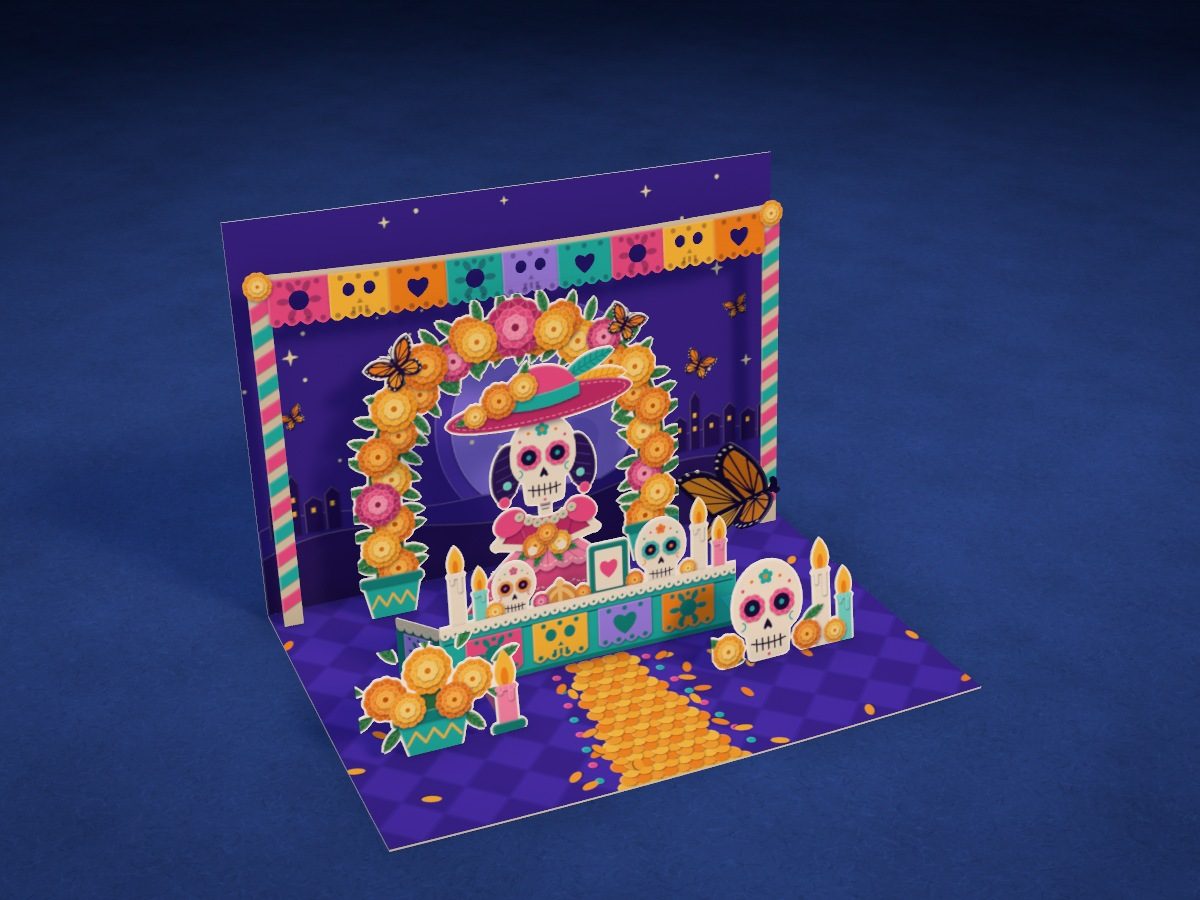
A nighttime ofrenda: La Catrina under an arch of marigolds, a table with sugar skulls and candles, a papel picado garland (each flag has one cutout; the small pattern is drawn), and a path of petals. Six layers on steps, the table’s side panel, and a monarch butterfly on a V-fold: it spreads its wings when the card opens. You can trace the template sheets through the camera or print them on cardstock — the files are at the bottom of this page.
- Hard
- 74 steps
- 4 Letter sheets
- 8 pieces
Make it with your phone cameraLesson code: 6413
On VanGami the template appears over your sheet through your phone camera — no printer needed. Trace it, cut, fold and glue. Below are all the steps in text.
What you’ll need
- 4 Letter sheets — office paper, 80 gsm (20 lb)
- Markers
- Pencil — and eraser
- Ruler — 8–12 in
- Scissors — small
- Glue stick — or PVA glue
- Empty pen — to score the folds
- Glass — phone stand
Steps
Base
- Sturdy base from two sheets. The base is made from two sheets of office paper: spread a glue stick over all of one sheet, lay the second on top and smooth it with your palm from the middle to the edges. Draw the base on this sheet.
- Base outline. Trace a 5⅞ × 8¼ in rectangle in the middle of the sheet — this is the card opened flat.
- Fold. Trace the middle line as a dashed line: the card will fold in half along it. Don't cut it.
- Back half: drawing. The top half will stand up like a wall. Copy its drawing: big shapes first, then the small details.
- Bottom half: drawing. The bottom half will lie flat on the table, and the pieces will stand on it. Copy the drawing.
- Back half: color. Color the top half to match the sample. Colors:
- Bottom half: color. Now the bottom half. Colors:
- Frames 1 · Butterfly. Two slanted frames numbered 1 by the fold: one on the bottom half, the other on the back half. The tabs of the “Butterfly” piece will be glued here. Trace them over the color and write in the numbers.
- Frames 2 · Garland. Trace over the color: on the bottom half — two frames 2 for the piece's tabs; on the back half — two frames 2 with a double side, for the strips. Write in the numbers.
- Frames 3 · Marigold arch. Trace over the color: on the bottom half — two frames 3 for the piece's tabs; on the back half — two frames 3 with a double side, for the strips. Write in the numbers.
- Frames 4 · La Catrina. Trace over the color: on the bottom half, frame 4 for the piece's tab; on the back half, frame 4 with a double side, for the strip. Write in the numbers.
- Frame 6 · Table. Trace over the color: on the bottom half, frame 6 for the piece's tab. Write in the number.
- Frame 7 · Sugar skull with candles. Trace over the color: on the bottom half, frame 7 for the piece's tab. Write in the number.
- Frame 8 · Marigold bush. Trace over the color: on the bottom half, frame 8 for the piece's tab. Write in the number.
- Cover: drawing. Flip the sheet over like a book page and put it back in the same place, edge to edge. Copy the cover: the drawing is upside down — on the closed card it will end up the right way up.
- Cover: color. Color the cover. Colors:
Pieces
- Sturdy sheet from two. The “Garland” piece is thin: made from a single sheet of office paper, it won’t stand up. Remove sheet 1. Cover a sheet of office paper all over with glue stick, lay a second one on top and smooth it with your palm from the middle to the edges. You get a sturdy sheet — put it where the old one was, edge to edge; don’t move the phone.
- New sheet · Butterfly. Trace the outline of piece 1 with a solid line — you’ll cut along it. The dash-dot lines mark the fold in the middle and the tabs at the bottom.
- Butterfly: drawing. Copy the drawing inside the outline. On the tab, write the number 1.
- Butterfly: color. Color it to match the sample. Colors: This piece's tabs will stay visible — color them the same as the base.
- 2 · Garland: outline. Trace the outline of piece 2 with a solid line — you'll cut along it. At the bottom are tabs: they fold back along the dashed line. Trace the little windows inside too.
- Garland: drawing. Copy the drawing inside the outline.
- Garland: color. Color it to match the sample. Colors: Don't color the tab — glue sticks better to bare paper.
- 3 · Marigold arch: outline. Trace the outline of piece 3 with a solid line — you’ll cut along it. At the bottom are tabs: along the dashed line they fold back.
- Marigold arch: drawing. Copy the drawing inside the outline. On the tab, write the number 3.
- Marigold arch: color. Color it to match the sample. Colors: Don't color the tab — glue sticks better to bare paper.
- 4 · La Catrina: outline. Trace the outline of piece 4 with a solid line — you'll cut along it. At the bottom is a tab: along the dashed line it folds back. Trace the windows inside, too.
- La Catrina: drawing. Copy the drawing inside the outline. On the tab, write the number 4.
- La Catrina: color. Color it to match the sample. Colors: Don't color the tab — glue sticks better to bare paper.
- 5 · Table side panel: outline. Trace the outline of piece 5 with a solid line — you’ll cut along it. On the side is a tab: its edge is outlined with a dashed line.
- Table side panel: drawing. Copy the drawing inside the outline. On the tab, write the number 5.
- Table side panel: color. Color it to match the sample. Colors: Don't color the tab — glue sticks better to bare paper.
- 6 · Table: outline. Trace the outline of piece 6 with a solid line — you'll cut along it. At the bottom is a tab: along the dashed line it folds back.
- Table: drawing. Copy the drawing inside the outline. On the tab, write the number 6.
- Table: color. Color it to match the sample. Colors: Don't color the tab — glue sticks better to bare paper.
- 7 · Sugar skull with candles: outline. Trace the outline of piece 7 with a solid line — you’ll cut along it. At the bottom are tabs: along the dashed line they fold back.
- Sugar skull with candles: drawing. Copy the drawing inside the outline. On the tab, write the number 7.
- Sugar skull with candles: color. Color it to match the sample. Colors: Don't color the tab — glue sticks better to bare paper.
- 8 · Marigold bush: outline. Trace the outline of piece 8 with a solid line — you’ll cut along it. At the bottom are tabs: along the dashed line they fold back.
- Marigold bush: drawing. Copy the drawing inside the outline. On the tab, write the number 8.
- Marigold bush: color. Color it to match the sample. Colors: Don't color the tab — glue sticks better to bare paper.
Strips
- Frame on piece 4. On the “La Catrina” piece, over the color, trace frame 6 and write in the number: strip 6 will be glued here.
- Frames on piece 6. On the “Table” piece, over the color, trace frames 7 and 8 and write in the numbers: each one gets a strip with the same number.
- Strips. Trace 8 strips: solid line — cut, dashed line — fold. They sit in the free spaces on the sheet; numbers: 2, 2, 3, 3, 4, 6, 7, 8. Copy the numbers and arrows: the arrow goes on the tab that is glued into the frame. No coloring needed.
Cut
- Cut out the base. Cut with scissors along the solid line. Don't cut the dashed line in the middle.
- Cut out: butterfly. Cut along the outline with scissors, tabs included. In narrow spots, cut with the tips.
- Cut out: garland. Cut along the outline with scissors, tabs included. In narrow spots, cut with the tips. Cut the windows inside with a craft knife on cardboard. On the back, write 2 in pencil.
- Cut out: marigold arch. Cut along the outline with scissors, tabs included. In narrow spots, cut with the tips.
- Cut out: La Catrina. Cut along the outline with scissors, including the tab. In tight spots, cut with the tips of the scissors. Cut the windows inside with a craft knife on cardboard.
- Cut out: table side panel. Cut along the outline with scissors, including the tab. In tight spots, cut with the tips of the scissors.
- Cut out: table. Cut along the outline with scissors, including the tab. In tight spots, cut with the tips of the scissors.
- Cut out: sugar skull with candles. Cut along the outline with scissors, tabs included. In narrow spots, cut with the tips.
- Cut out: marigold bush. Cut along the outline with scissors, tabs included. In narrow spots, cut with the tips.
- Cut out the strips. 8 strips: cut along the straight lines. Leave the numbers and arrows so the strips don't get mixed up.
Fold
- Fold the base in half. Score the dashed line with an empty pen along a ruler and fold the base with the drawing inside. Then open it up to a right angle.
- Piece tabs. Fold the tabs of the pieces back, away from the drawing, along the dashed line — to a right angle. The “Butterfly” is different: fold it in half with the drawing inside and only lightly crease the tabs — a little toward you, toward the drawing.
- Strips. Fold the strips' tabs to a right angle: plain dashed line — away from you, dash-dot line — toward you, toward the number.
Glue
- 1 · Butterfly. Open the card. Apply glue to the back of the tab on the right half (see the picture) and glue it into frame 1 of the bottom half: the sharp corner of the piece goes exactly into the fold of the card. Fold the piece in half, apply glue to the second tab on top and close the card.
- 2 · Garland: strips. Hold both strips 2 with the number facing up: on each one, the tab with the arrow goes into its own frame 2 on the back half, with the fold toward the double side of the frame.
- 2 · Garland: into place. The piece's tabs go into frames 2 on the bottom half. Place the piece face down, top toward you. Straighten the free tabs of the strips, apply glue to the underside and slowly close the card: the strips will lie down on the back of the piece by themselves. Press down.
- 3 · Marigold arch: strips. Hold both strips 3 with the number facing up: on each one, the tab with the arrow goes into its own frame 3 on the back half, with the fold toward the double side of the frame.
- 3 · Marigold arch: into place. The piece's tabs go into frames 3 on the bottom half. Place the piece face down, top toward you. Straighten the free tabs of the strips, apply glue to the underside and slowly close the card: the strips will lie down on the back of the piece by themselves. Press down.
- 4 · La Catrina: strip. Hold strip 4 with the number facing up: the tab with the arrow goes into frame 4 on the back half, with the fold toward the double side of the frame.
- 4 · La Catrina: into place. The piece's tab goes into frame 4 on the bottom half. Place the piece face down, top toward you. Straighten the strip's free tab, apply glue to the underside and slowly close the card: the strip will lie down on the back of the piece by itself. Press down.
- 5 · Table side panel. Place the “Table” piece next to the card face down, top away from you. Glue the tab of the “Table side panel” piece to its back near the right edge: the tab’s fold is flush with the edge, and the bottom of the side piece is 1/16 in above the bottom of the table. The “Table side panel” piece also lies face down: in the card it will fold back, with the drawing facing out.
- 6 · Table: strip. Hold strip 6 with the number facing up: the tab with the arrow goes into frame 6 on the “La Catrina” piece, with the fold toward the double side of the frame.
- 6 · Table: into place. The piece's tab goes into frame 6 on the bottom half. Place the piece face down, top toward you. Straighten the strip's free tab, apply glue to the underside and slowly close the card: the strip will lie down on the back of the piece by itself. Press down.
- 7 · Sugar skull with candles: strip. Hold strip 7 with the number facing up: the tab with the arrow goes into frame 7 on the “Table” piece, with the fold toward the double side of the frame.
- 7 · Sugar skull with candles: into place. The piece's tabs go into frame 7 on the bottom half. Place the piece face down, top toward you. Straighten the strip's free tab, apply glue to the underside, and slowly close the card: the strip will lie down on the back of the piece by itself. Press down.
- 8 · Marigold bush: strip. Hold strip 8 with the number facing up: the tab with the arrow goes into frame 8 on the “Table” piece, with the fold toward the double side of the frame.
- 8 · Marigold bush: into place. The piece's tabs go into frame 8 on the bottom half. Place the piece face down, top toward you. Straighten the strip's free tab, apply glue to the underside, and slowly close the card: the strip will lie down on the back of the piece by itself. Press down.
Check
- Close. Slowly fold the card shut: the pieces lie flat, one on top of another. If something catches — don't force it: find the strip that is pulling and glue it again.
- Press. Hold the closed card under your palm for 10 seconds: the tabs will set in the position where they fold naturally.
- Open. Open it to a right angle: the pieces stand up one by one, from the back half toward you.
Done. The card is done. Closed, it can go into an envelope: the pieces lie flat between the halves.
Make it with your phone camera
 Pop-Up HeartHard
 Surprise BookHard
 Lotus in the WindowHard
 Bouquet of RosesHard
 Love LetterEasy
 Slider CardMedium