 VanGami.com
Cone Doll: Magical Girl
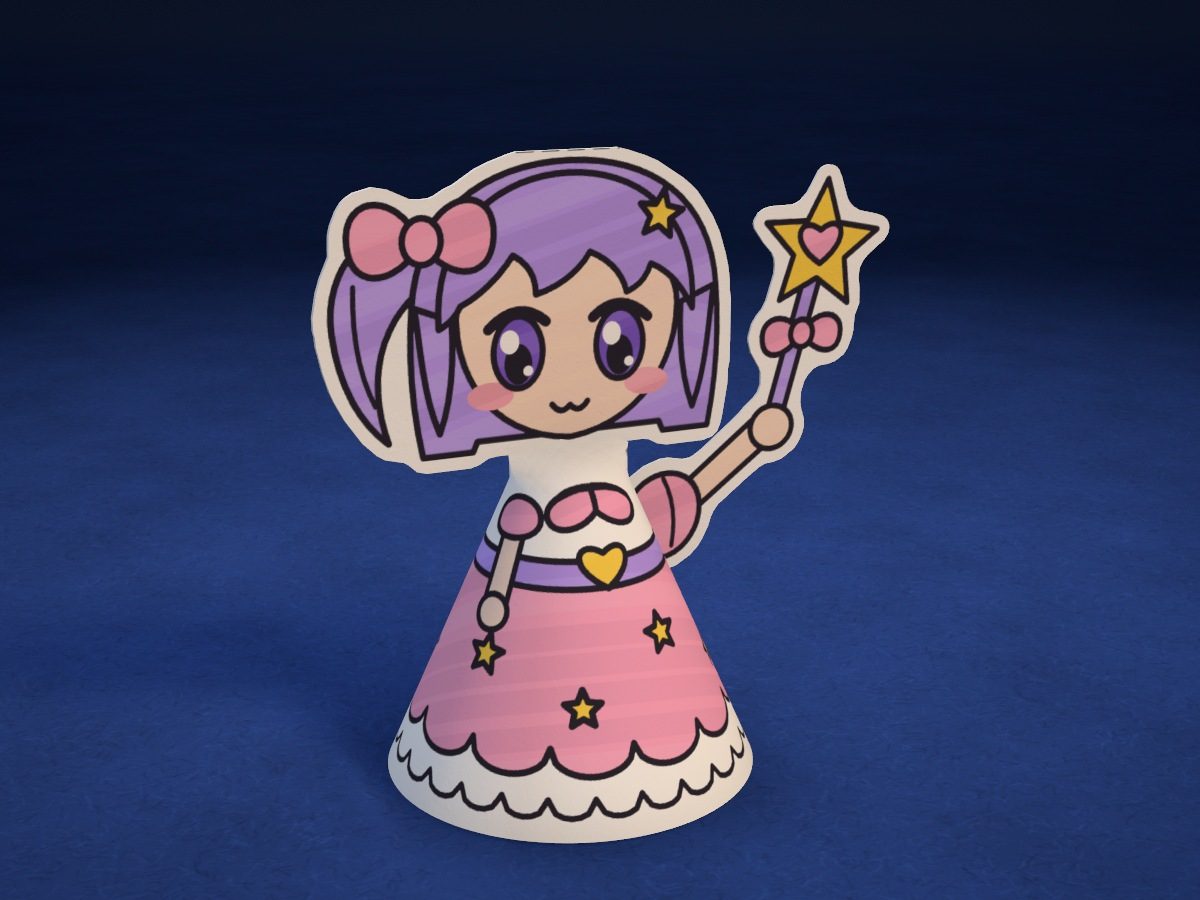
A magical girl, 3½ in tall: the pink dress with a wavy hem is a paper cone, and the head is folded from two halves. A lilac ponytail on a big bow, and a star wand in her hand.
- Easy
- 9 cm tall
- 3 pieces
- 1 Letter sheet
Make it with your phone cameraLesson code: 3482
On VanGami the template appears over your sheet through your phone camera — no printer needed. Trace it, cut, fold and glue. Below are all the steps in text.
What you’ll need
- Letter sheet — office paper, 80 gsm (20 lb)
- Markers
- Pencil — and eraser
- Scissors — small
- Glue stick — or PVA glue
- Glass — phone stand
Steps
Trace
- Dress: outline. Trace the solid line: the two straight sides from the pointed corner and the arc at the bottom. You'll cut along it.
- Dress: drawing. Trace the drawing with thin lines. Three more lines: along the right straight edge, the edge of the glue strip (don’t color the strip); near the sharp corner, a short arc, the neck line; and on the side, a short straight line, the mark: you’ll glue the tab to it.
- Head and wand: outlines. Trace 2 pieces with a solid line: head, wand. You'll cut along these lines.
- Head and wand: folds. Draw a dashed line across the top of the head — the head will fold in half along it — and a line at the sleeve. Don't cut along dashed lines.
- Head and wand: drawing. Copy the drawing with thin lines: the picture on the screen is your guide. It doesn't have to be exact to the millimeter.
Color
- Color: dress. Skirt from the belt to the wavy edge, collar, and sleeve — pink; belt and the big bow on the back — lilac; stars and heart — yellow; hand — skin tone. The top of the dress and the underskirt stay white; trace the drawing lines in black.
- Color: head and wand. Hair and ponytail — lilac; big bow, heart and little bow of the wand, and sleeve — pink; stars — yellow; eyes — purple; face and hand — skin tone. The stick of the wand and the bottom of the sleeve tab — lilac: the tab will lie on the belt.
Cut
- Cut out: dress. Cut out the dress along the outline: cut the straight sides in one motion, and turn the sheet as you cut the arc.
- Cut out: head and wand — 2 pcs. Cut out the head in one piece — face and back together; don't cut along the dashed line on top. Cut out the wand together with its tab.
- Color the back. Flip the wand face down and color the back: on the wand, the star yellow and everything else pink. The drawing shows through a little — follow it.
Glue
- Roll the dress. Apply glue to the narrow strip along the right edge. Roll the piece into a cone with the drawing facing out and lay the left edge over the strip up to the line: the bottom should become an even circle. Press the seam.
- Head on top. Flatten the top of the dress with your fingers down to the neck line — the seam goes at the back. Lay the head face down, unfolded, and apply glue to the whole back side. Place the flattened top on the half with the face — the neck line along the bottom edge of the head — and cover it with the back of the head, folding along the dashed line. Hold for 20–30 seconds.
Assemble
- Wand. Fold the sleeve tab back along the dashed line, apply glue to it, and press it to the right side of the dress: the arm is raised, with the star next to the head. The fold goes at the mark on the side. Hold for 20–30 seconds until the glue sets.
Done. The magical girl is done: she stands on her pink hem, the star wand is raised, the ponytail on the bow sticks out to the side, and the big bow on the belt is at the back.
Make it with your phone camera
 Chibi NinjaHard
 Chibi StandeeMedium
 Capybara with a TangerineHard
 Chibi Cube: FoxMedium
 Little RobotMedium
 Little FoxHard