 VanGami.com
Chibi Standee
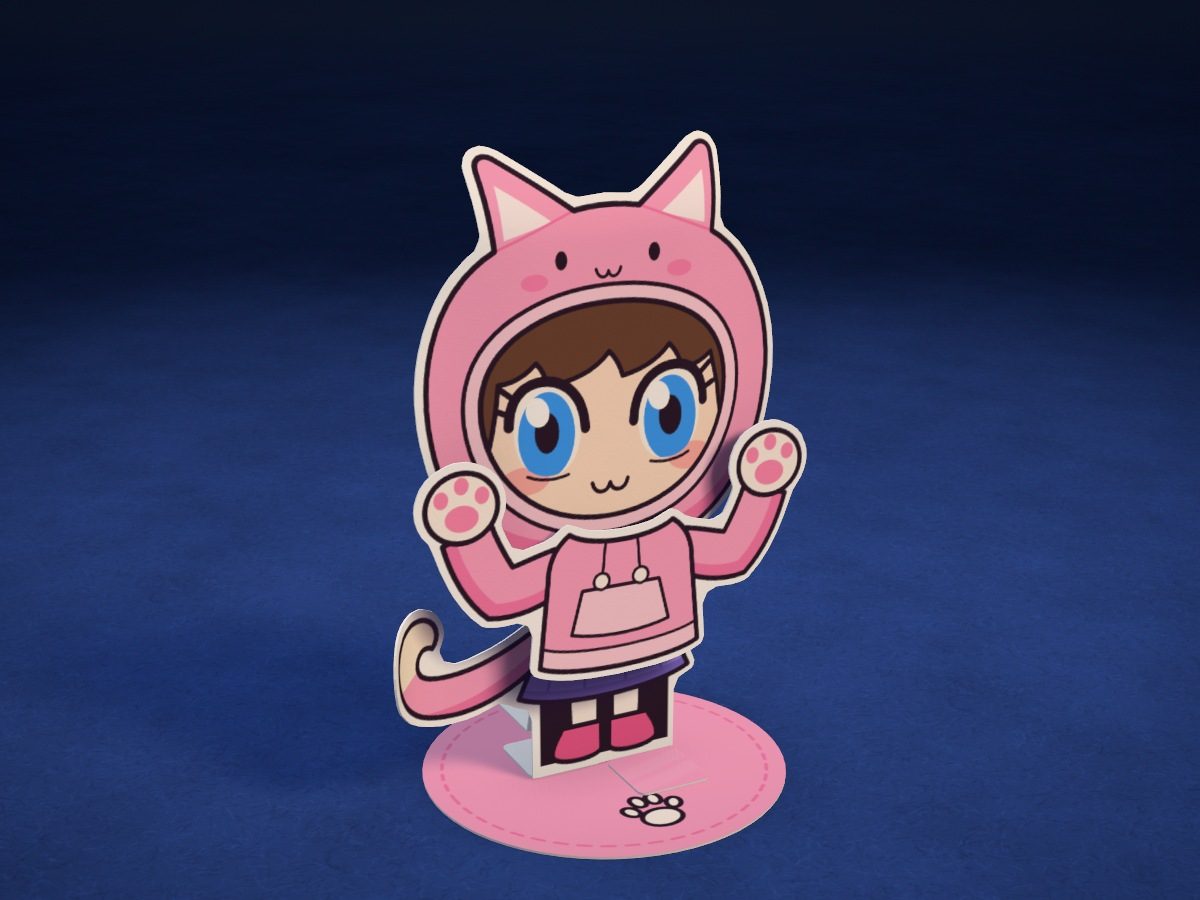
A girl in a cat hoodie — an original anime-style character — made of three layers: a back layer with the tail and skirt, a head in a hood with ears, and a sweatshirt with paw mittens. The layers sit on pieces of foam tape, and the figure stands on a round base with a prop at the back.
- Medium
- 11 cm tall
- 5 pieces
- 2 Letter sheets
Make it with your phone cameraLesson code: 8615
On VanGami the template appears over your sheet through your phone camera — no printer needed. Trace it, cut, fold and glue. Below are all the steps in text.
What you’ll need
- 2 Letter sheets — office paper, 80 gsm (20 lb)
- Markers
- Pencil — and eraser
- Scissors — small
- Ruler — 8–12 in
- Glue stick
- Glass — phone stand
Steps
Trace
- Sturdy sheet from two. Apply glue stick over the whole surface of a sheet of printer paper, press a second sheet onto it, and smooth with your palm from the middle to the edges. You'll get a thick sheet — work on that one. Put it back in the same spot, edge to edge; don't move the phone.
- Back layer: outline. Trace the solid line, including the two stand tabs at the bottom — you’ll cut along it. It runs 1/16 in outside the drawing, so it doesn’t need to be exact.
- Back layer: fold. At the bottom, draw the fold line for the stand tabs: a dashed line on the left, a dash-dot line on the right. Don't cut along it.
- Back layer: drawing. Copy the tail with a white tip, the pleated skirt, the legs and the shoes in thin lines. The top of the back layer stays blank: the head and sweatshirt will cover it. The little squares are where the tape goes, the short line marks the middle of the sweatshirt.
- Head: outline. Trace the solid line — you’ll cut along it. It runs 1/16 in outside the drawing, so it doesn’t need to be exact.
- Head: drawing. The hood with ears and a kitty face, with a trim around the face. The face: bangs, big eyes with a highlight, blush, and a little “kitty” mouth.
- Sweatshirt and base: outlines. Trace the sweatshirt with its sleeves and mittens, and the base circle under it, with a solid line — you’ll cut along these lines. The line sits 1/16 in outside the drawing: it doesn’t need to be exact.
- Sweatshirt and base: drawing. Sweatshirt: sleeves, pocket, drawstrings with pompoms, elastic band along the bottom and paw mittens. On the base: a dashed line along the edge and a paw.
Color
- Color: back layer. Color the tail and the right leg below the fold line pink, the bottom of the tail and the shoes dark pink, the skirt lilac, and the area around the legs under the skirt black: that’s the shadow. Leave the tip of the tail, the stockings, the left leg and the top of the back layer white.
- Color: head. Hood in pink, its bottom edge and the kitty’s cheeks in dark pink; leave the trim and the insides of the ears light. Bangs in brown, face in skin tone, blush in pink, eyes in light blue, pupils in black; don’t color the highlights.
- Color: sweatshirt and base. Sweatshirt and sleeves in pink, the bottoms of the sleeves in dark pink; leave the elastic band, pocket and mittens light, and color the paw pads pink. Base in pink; leave the paw on it white.
Cut
- Cut out: back layer. Cut out the back layer along one outline, including the tail and the stand tabs at the bottom. Between the tabs, make a short cut to the fold line.
- Cut out: head. Cut with scissors along the solid line. Turn the sheet, not the scissors — the cut will come out neater.
- Cut out: sweatshirt and base — 2 pcs. Cut out the sweatshirt and the base circle. Cut the circle by turning the sheet, not the scissors.
- Cut off the prop. Measure ⅝ in from any free, straight edge of the sheet with a ruler, draw a line, and cut off a strip 3½ in long along it. This is the prop — it holds the figure up from behind.
Assemble
- Add volume. Wind the tip of the tail around a pencil with the drawing facing in — it will curl toward you — and bend the hood ears back. Press the head against the glass with the drawing facing out and smooth it with your palm: it will become rounded.
- Head onto the back layer. Put two pieces of foam tape on the top squares and peel off the backing. Lay the head down so that it covers the top of the back layer and none of its edge shows.
- Sweatshirt on top. On the lower squares, put two stacks of foam tape, two pieces on top of each other in each: the sweater will sit above the head. Center the pocket exactly between the stacks, keep the mittens at the same height, and let the bottom of the sweater cover the top of the skirt by about 3/16 in.
Base
- Fold out the stand tabs. The back layer has two stand tabs at the bottom. Fold the left one back and the right one forward: hold a ruler against the fold line and fold along it.
- Glue to the base. Apply glue to the underside of the stand tabs and set the figure in the middle of the base. Press each tab for 10 seconds.
- Glue the prop. Fold both ends of the prop ⅝ in in the same direction and apply glue to the outside. Glue the bottom end to the base near the back edge, and press the top end to the back layer while holding the figure upright.
- Check. The figure stands straight and doesn't wobble: the prop holds it from behind. If it leans, peel off the top end of the prop, straighten the figure, and press it down again.
Done. The chibi is done: the hood and sweatshirt are raised above the back layer and the tail is curled, so the figure looks 3D.
Make it with your phone camera
 Chibi NinjaHard
 Capybara with a TangerineHard
 Chibi Cube: FoxMedium
 Little RobotMedium
 Little FoxHard
 CrystalEasy