 VanGami.com
Birthday Cake Card
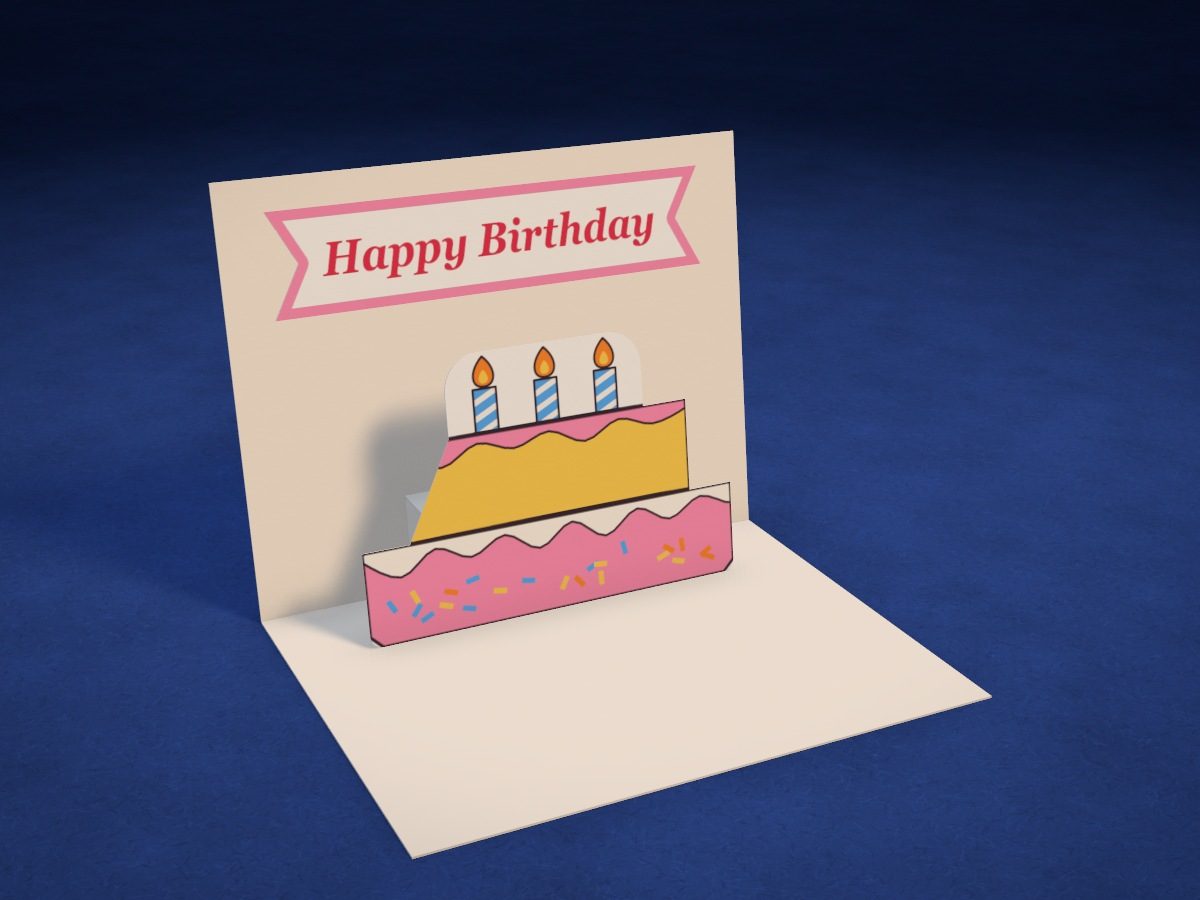
A card made from a Letter sheet folded in quarters. Open it into an L shape, and a cake with candles pops up, with a “Happy Birthday” banner above it. The cake is held up by a step made from a strip of paper.
- Easy
- 2 Letter sheets
- 3 pieces
- 3 folds on the stand
Make it with your phone cameraLesson code: 7588
On VanGami the template appears over your sheet through your phone camera — no printer needed. Trace it, cut, fold and glue. Below are all the steps in text.
What you’ll need
- 2 Letter sheets — office paper, 80 gsm (20 lb)
- Markers
- Pencil — and eraser
- Scissors — small
- Glue stick — or PVA glue
- Glass — phone stand
Steps
Trace
- Sheet 1: white sheet. The white sheet should be under the camera now. The template has 1 sheets.
- Cake: outline. Trace the cake with a solid line: tiers like steps, and a rounded top above the candles. You’ll cut along this line.
- Cake: drawing. Copy the candles, flames, frosting waves and the little sprinkle dashes. It doesn’t have to be exact to the millimeter.
- Step: outline. Trace a rectangle, 2⅞ × 2⅜ in, with a ruler. This is the step the cake will stand on.
- Step: folds. Three lines across — dash-dot lines. Write the numbers 1, 2, 3 next to them: you’ll fold along them in that order.
- Banner: outline. Trace the ribbon with “swallowtail” notches at the ends.
- Banner: lettering. Copy the letters “Happy Birthday” and the stripe along the edge.
- Cake: coloring. Color the bottom tier pink and the top tier yellow, with pink frosting on it. Make the candles light blue with white stripes, and the flames orange with a yellow center. Color the outlines black.
- Banner: coloring. Color the stripe along the edge pink and the letters red.
Base
- Card base. You don’t need the camera here — this is a diagram. Fold the sheet in half, short edge to short edge (line 1), then in half again (line 2), and crease the folds with your fingernail. You now have a 4¼ × 5½ in card.
Cut
- Cut out: cake. Cut out the cake along the solid line: keep the white border around the candles — that way you don’t have to cut them out one by one.
- Cut out: stand. Cut out the stand using a ruler: straight edges make a straight step.
- Cut out: banner. Cut with scissors along the solid line. Turn the sheet, not the scissors — the cut will come out neater.
Fold
- Stand folds. Fold the stand along lines 1, 2 and 3 pencil side in, creasing each fold. Then fold it in half along line 2: the tabs will lie on top of each other.
Glue
- Bottom tab. Open the card and lay it flat. Place the folded stand on the bottom half: fold 2 toward you, tabs toward the card’s fold, line 1 1 in from it, centered. Spread glue on the underside of the bottom tab and press it down.
- Top tab. Spread glue on top of the top tab. Close the card and press with your palm where the stand is.
- L shape. Open the card into an L shape: the bottom half lies flat, the top half stands up. The stand will pop up into a step by itself.
- Cake. Spread glue on the back of the bottom of the cake — a strip ¾ in high. Press the cake onto the wall of the stand: the bottom of the cake level with the floor of the card, centered.
- Banner. Glue the banner onto the card’s wall above the cake, centered: glue on the back, along the whole banner.
Done. The card is done. Stand it open in an L shape: the cake stands in front, with the banner above it. The card closes flat, and the cake folds down inside.
Make it with your phone camera
 Pop-Up HeartHard
 Surprise BookHard
 Lotus in the WindowHard
 Bouquet of RosesHard
 Love LetterEasy
 Slider CardMedium